This article was first published on SearchServerVirtualization.TechTarget.com.
In the first article in this series, we walked through the process of installing Microsoft Virtual Server 2005. That process set the stage for the real task: Creating and managing virtual machines. In this article, I’ll walk through what you need to know to create a new VM.
Configuring Virtual Server Settings
While you could start creating VMs immediately after the installation of the Virtual Server service, it’s worth taking some time to examine and customize some basic server settings. If you want to play along at home, start by launching the Virtual Server Administration Web Site (I’ll provide screenshots if you’d rather just sit back). While there are many different configuration options that might be important, in this article, I’m going to hit the highlights (settings that most Virtual Server administrators will want to change).
Enabling the VMRC Server
The Virtual Machine Remote Control (VMRC) Server is a process that allows users to connect directly with virtual machines. This is usually most important during the guest OS installation process. For security purposes, the VMRC Server is disabled by default. To enable it, click on the “Server Properties” link under “Virtual Server” in the left navigation bar. Then, click on the VMRC Server link.
Here, you’ll be able to configure many different settings, including the TCP port number, on which network interface(s) the VMRC server will respond, default screen resolution, and supported authentication methods (see Figure 1). To allow connections, check the Enable checkbox and click OK. You’ll now be able to connect to VMs using the VMRC client application or directly through the Virtual Server Administration Web Site.
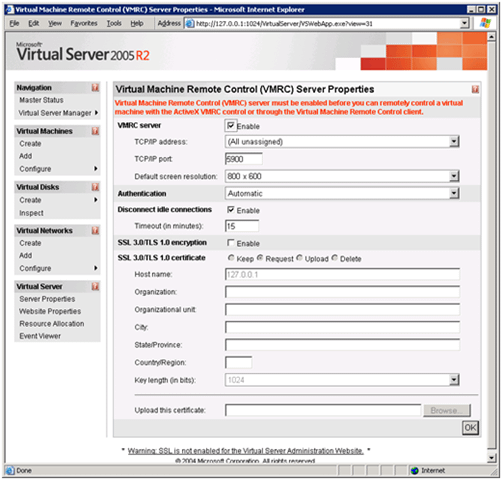
Figure 1: Configuring VMRC Server options for Virtual Server.
Configuring Search Paths
By default, Virtual Server will create new VM-related files within a folder buried beneath the local “Documents and Settings” folder. It’s almost always better to create your VMs in another file system location. In order to change these settings, again click on “Server Properties” in the Virtual Server Administration Web Site and then select “Search Paths”. Figure 2 shows the options that are available.3
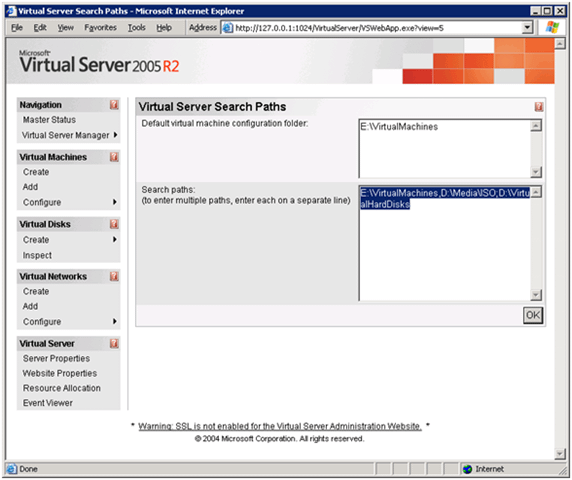
Figure 2: Configuring Virtual Server search paths.
The two settings are:
- Default virtual machine configuration folder: This is a single file system path that specifies where new virtual machines will be created. Be sure to choose a path on a volume that has plenty of free disk space. You can always override this location, but keeping VM-related files in an organized location will pay off in simplifying administration.
- Search paths: Here, you can enter a comma-separated list of file system paths. This option is provided mainly for convenience: When you’re working with VMs and related objects, the Virtual Server Administration Web Site will automatically look in these paths for files. You can always manually type the path names, but it’s much easier to just select appropriate objects from a list.
When you click OK, Virtual Server will attempt to verify the file system locations that you’ve specified. If the paths or folders don’t exist, you’ll receive a warning. You can always change these file system locations in the future (just note that Virtual Server will not move any files – you’ll have to do that yourself).
Creating a New Virtual Machine
With the basic server settings out of the way, it’s time to create a new virtual machine. While you could manually created virtual hard disks (VHDs) and VMs, Virtual Server provides a shortcut. The process is easy enough using the Virtual Server Administration Web Site: Just click on “Create” in the Virtual Machines section. Figure 3 shows the available options.
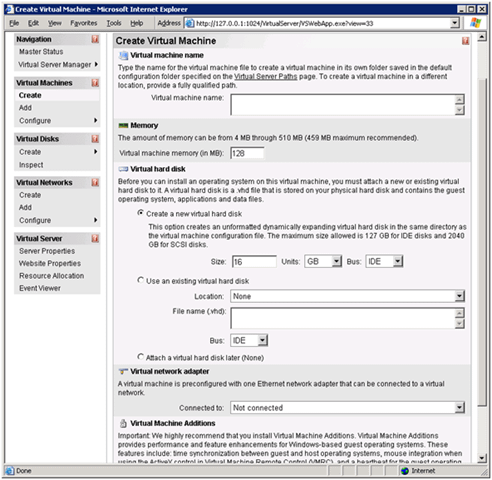
Figure 3: Creating a new virtual machine.
Incase you’re worried, rest assured that all of the decisions you make here can be changed later. Here’s a quick overview of the information you’ll need to specify:
- Virtual machine name: This is the name of the virtual machine you are creating. It’s a good idea to use a description of the configuration of the VM. Examples might be, “Windows Server 2003 Enterprise Ed.”, or “RedHat Test Workstation”). Virtual Server will use these names for the folder name and the name of the initial virtual machine configuration (.vmc) file and, optionally, virtual hard disk (.vhd) file that it creates. Note that if you want to create the VM in a location other than the default Virtual Server path, you can type the fully-qualified path in this box.
- Memory: This box will allow you to specify the total amount of physical memory that will be committed to the virtual machine. A good rule of thumb is to use at least the minimum that you would have in a physical machine that was designed to run the intended guest OS. You can always change the setting later.
- Virtual hard disk: In this section, you can choose to create a new virtual hard disk (VHD). This is the simplest option, as it allows you to specify the maximum size of the VHD and whether it should be connected to a virtual IDE or SCSI controller. The physical file that is created will initially be small but will expand as space is required by the Guest OS. Since the maximum size cannot be directly changed, it’s a good idea to use the 16GB recommendation. You can also attach an already-existing VHD, or choose to create the VM with no VHD at all.
- Virtual network adapter: Here’s where you can determine the type of network connectivity you want the VM to have. By default you’ll have the option of internal network (specifying that VMs will only be able to talk to each other), or external network (which will allow the VM to participate on the host’s LAN connection). I’ll cover the options in detail in a future article. If you’re not sure what to choose, “Not connected” is a safe bet (you can always attached to a network later).
Once you’ve provided the necessary details, you can click the Create button to define the VM. Virtual Server will create the necessary files, and you’ll see your new VM in the “Master Status” page of the Administration Web Site.
Configuring VM Hardware Options
So far, you’ve only included the bare minimum that’s required to create a basic VM. You can also view further details about the hardware configuration of the VM by clicking on “Configure” in the “Virtual Machines” section of the Administration Web Site. As shown in Figure 4, you’ll be able to make changes such as changing the amount of memory allocated to the VM, changing its name, modifying virtual network adapters, adding virtual hard disks, etc. I’ll cover several of these options in future articles.
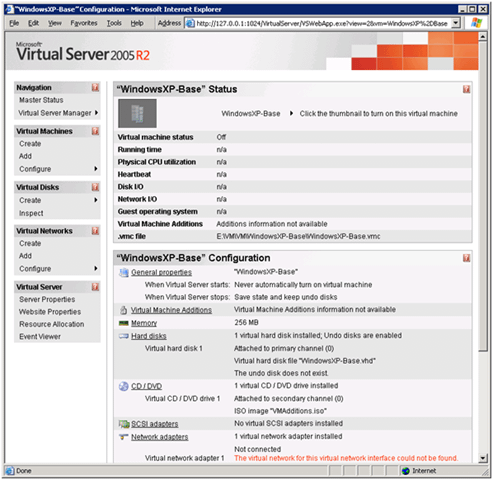
Figure 4: Viewing a VMs virtual hardware configuration.
Next Steps
Now that you’ve configured Virtual Server and created your first VM, you’re ready for the process of installing a guest OS. I’ll cover that topic in the next article.