This article was first published on SearchServerVirtualization.TechTarget.com.
If you’ve been following the article series so far, you’ve already setup Microsoft Virtual Server, configured some basic server settings, and have created a new VM. What’s missing in this picture? Well, so far, the VM doesn’t do much – you can start it, but all you’ll get is a black screen stating that no operating system can be found. That makes sense – so far, you have the equivalent of a physical computer with a blank hard drive. The next logical step is to install a guest operating system. You’re in luck, as that’s the topic of this article!
Guest OS Installation Overview
The process of installing a guest operating system is similar to that of installing an operating system on a new physical machine. You need to start with some way of getting the OS installer (and all related files) onto the computer. In the old days, you’d likely use floppy disks. Now, CDs, DVDs, and network-based installs are more common. Literally hundreds of operating systems have been successfully run with Virtual Server (though only a small subset of them are officially supported by Microsoft). In general, as long as your guest OS supports the hardware configuration shown in Figure 1, you should be able to run it within a Virtual Server VM.
Figure 1: The virtual hardware configuration for a Virtual Server VM.
The main concept to keep in mind is that, in almost every way, the guest OS will function like a physical one. It has a BIOS, it performs a POST operation, and it enumerates removable drives and fixed hard disks during the boot process. You can even go into the BIOS to make changes (though the default options will probably work best). OK, with that out of the way, let’s look at installation options.
Guest OS Installation Options
On a physical machine, you’d most likely start the installation of a new OS by inserting a CD or DVD into the system. Since there are no physical drives for a virtual machine, you’ll need to attach your VM’s virtual DVD-ROM drive (which also supports CD-ROMs) to the appropriate media. To manage these attachments, simply choose to edit the configuration of your virtual machine using the Virtual Server Administration Web Site. Let’s look at the three most common methods.
Installation Using Physical Media
If you have a physical CD-ROM or DVD-ROM from which you can install your guest OS, the simplest approach is to “capture” host computer’s physical DVD-ROM drive to your VM’s virtual DVD-ROM drive. To do this, go to the configuration of your virtual machine and then click on the “CD/DVD” link. As shown in Figure 2, you’ll have several options. Just select “Physical CD/DVD drive” and choose the appropriate drive letter from the host.
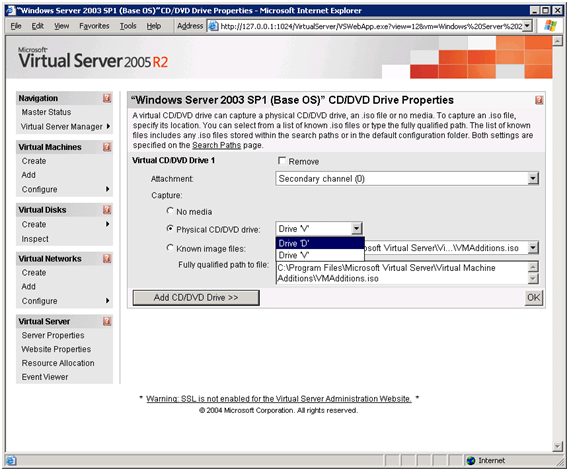
Figure 2: Capturing a physical CD/DVD drive.
The next time the VM is booted, it should automatically detect the media as if it were mounted in a virtual DVD-ROM device. Assuming that the media is bootable, you’ll be off and running with the Guest OS installation process. This is a pretty simple process, but there’s one catch: Using physical media can be a very slow method of installing an OS. Also, only a single VM can capture a physical host drive at a time (a problem if you’re planning to run multiple installations in parallel). Fortunately, there’s another option.
Installation Using ISO Files
The ISO standard specifies a method by which disc-based media formats (like DVDs and CDs) can be represented in a file. You can create an ISO file using various third-party utilities, and it has become very common for OS distributions to be available for download in ISO formats. If you have an ISO file, you can easily make it available for use by a VM, as shown in Figure 3.
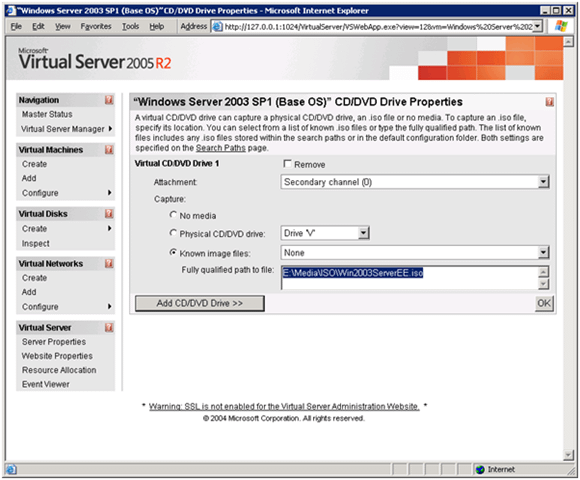
Figure 3: Attaching to an ISO file to a VM’s Virtual CD/DVD drive.
Installing from an ISO file is usually significantly faster than using physical media, and multiple VMs can attach to the same ISO file at the same time.
Network-Based Installations
The Pre-boot eXecution Environment (PXE) standard allows for computers to be booted over a network. There are several requirements for this to work properly. First, the virtual network card must support PXE booting. Virtual Server has you covered here (as long as you’re using Virtual Server 2005 R2 or later). The other is that a collection of server-side technologies need to be available. Various vendors (including Microsoft) have PXE-based installation methods for their operating systems.
Using the VMRC
Once you’ve captured the appropriate media for installation, all you need to do is start the VM and use the VMRC to connect to it from within the Virtual Server Administration Web Site. Both operations can be performed by clicking on the thumbnail of the VM in the “Master Status” page.
Completing the OS Installation
Obviously, the exact steps for performing an OS installation will vary based on the specific OS. Again, keep in mind that the process should be similar (if not identical) to that of installing on a physical machine.
The first step that you’ll want to perform after the OS installation is complete is to install the Virtual Machine Additions. This package includes drivers and related software that will greatly improve VM performance and usability. The easiest way to do this is to click the “Install VM Additions” link when using the VMRC. Behind the scenes, Virtual Server will automatically mount the appropriate ISO file and (if your OS supports it), will automatically start the installation process. Once you reboot the VM, you should be all set to do what you will with your new VM.
Virtualization Checkpoint
In the first three articles in this series, we’ve gone through the process of setting up a new VM and getting it ready for use with a guest OS of your choice. In future articles, I’ll cover details related to other configuration options such as configuring virtual networks. Stay tuned!


#1 by jyoti on May 6, 2011 - 5:32 am
Quote
I point to ISO image of Centos OS and turn on the VM. It successfully boots and starts the installation. But just after selecting keybord type it says that “Installation Method” “What type of media contains the packages to be installed – local cdrom hrd disk nfs image” and when I select “local cdrom” it says that no media present. Insert media and retry.
Any help is highly appreciated.
#2 by Anil Desai on May 6, 2011 - 9:19 am
Quote
Jyoti: This sounds like an issue that’s specific to CentOS, as Virtual Server seems to recognize and boot from the ISO image. It’s possible that the layout of the ISO image doesn’t include the files the OS needs. I don’t have any specific experience with CentOS, so I recommend posting your issue in their support forum (http://www.centos.org/modules/newbb/). I hope this helps! – Anil