Archive for category Virtualization

VDI Benefits without VDI:Managing Security

This article was first published on SearchServerVirtualization.TechTarget.com.

What do leaky faucets, fragmented file systems and failed hard disks all have in common? We want to fix them! As IT professionals, most of us pride ourselves on our problem-solving abilities. As soon as we hear about an issue, we want to find the solution. Every once in a while a technology offers new solutions to problems you may not have recognized. VDI addresses raises and addresses some important issues that are related to IT management. But, is VDI the only solution to those problems?

Whether or not you agree that VDI technology will make inroads into replacing traditional desktop computers, all of the recent press on the technology helps highlight the typical pain that’s being seen in IT departments. From security to supportability to regulatory compliance, there’s clearly a need for improvements in IT management. For many environments, however, it’s possible to find solutions by using other approaches and practices.

For the record, I certainly don’t oppose the use of virtualization for desktop environments, and I think it most likely will find a useful role in many environments. However, in order to justify the costs and technology investments, it’s worth understanding other options. The point of this article is that VDI is not required in order to solve many IT-related security problems. Let’s look at some problems and alternatives.

Securing Desktop Data

  • Problem: Data stored on corporate desktop and notebook computers is vulnerable to theft or unauthorized access. By using VDI to physically store all of this data on virtual machine images in the data center, chances of data compromise are reduced. The reason for this is that information is that sensitive data is never actually stored on a desktop or portable computer. If the system is lost or stolen, organizations don’t have to worry about losing information since it is not stored on the local hard disk.
  • Alternative Solution(s): Securing data is a common challenge in all IT environments, and many solutions are available. Sensitive information, in general, should be stored in protected network locations. File servers should adhere to security standards to prevent unauthorized access or data loss. In this scenario, the most important data is already secured within the data center. For protecting local copies of information, there are several hardware and software-based solutions that can be used to encrypt the contents of desktop and notebook hard disks. An example is Windows Vista’s BitLocker feature. Even with VDI, you would have the need to protect local copies of VMs for traveling users.

Data Protection

  • Problem: Backing up and restoring important data on client machines takes significant time and effort. When using VDI, all of the contents of the desktop and notebook computers are actually stored in the data center (usually on a dedicated storage arrays or network-based storage devices). Since all of the data is stored centrally, systems administrators can easily make backups of entire computer configurations (including the operating system, installing applications, data, and configuration settings). The no longer have to really on network-based backup agents that require the computer to be powered on and accessible in order for the data to be copied.
  • Alternative Solution(s): Hardware failures or accidental data modifications on client-side computers are potential problems, but there are many backup-related solutions. I already mentioned the importance of storing critical files on data center servers. By using automated restore tools, users can quickly be restored to service, even after a complete hardware failure. While VDI might seem to help in this area, when backing up entire VMs and virtual hard disks, you’re actually protecting a lot of unnecessary information. For example, each virtual hard disk that is backed up will include the entire operating system and all of the installed program files. These types of files could be much more easily restored using installation media or by reverting to an image-based backup. Users should understand the importance of storing information in network environments. File synchronization (such as the Windows Offline Files feature) can be used to automatically support traveling users.

Managing System Updates

  • Problem: Systems administrators spend a lot of time in keeping systems up-to-date with security updates and related patches. Part of the challenge is in dealing with remote machines that must be connected to the network and be properly configured in order to be maintained. With VDI, guest OS images are located in the data center and can be accessed by systems administrators whether or not the VM is being used.
  • Alternative Solution(s): The VDI approach still requires each user to have access to a single operating system. The OS itself must be secured, patched, and periodically maintained with other types of updates. Most vendors have tools for automatically deploying updates to large numbers of computers. These same methods can be used with or without VDI. In addition, features such as Network Access Control (NAC) can help ensure that only secure computers are able to access the network.

Summary

VDI approaches can help increase security in many different situations. But, VDI is not the only option for meeting these needs. IT automation tools and practices can help address problems related to data protection, security of client-side data, and ensuring that network systems remain free of malware and other infections. When deciding how and when to deploy VDI, keep in mind the alternative approaches.

My E-Mail Setup: Outlook + GMail + a Personal E-Mail Address

Almost two years ago, I switched from using my ISP-provided e-mail account to using GMail as my primary mail account.  I also decided that I never wanted to go through the pain of switching accounts again, so I also decided to get my own domain name.  I’m really happy with this setup, and I thought I’d outline how it all fits together. 

Benefits

Before we dive down into the technical details, here are the major benefits of this configuration.

  • Automatic backups:  Both my ISP-based POP account and GMail hold copies of my e-mail messages.  This is in addition to my local Outlook message store (which I also back up over the Internet nightly).  Perhaps that’s overkill, but most of this stuff is automatic and costs very little.
  • E-mail access from anywhere:  When I travel, I can directly access my GMail account via the web interface.  The vast majority of the time, though I use Microsoft Outlook.
  • The ability to use Microsoft Outlook:  While web-based messaging systems provide some advantages, I greatly prefer using Microsoft Outlook.  The only issue with Outlook is that it doesn’t provide a way to synchronize multiple PST files (unless, of course, you rely on either an Exchange Server or your ISP’s POP/IMAP features to keep mail on the server).
  • Spam filtering: I generally receive about 400 spam messages per day (a dubious distinction).  By using GMail’s Spam Filter combined with Outlook 2007’s Junk E-Mail filter, I rarely see any of it. 
  • A permanent e-mail address:  I have my own permanent address that’s personalized and won’t have to change as I switch Internet providers.  And, this way spammers won’t have to bother to learn the address.  🙂
  • Archiving: To keep my Outlook PST file relatively small, I can archive off the data to another file.  If I need to find an old message, I can always search for it online using GMail.
  • Deletion of attachments: A single attachment can be larger than the next 500 e-mail messages combined.  I usually delete file attachments from Outlook messages or store them in the file system.  Should I need an attachment, I can always log in to GMail and download it.  That’s a pretty rare occurrence, though.

There are some other minor benefits, but I think that covers the main list.

Requirements

In order to set all of this up, I needed the following:

  1. A registered domain name
  2. An ISP to host the domain (~$4.00/month) and to provide POP3 access
  3. A GMail account (free)
  4. (optional) Microsoft Outlook (or any other e-mail client)

The costs are really minimal, especially if you go with a discount web host and if you’re already using Outlook or another e-mail client.

Configuration

Now, let’s look at the technical details.  If you’re unfamiliar with standards and protocols such as POP3 and SMTP, you’ll probably need to do some research before setting this up.  Otherwise, it should be fairly straight-forward.

So, the way inbound mail works is as follows:

image

  • The DNS MX record for my domain points to my ISP’s POP3 account, and all new mail is received there.
  • All inbound messages from my ISP are set to redirect to my GMail account.
  • GMail is configured to allow POP3 access and to automatically archive messages that are downloaded
  • Outlook is configured to use POP3 to download messages from GMail.  Once messages are downloaded, they’re automatically archived on the GMail server.

Outbound mail works like this: I set the Reply To address to my custom domain e-mail address and then send messages to GMail as my outbound SMTP server.  The benefit here is that all outbound messages are cached by GMail (so I can search them later or access them online).

A Little Quirk

There’s one minor issue with this configuration: When Outlook users see me messages, they look something like “Anil@domain.com on behalf of Anil@ISPAccount.com“.  All operations such as replying works just fine, but some people seem to be confused by it.  Other than that, I haven’t had any problems with the setup.

The Add-Ons

You can download and install the GMail Notifier or the Google Desktop to automatically receive notifications and/or previews of new messages as they arrive.

Customization Options

The same setup can certainly be created in a variety of different ways.  For example, you can use a web-based server other than GMail, and you’re certainly not tied to Microsoft Outlook in any way.  Overall, the approach should work fine for most people.

Conclusion

Overall, this e-mail setup works well for me.  It also costs a total of ~$4.00/month (a fee that I could probably eliminate by finding a free web host).  And, I get the benefits of web-based messaging (simplified access and online storage), with the convenience of using Microsoft Outlook.  Was this helpful?  Does it make sense?  Should I add more detail?  Post a comment!

IT Policies: Monitoring Physical and Virtual Environments

This article was first published on SearchServerVirtualization.TechTarget.com.

Here’s quick question: How many virtual machines and physical servers are currently running on your production environment? If you can answer that, congratulations! Here’s a harder one: Identify the top 10 physical or virtual machines based on resource utilization. For most IT organizations, both of these questions can be difficult to answer. Fortunately, there are ways to implement monitoring in an automated way. In this tip, I’ll present some advice related to monitoring VMs and host computers in a production environment.

They’re all pretty much the same…

In many ways, the tasks associated with monitoring virtual machines are similar to those of working with physical ones. Organizations that have invested in centralized monitoring solutions can continue to rely upon them for gaining insight into how applications and services are performing. Examples include:

  • Establishing Baselines: A baseline helps you determine the standard level of resource utilization for a physical or virtual workload. Details to track typically include CPU, memory, disk, and network performance.
  • Root-Cause Analysis / Troubleshooting: When users complain of slow performance, it’s important for IT staff to be able to drill-down into the main cause of the problem. Performance statistics can often help identify which resources are constrained. Ideally, that will help identify the source of the problem and provide strong hints about resolving them.
  • Generating Alerts: In order to proactively manage performance, IT staff should be alerted whenever resource utilization exceeds certain thresholds. This can help reconfigure workloads

All of these tasks are fairly standard in many IT environments and are also applicable to working with virtual workloads.

… Except for their differences

Environments that use virtualization also have some unique challenges related to performance monitoring. Since it’s quick and easy to deploy new VMs, keeping track of them is a huge challenge. Some additional features and functions that can be helpful include:

  • Mapping Guest-to-Host Relationships: While virtual machines have their own operating system, resource utilization is often tied to other activity on the same host server. Virtualization-aware monitoring tools should be able to uniquely identify VMs and relate them to the physical computers on which they are running.
  • Automated Responses / Dynamic Reconfiguration: In many cases, it’s possible to perform automated tasks in reaction to performance-related issues. For example, if CPU usage of a single VM is slowing down the entire host, VM priority settings can be adjusted. Or, when excessive paging is occurring, the VM’s memory allocation can be increased.
  • Broad Platform Support: There’s a good chance that you’re supporting many more OS versions and flavors for VMs than on physical machines. A good performance monitoring solution will support the majority of virtual operating environments.
  • Reporting / Capacity Planning: The primary purpose of performance monitoring is to facilitate better decision-making. Advanced reporting features can help track untapped resources and identify host servers that are overloaded. Tracking historical performance statistics can also be very helpful.

Choosing the Right Tools for the Job

Most operating systems provide simple tools for troubleshooting performance issues on a single or a few computers. In environments that support more than a few VMs, automated performance monitoring and management tools are practically a must-have. Figure 1 provides some details into features that can be useful.

image

Figure 1: Features to look for in performance management tools

Summary

Overall, many of the standard IT best practices apply equally to monitoring physical and virtual machines. When searching for tools to get the job done, however, there are certain features that can dramatically reduce the time and effort required to gain insight into production performance.

IT Policies: Service Level Agreements (SLAs)

This article was first published on SearchServerVirtualization.TechTarget.com.

Have you heard the one about the IT department whose goals were not well-aligned with the needs of its users? OK, so that’s probably not a very good setup for a joke. One of the most common challenges faced by most IT organizations is defining their internal customers’ requirements and delivering services based on them. In this Tip, I’ll provide details on how you can define Service Level Agreements (SLAs) and how you can use them to better manage virtualization and to reduce costs.

Agreeing to Service Level Agreements

Challenges related to deploying virtualization include skepticism related to the technology. This often reads to resistance and a lack of knowledge about the potential cost and management benefits of using virtual machines.

The purpose of a Service Level Agreement is to define, prioritize, and document the real needs of an organization. All too often, IT departments tend to work in a relatively vacuum, focusing on technology. The area of virtualization is no exception – it’s often much easier to create and deploy VMs than it is to determine the strategic needs of the company. The problems range from poorly managing users’ expectations to large costs that might not directly address the most important challenges. The goal of containing costs is the basis for a lot of virtualization decisions, so it’s important to keep this in mind.

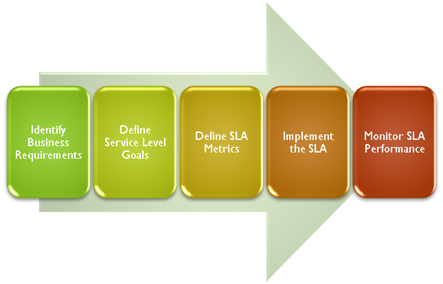
When developing SLAs, the most important aspect is for the process to be a team effort. Managers, IT staff, and end-users should all have input into the process. Typical steps in the process are shown in Figure 1.

image

Figure 1: Steps in the process of creating a new SLA

Defining SLA Goals and Metrics

SLA goals define the targeted levels of service that are to be expected from IT departments. Metrics are the specific statistics and data that must be measured to ensure that the levels are being met. Some examples might include:

  • Deployment: The time it takes to provision a new VM
  • Performance: Ensuring adequate application and service response times
  • Availability: Verifying virtual machine uptime
  • Change Management: Efficiently managing VM configuration updates

A well-defined SLA should include details about how the quality of the service is measured. For example, the goal for the uptime of a particular VM might be 99.9%. This can be measured using standard enterprise monitoring tools. Or, the deployment goal for a standard configuration of a virtual machine might be 4 business hours from the time of the request.

Reducing Costs with SLAs

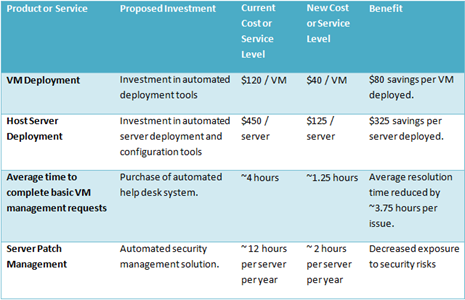
If you haven’t yet created SLAs, you might be thinking about the time and effort that it will take to setup and track the associated metrics. While there is certainly a cost to be paid for creating SLAs, there can also be numerous benefits. One important aspect is that areas for improvement can easily be identified. For example, if a business finds that it could improve its operations by more quickly deploying VMs, an investment in automation could help. Table 1 provides that and some other hypothetical examples.

image

Table 1: Examples of potential cost savings based on automation

Summary

IT organizations that constantly find themselves trying to keep up with virtualization-related requirements can benefit by creating SLAs. When done properly, this will help technical initiatives (such as VM deployments and server consolidations) stay in line with users’ expectations. Overall, this can help the entire organization make better decisions about the importance of virtual infrastructures.

Virtualization Security: Pros and Cons

This article was first published on SearchServerVirtualization.TechTarget.com.

Historically, organizations have fallen into the trap of thinking about security implications after they deploy new technology. Virtualization offers so many compelling benefits, that it’s often an easy sell into IT architectures. But what about the security implications of using virtualization? In this tip, I’ll present information about the security-related pros and cons of using virtualization technology. The goal is to give you an overview of the different types of concerns you should have in mind. In a future article, I’ll look at best practices for addressing these issues.

Security Benefits of Virtualization

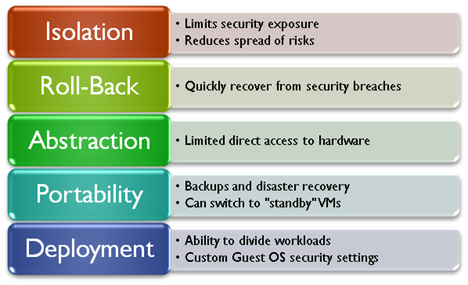
There are numerous potential benefits of running workloads with a VM (vs. running them on physical machines). Figure 1 provides an overview of these benefits, along with some basic details.

image

Figure 1: Virtualization features and their associated security benefits.

Since virtual machines are created as independent and isolated environments, systems administrators have the ability to easily configure them in a variety of ways. For example, if a particular VM doesn’t require access to the Internet or to other production networks, the VM itself can be configured with limited connectivity to the rest of the environment. This helps reduce risks related to the infection of a single system affecting numerous production computers or VMs.

If a security violation (such as the installation of malware) does occur, a VM can be rolled back to a particular point-in-time. While this method may not work when troubleshooting file and application services, it is very useful for VMs that contain relatively static information (such as web server workloads).

Theoretically, a virtualization product adds a layer of abstraction between the virtual machine and the underlying physical hardware. This can help limit the amount of damage that might occur when, for example, malicious software attempts to modify data. Even if an entire virtual hard disk is corrupted, the physical hard disks on the host computer will remain intact. The same is true for other components such as network adapters.

Virtualization is often used for performing backups and disaster recovery. Due to the hardware-independence of virtualization solutions, the process of copying or moving workloads can be simplified. In the case of a detected security breach, a virtual machine on one host system can be shut down, and another “standby” VM can be booted on another system. This leaves plenty of time for troubleshooting, while quickly restoring production access to the systems.

Finally, with virtualization it’s easier to split workloads across multiple operating system boundaries. Due to cost, power, and physical space constraints, developers and systems administrators may be tempted to host multiple components of a complex application on the same computer. By spreading functions such as middleware, databases, and front-end web servers into separate virtual environments, IT departments can configure the best security settings for each component. For example, the firewall settings for the database server might allow direct communication with a middle-tier server and a connection to an internal backup network. The web server component, on the other hand, could have required access via standard HTTP ports.

This is by no means a complete list of the benefits of virtualization security, but it is a quick overview of the security potential of VMs.

Potential Security Issues

As with many technology solutions, there’s a potential downside to using virtual machines for security. Some of the risks are inherent in the architecture itself, while others are issues that can be mitigated through improved systems management. A common concern for adopters of virtual machine technology is the issue of placing several different workloads on a single physical computer. Hardware failures and related issues could potentially affect many different applications and users. In the area of security, it’s possible for malware to place a significant load on system resources. Instead of affecting just a single VM, these problems are likely to affect other virtualized workloads on the same computer.

Another major issue with virtualization is the tendency for environments to deploy many different configurations of systems. In the world of physical server deployments, IT departments often have a rigid process for reviewing systems prior to deployment. They ensure that only supported configurations are setup in production environments and that the systems meet the organization’s security standards. In the world of virtual machines, many otherwise-unsupported operating systems and applications can be deployed by just about any user in the environment. It’s often difficult enough for IT departments to know what they’re managing, let alone how to manage a complex and heterogeneous environment.

The security of a host computer becomes more important when different workloads are run on the system. If an unauthorized user gains access to a host OS, he or she may be able to copy entire virtual machines to another system. If sensitive data is contained in those VMs, it’s often just a matter of time before the data is compromised. Malicious users can also cause significant disruptions in service by changing network addresses, shutting down critical VMs, and performing host-level reconfigurations.

When considering security for each guest OS, it’s important to keep in mind that VMs are also vulnerable to attacks. If a VM has access to a production network, then it often will have the same permissions as a physical server. Unfortunately, they don’t have the benefits of limited physical access, such as controls that are used in a typical data center environment. Each new VM is a potential liability, and IT departments must ensure that security policies are followed and that systems remain up-to-date.

Summary

Much of this might cast a large shadow over the virtualization security picture. The first step in addressing security is to understand the potential problems with a particular technology. The next step is to find solutions. Rest assured, there are ways to mitigate these security risks. That’s the topic of my next article, “Best Practices for Improving VM Security.”

Improving VM Security: Best Practices

This article was first published on SearchServerVirtualization.TechTarget.com.

In my previous Tip, “Pros and Cons of Virtualization Security”, I described many considerations that IT organizations should keep in mind when planning to deploy virtual machines. To put it simply, the goal was to better-define the problem. In this Tip, I’ll present some best practices for managing security for virtualization.

Assessing Risks

Before we dive further into technical details of securing VMs, it’s important to consider the potential security vulnerabilities that are relevant to a particular host and guest OS. Particular questions to ask include:

  • Does the guest of host contain sensitive information such as logon details or sensitive data? If so, how is this information protected?
  • Does the VM have access to the Internet?
  • Can the VM access other production computers?
  • Is the Guest OS running a supported operating system version?
  • Are host and guest OS’s updated automatically?

Answering each question can help clue you in to issues that may need to be addressed. For example, non-networked VMs that reside on a test network will likely have different security requirements from those that are running in a production environment. Let’s look at some details.

Implement Minimal Permissions

A fundamental aspect of maintaining security is to provide users and systems administrators with the minimal permissions they need to complete their jobs. Figure 1 provides an overview of the types of permissions that should be configured.

image

Figure 1: Types of permissions to consider when securing virtualization

On virtualization hosts, for example, only certain staff members should be able to start, stop, and reconfigure VMs. In addition, it’s important to configure virtual applications and services using limited system accounts. Finally, you should take into account the real requirements for VM configurations. For example, does every VM really need to be able to access the Internet? If so, what is the reason for this? Remember, in the case of a security breach, you want to minimize the number and types of systems that may be affected.

Virtual Machines are still “machines”

Whether an operating system is running on a physical machine or within a virtual one, it still should be regularly updated. Most IT organizations have already invested in some type of automated patch and update deployment process. With virtualization, there are a couple of additional challenges: First, IT departments must be aware of all VMs that are deployed in the environment. Second, each guest OS must be either protected by the update management solution, or must be kept up-to-date manually. Regardless of the approach, systems administrators should keep in mind the time and effort required.

Enforce Consistency and Quality

Simpler environments are much easier to manage than ones in which there is a huge variation in the number and types of systems that are supported. Whenever possible, IT departments should create a base library of reference virtual machines from which users and systems administrators should start. These base images should be verified to meet the IT department’s policies and must be kept up-to-date. Of course, it’s likely that some workloads require deviations from standard deployments. In those cases, IT departments must remain involved in the deployment of all new virtual machines (or, at least those that will have access to production resources).

Managing Moving Targets

The process of moving virtual machines between host servers is usually as simple as performing file copy operations. When a VM is moved, it is important for all relevant security settings and options to move with it. For example, permissions set on virtual hard disk files, and network access details, should be recreated on the target platform. Figure 2 provides some examples of relevant configuration settings to consider.

image

Figure 2: Security-related settings to consider when moving VMs

Security through Education

Even though the basic concept of virtualization technology is well-planted in most peoples’ minds, users and systems administrators are often confused about the potential use (and misuse) of virtual machines. IT departments, therefore, should verify that their staff is aware of the potential security risks related to deploying new VMs. For most practical purposes, deploying a new VM is similar to deploying a new physical server (though it’s often quicker, cheaper, and easier).

Using Third-Party Solutions

It’s no secret that virtualization technology creates additional burdens related to security. Numerous third-party vendors understand this and have either updated their existing enterprise management tools to include virtualization or have created totally new solutions with innovative approaches to limited vulnerabilities. The focus of this article is on best practices, but when it comes to implementation, IT departments should consider evaluating these various tools.

Summary

Overall, organizations can realize the benefits of using virtualization to improve security. However, they will need to be diligent in the creation and deployment of new VMs, as well as with the maintenance of VMs after they’re deployed. As with many other IT solutions, you’ll need to focus on management in order to get the best benefits while minimized vulnerabilities. It’s not an easy job, but it certainly can be done.

IT Policies: Managing VM Sprawl

This article was first published on SearchServerVirtualization.TechTarget.com.

Many organizations have turned to virtualization to help reduce the number of servers and other computer that they support in their environments. The problem itself has often been referred to as “server sprawl”. The cause of this phenomenon is often the excessive deployment of new physical machines. Often, systems administrators would deploy a new computer just to support a lightweight web application or a simple workload that could easily have been placed on another server. In other cases, the proliferation was unavoidable, as some applications and services just don’t behave nicely with others on the same machine.

Virtualization technology can help resolve the latter problem by allowing multiple independent workloads to run on the same computer at the same time. The process of deploying a new VM can be performed in a matter of minutes, thereby reducing costs and administrative effort. Unfortunately, these benefits can lead to a new problem: “VM sprawl”. IT organizations often find themselves tasked with keeping track of dozens or hundreds of new VMs seemingly overnight. When considering security, performance, reliability, and adhering to IT standards, the task of managing virtual systems can quickly become overwhelming. Fortunately, there are some ways to reduce some of the headaches. In this tip, I’ll present some best practices that can help.

Virtual Machine Deployment

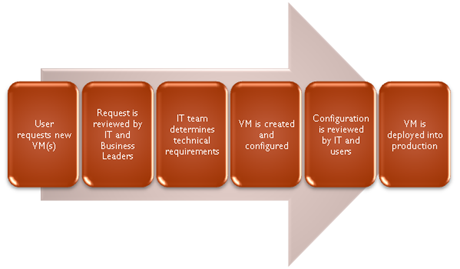
The first step in managing VM sprawl is related to reign in the deployment of new VMs. Just because end-users and systems administrators have the ability to deploy new virtual machines does not necessarily mean that they should do so. IT departments should define a process for the deployment of a new VM. Figure 1 provides a basic example of some typical steps. Often, the suggestion of a process conjures up an image of a small army of pointy-haired bosses creating a new bureaucracy. In reality, it’s certainly possible to perform all of the steps in a process such as this in a matter of minutes.

image

Figure 1: Possible steps in a VM deployment process.

Best Practice: IT departments should remain involved in all virtual machine deployments.

Configuration Management

Another problem related to the widespread deployment of VMs is a lack of configuration consistency. Since users can choose from a wide array of operating systems and applications to run within a VM, the number of variations can grow exponentially. Additionally, the VMs that are deployed may not adhere to IT standards and guidelines for security and other settings.

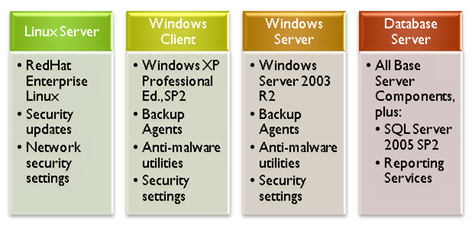
One way to minimize these effects is for IT organizations to create a standardized set of base images in what is often referred to as a VM library. Users should be required to begin the creation of a new VM using one of these images. Figure 2 provides some examples of types of VM images that might be created.

image

Figure 2: Examples of virtual machine images that might be available in a VM library.

While developing a list of standard configurations can help reduce the number of configurations that are supported, IT staff should still remember the need to verify configurations before deployment into a production environment.

Best Practice: All users and systems administrators should base their deployments on IT-approved base images and supported configurations.

Keeping VMs Up-to-Date

An important concern for all deployments – both physical and virtual – is keeping systems up-to-date. Security patches and application upgrades can help minimize the risk of reliability and data loss. The good news is that IT organizations can depend on their standard patch and update deployment tools for managing virtual machines. Of course, this will only be possible if the guest OS is supported by those tools (another good reason for implementing configuration management).

Best Practice: Treat productions VMs as if they were physical machines, and ensure that they are monitored and updated regularly.

Contain Yourself (and your VMs)!

If you’re responsible for limiting VM sprawl in your environment, you know that it’s important to give users what they want. Reducing deployment times and providing access to virtualization functionality can positively impact productivity while minimizing data center impacts. By keeping IT departments involved in deployment decisions, and making sure that VMs are properly managed, organizations can enjoy these benefits without suffering from unmitigated VM sprawl.

Implementing Disaster Recovery for Virtual Machines

This article was first published on SearchServerVirtualization.TechTarget.com.

One of the many benefits of virtualization technology is its ability to de-couple workloads and operating systems from the underlying hardware on which they’re running. The end result is portability – the ability to move a VM between different physical servers without having to worry about minor configuration inconsistencies. This ability can greatly simplify a common IT challenge: Maintaining a disaster recovery site.

In an earlier article, “Implementing Backups for Virtual Machines”, I focused on performing backups from within guest OS’s. In this article, I’ll look at the other approach: Performing VM backups from within the host OS.

Determining What to Back Up

From a logical standpoint, virtual machines themselves are self-contained units that include a virtual hardware configuration, an operating system, applications, and services. Physically, however, there are numerous files and settings that must be transferred to a backup or disaster recovery site. While the details will differ based on the virtualization platform, the general types of files that should be considered include:

  • Host server configuration data
  • Virtual hard disks
  • VM configuration files
  • Virtual network configuration files
  • Saved-state files

In some cases, thorough documentation and configuration management practices can replace the need to track some of the configuration data. Usually, all of the files except for the virtual hard disks are very small and can be transferred easily.

Performing Host-Level Backups

The primary issue related to performing VM backups is the fact that VHD files are constantly in use while the VM is running. While it might be possible to make a copy of a VHD while it is running, there’s a good chance that caching and other factors might make the copy unusable. This means that “open file agents” and snapshot-based backups need to be aware of virtualization in order to generate reliable (and restorable) backups.

There are three main ways in which you can perform host-level backups of VM-related files. Figure 1 provides an overview of these options. Cold backups are reliable and easy to implement, but they do require downtime. They’re suitable for systems that may be unavailable for at least the amount of time that it takes to make a copy of the associated virtual hard disk files. Hot Backups, on the other hand, can be performed while a VM is running. Virtualization-aware tools are usually required to implement this type of backup.

image

Figure 1: Options for performing host-level VM backups

Backup Storage Options

One of the potential issues with performing backups of entire virtual hard disks is the total amount of disk space that will be required. IT organizations have several different storage-related options. They are:

  • Direct-Attached Storage (Host File System): This method involves storing copies of VHD files directly on the host computer. While the process can be quick and easy to implement, it doesn’t protect against the failure of the host computer or the host disk subsystem.
  • Network-based Storage: Perhaps the most common destination for VM backups is network-based storage. Data can be stored on devices ranging from standard file servers, to dedicated network-attached storage (NAS) devices to iSCSI-based storage servers. Regardless of the technical details, bandwidth is an important concern. This is especially true when dealing with remote disaster recovery sites.
  • Storage Area Networks (SANs): Organizations can use SAN-based connections to centrally manage storage, while still providing high performance for backups and related processes. SAN hardware is usually most applicable to backups performed within each of the disaster recovery sites, since there are practical limitations on the length of these connections.

Maintaining the Disaster Recovery Site

So far, we’ve looked at what you need to backup and some available storage technologies. The most important question, however, is that of how to maintain the disaster recovery site. Given that bandwidth and hardware may be limited, there are usually trade-offs. The first consideration is related to keeping up-to-date copies of VHDs and other files at both sites. While there are no magical solutions to this problem, many storage vendors provide for bit-level or block-level replication that can synchronize only the differences in large binary files. While there is usually some latency, this can minimize the bandwidth load while keeping files at both sites current.

At the disaster recovery site, IT staff will need to determine the level of capacity that must be reserved for managing failures situations. For example, will the server already be under load? If so, during a fail-over, what are the performance requirements? The process of performing a fail-over can be simplified through the use of scripts and automation. However, it’s critically important to test (and rehearse) the entire process before a disaster occurs.

Planning for the Worst…

Overall, the task of designing and implementing a disaster recovery configuration can be challenging. The use of virtual machines can simplify the process by loosening the requirements for identical hardware at the primary and backup sites. The process still isn’t easy, but with proper planning and the right tools, it’s certainly possible. Good luck, and let’s hope you never need to use your DR handiwork!

Implementing Backups for Virtual Machines

This article was first published on SearchServerVirtualization.TechTarget.com.

In the early days of virtualization, it was common for users to run a few VMs in test and development environments. These VMs were important, but only to a small set of users. Now, it’s common for organizations to run mission-critical production workloads on their virtual platforms. Downtime and data loss can affect dozens or hundreds of users, and the rule is to ensure that virtual machines are at least as well protected as their physical counterparts. So how can this be done? In this article, I’ll present some information related to developing a backup strategy for virtual machines. In a related article, “Implementing Disaster Recovery for Virtual Machines,” I’ll look at some additional options for performing host-based backups.

Determining Recovery Requirements

If there’s a golden rule to follow related to implementing backups, it’s to start with enumerating your recovery requirements. After all, that’s the goal of performing backups: To allow for recovery. Considerations should include:

  • Data loss: What is an acceptable amount of data loss, in a worst-case scenario? For some applications and services, it might be acceptable to lose several hours worth of data if it can lower backup costs. In other cases, near-realtime backups might be required.
  • Downtime windows: What is an acceptable amount of downtime? Some workloads will require rapid recovery in the case of the failure of a host. In other cases
  • Virtual machine configuration details: What are the CPU, memory, disk, and network requirements for the VM? These details can help prepare you for moving a workload to another physical host.
  • Identifying important data: Which information really needs to be backed up? In some cases, full VHD backups might make sense. More often, critical data such as web server content, data files, and related information is sufficient.
  • Budget and Resources: Organizations have limits based on the amount of available storage space, bandwidth, human resources, and technical expertise. These details must be factored in to any technical solution.

Once you have the business-related requirements in mind, it’s time to look at technical details.

Backups for Guest OS’s

One common approach to performing backups for VMs is to treat virtual machines as if they were physical ones. Most organizations have invested in some method of centralized backup solution for their physical servers. Since VMs will often be running a compatible guest OS, it’s usually easy to install and configure backup agent within them. Configuration details will include the frequency of backups, which data to protect, and associated monitoring jobs.

The technical details can vary significantly, based on the needs of the environment. Some examples might include:

  • Small Environments: When managing a few virtual machines (such as in development and test environments), simple scripting or automation might be enough to meet backup requirements. For example, test results and data files might be stored on a shared network drive so they can be reviewed even when the VMs are unavailable.
  • Medium-Sized Environments: The job of supporting dozens or hundreds of virtual machines will require the use of a centralized, automated backup solution. Data is usually sent over a dedicated backup network and stored in one or more network locations.
  • Large Environments: When scaling to support many hundreds of virtual machines, managing direct-attached storage becomes nearly impossible. Organizations often invest in Storage Area Network (SAN) technology to support the increased bandwidth and disk space requirements. It may become difficult to identify important data when working with a vast array of different types of VMs. Organizations that can afford the storage resources may consider backing up the entire contents of their virtual hard disks to ensure that they can quickly recover them.

Again, regardless of the approach, the goal should be to meet business-level recovery requirements. Technical constraints such as limited storage space and limited bandwidth will play a factor in the exact configuration details.

Benefits of iSCSI

An important virtualization management-related concern is that of keeping track of virtual hard disks. The default option in many environments is to rely upon local storage. The problem is that it can quickly become difficult to enumerate and backup all of these different servers. For many environments, SAN-based resources are too costly for supporting all virtual machines. The iSCSI standard provides an implementation of SCSI that runs over standard Ethernet (copper-based) networks. To a host computer or a guest OS, an iSCSI-attached volume appears like a local physical volume. Block-level operations such as formatting or even defragmenting the volume are possible.

From a backup standpoint, systems administrators can configure their host and/or guest OS’s to use network-attached storage for storing virtual hard disk data. For example, on the host system, virtual hard disks may be created on iSCSI volumes. Since the actual data resides on a network-based storage server, this approach lends itself to performing centralized backups. One important caveat is that organizations should thoroughly test the performance and reliability of their iSCSI infrastructures before relying on their for production workloads. Issues such as latency can cause reliability issues.

Other Options

In this article, I presented details related to perform virtual machine backups from within Guest OS’s. Of course, this is only one option. Another useful approach is to perform backups at the level of the host OS. I’ll cover that topic in my next article, “Implementing Disaster Recovery for Virtual Machines.”

High-Availability with Exchange Server 2007 and Neverfail

I have written a free White Paper for The Neverfail Group – a leading provider of high-availability solutions for a variety of different platforms.  The following figure provides a brief architectural comparison of the differences between Microsoft’s Exchange Server approach Neverfail’s H-A solutions.

Figure - Comparing Neverfail vs. Exchange Server HA

The complete paper includes an overview of H-A features in Exchange Server 2007.  You can directly download the White Paper,  Enhancing Exchange Server 2007 High-Availability with Neverfail [PDF File].

Automating Virtual Server, Part 4: Creating and Managing VMs

This article was first published on SearchServerVirtualization.TechTarget.com.

If you’ve been following along with my series on “Automating Virtual Server” so far, you’re familiar with the process of connecting to an instance of Virtual Server and accessing a virtual machine object (either by name or by looping through a collection of all VMs on the server). I provided examples of code in VBScript, Visual Basic .NET, and C#. In this article, I’ll walk through the process of creating new VMs, and managing some basic VM properties.

Creating a new VM

Since the point of virtualization is to run VMs, it should come as no surprise that the Virtual Server object contains a collection of virtual machines. Let’s walk through the most common operations related to working with VMs. When writing code, you’ll generally first create an instance of a Virtual Server host object by connecting to the host. To create a new VM, you can use the following method:

.CreateVirtualMachine(configurationName, configurationPath)

You need only provide two arguments to this method:

  • configurationName: A string value that specifies the logical name of the new virtual machine. The name must be unique on each instance of Virtual Server, so it’s a good idea to check the .VirtualMachines collection for potential conflicts. Note that this name will also be used to create the default filenames of the VM.
  • configurationPath: A string that specifies the full path to the host folder into which the new VM files will be placed. It’s a good idea to test that the Virtual Server service can access this path. If the specific folder does not exist, the Virtual Server COM API will create it automatically.

It’s important to keep in mind that different instances of Virtual Server might have different configuration settings. Remember that you can get information about default paths and search paths by using properties of the Virtual Server object.

Deleting a Virtual Machine

From time to time, it will be necessary to delete a virtual machine and its associated files. The code requires a call to a method of the Virtual Server object:

.DeleteVirtualMachine(VirtualMachineObject)

The argument here is actually a virtual machine object. So, your code will need to get an instance of a VM object by looping through the .VirtualMachines collection or by finding it by name. There’s one important warning: Calling this method will actually result in the deletion of the relevant virtual machine configuration (.vmc) file, along with any undo disks or saved state files. Use with caution!

Registering VMs

Adding and removing virtual machines from the Virtual Server instance is also a simple process. Registration involves pointing Virtual Server to an existing virtual machine configuration (.vmc) file. Virtual Server will try to enumerate the virtual hard disks and other properties stored in that file and add the VM with a given name. The method call is:

.RegisterVirtualMachine(configurationName, configurationPath)

Note that the syntax is similar to the of creating a new VM – you need to provide the logical name that will be used for the VM, along with the full path and filename of the .vmc file.

Unregistering VMs

If you want to remove a virtual machine from Virtual Server without deleting the associated files, you can use this method:

objVirtualServer.UnregisterVirtualMachine(VirtualMachineObject)

As with deleting virtual machines, you need to provide an instance of a virtual machine object. This method is handy when you want to move or copy a virtual machine to another server.

Code Examples: Managing Virtual Machines

So far, we’ve looked at some pseudo-code that shows you how to perform common operations related to adding and removing VMs. Now, let’s look at specific working examples. The following code will perform these steps:

  • 1) Create a new VM called “VSAutomation”. The files will be stored in “C:\VM\VSAutomation” (note that you’ll most likely want to change this path if you plan to run the code yourself).
  • 2) Unregister this VM from the Virtual Server installation.
  • 3) Copy all VM-related files to a new folder: VSAutomation2.
  • 4) Register the new VM in Virtual Server under the logical name “VSAutomation2”.

Here are the code samples in VBScript, Visual Basic .NET and C# formats, respectively:

Set objVirtualServer = CreateObject(“VirtualServer.Application”)

‘Create a new VM named “VSAutomation ”

objVirtualServer.CreateVirtualMachine “VSAutomation”, “C:\VM\VSAutomation”

‘Get a Virtual Machine object

Set objVirtualMachine = objVirtualServer.FindVirtualMachine(“VSAutomation”)

‘Unregister the new VM

objVirtualServer.UnregisterVirtualMachine(objVirtualMachine)

‘Copy the Virtual Machine files to the folder “VSAutomation2”

Set objFSO = CreateObject(“Scripting.FileSystemObject”)

objFSO.CopyFolder “C:\VM\VSAutomation”, “C:\VM\VSAutomation2”, OverWriteFiles

‘Register the new copy of the virtual machine

objVirtualServer.RegisterVirtualMachine “VSAutomation2”, “C:\VM\VSAutomation2”

WScript.Echo “Operation complete.”

Listing 1: Managing Virtual Machines using VBScript

Imports Microsoft.VirtualServer.Interop

Namespace SearchServerVirtualization_VB

Public Class Listing_2

Public Shared Function ManageVirtualMachines() As String

Dim objVirtualServer As New VMVirtualServer

‘Create a new VM named “VSAutomation”

objVirtualServer.CreateVirtualMachine(“VSAutomation”, ” C:\VM\VSAutomation”)

‘Get a Virtual Machine object

Dim objVirtualMachine As VMVirtualMachine

objVirtualMachine = objVirtualServer.FindVirtualMachine(“VSAutomation”)

‘Unregister the new VM

objVirtualServer.UnregisterVirtualMachine(objVirtualMachine)

‘Copy the Virtual Machine files to the folder “Test-Copy”

My.Computer.FileSystem.CopyDirectory(“C:\VM\VSAutomation”, “C:\VM\VSAutomation2”)

‘Register the new copy of the virtual machine

objVirtualServer.RegisterVirtualMachine(“VSAutomation2”, “C:\VM\VSAutomation2”)

Return “Operation complete.”

End Function

End Class

End Namespace

Listing 2: Managing Virtual Machines using VB.NET

using Microsoft.VirtualServer.Interop;

namespace SearchServerVirtualization_CSharp

{

namespace ScriptingVirtualServer

{

public class Listing_3

{

public static string ManageVirtualMachines()

{

VMVirtualServer objVirtualServer = new VMVirtualServer();

//Create a new VM named “VSAutomation”

objVirtualServer.CreateVirtualMachine(“VSAutomation”, @”C:\VM\VSAutomation”);

//Get a Virtual Machine object

VMVirtualMachine objVirtualMachine;

objVirtualMachine = objVirtualServer.FindVirtualMachine(“VSAutomation”);

//Unregister the new VM

objVirtualServer.UnregisterVirtualMachine(objVirtualMachine);

//Create a new folder called “Test-Copy” and move the .vmc file

System.IO.Directory.CreateDirectory(@”C:\VM\VSAutomation2″);

System.IO.File.Move(@”C:\VM\VSAutomation\VSAutomation.vmc”, @” C:\VM\VSAutomation2\VSAutomation2.vmc “);

//Register the new copy of the virtual machine

objVirtualServer.RegisterVirtualMachine(“VSAutomation”, @”C:\VM\VSAutomation2\VSAutomation2.vmc “);

return “Operation complete.”;

}

}

}

}

Listing 3: Managing Virtual Machines using C#

Summary

In this article, I walked through details related to creating new VMs and managing VM registration in Virtual Server. It only takes a little imagination to see how the code samples could be used to programmatically move and copy VMs between installations of Virtual Server. While I left out important aspects such as error-handling, logging, security-checking, and other details, this should serve as a great foundation for performing useful automation tasks.

In the next article in this series, I’ll provide details about how you can work with VMs, including diving down into their virtual hardware configurations. Stay tuned!

Automating Virtual Server, Part 3: Configuring the Virtual Server Service

This article was first published on SearchServerVirtualization.TechTarget.com.

In the first two articles in this series on “Automating Virtual Server”, I presented details on connecting to an instance of Virtual Server using its COM API. The first focused on accomplishing this using VBScript, and the second focused on using .NET (Visual Basic .NET and C#). The articles stopped a little short of doing anything useful once you’ve connected to a Virtual Server instance. So, that’s where I’ll resume. In this article, I’ll present ways in which you can programmatically manage properties and details related to the Virtual Server service itself.

The Virtual Server Object

Understanding the relationships between the major objects and collections is an important first step when working with the Virtual Server COM API. The Virtual Server object represents the host computer’s virtualization service. It contains properties and methods related to the configuration of the virtualization layer. Table 1 provides some examples of commonly-used properties.

image

Table 1: Commonly-used properties of the Virtual Server object

If you’re writing script or application code, these properties can be very helpful. For example, you might want to determine the default path into which a new VM would be placed (which returned by the .DefaultVMConfigurationPath property). Or, you might want to reference the .Version property so you can execute different sections of code based on the specific version of the Virtual Server platform that’s running on the system. Finally, the .GetVirtualMachineFiles method allows you to take a quick inventory of all of the VM-related files that are available within the default search paths.

Getting Host Details

When programmatically working with Virtual Server, it’s important to keep track of the details of the platform you’re managing. One particularly useful collection for returning these details is the .HostInfo property of a Virtual Server object. Table 2 provides a listing of the information you can obtain.

image

Table 2: Properties of the .HostInfo collection

Code Examples: Getting Host Information

Now that we have an understanding of what information is available, let’s write some simple code that will return the following:

  • 1) Total Uptime for the Virtual Server instance (returned in seconds)
  • 2) The Operating System platform
  • 3) The number of CPUs
  • 4) The CPU Speed

The following Listings provide code samples in VBScript, VisualBasic.NET and C# formats, respectively.

Set objVirtualServer = CreateObject(“VirtualServer.Application”)

Set objHostInfo = objVirtualServer.HostInfo

‘Generate the output string

Output = “Uptime (sec): ” & objVirtualServer.Uptime

Output = Output & vbCrLf & “Host OS: ” & objHostInfo.OperatingSystem

Output = Output & vbCrLf & “# of CPUs: ” & objHostInfo.PhysicalProcessorCount

Output = Output & vbCrLf & “CPU Speed: ” & objHostInfo.ProcessorSpeedString

WScript.Echo Output

Listing 1: Getting Virtual Server Host Info using VBScript

Imports Microsoft.VirtualServer.Interop

Namespace SearchServerVirtualization_VB

Public Class Listing_2

Public Shared Function GetHostInfo() As String

Dim objVirtualServer As New VMVirtualServer

Dim Output As String = “”

Output = “Uptime (sec): ” & objVirtualServer.UpTime.ToString

Output &= vbCrLf & “Host OS: ” & objVirtualServer.HostInfo.OperatingSystem.ToString

Output &= vbCrLf & “# of CPUs: ” & objVirtualServer.HostInfo.PhysicalProcessorCount.ToString

Output &= vbCrLf & “CPU Speed: ” & objVirtualServer.HostInfo.ProcessorSpeedString

Return Output

End Function

End Class

End Namespace

Listing 2: Getting Virtual Server Host Info using VB.NET

using Microsoft.VirtualServer.Interop;

namespace SearchServerVirtualization_CSharp

{

namespace ScriptingVirtualServer

{

public class Listing_3

{

public static string GetHostInfo()

{

VMVirtualServer objVirtualServer = new VMVirtualServer();

string Output = “”;

Output = “Uptime (sec): ” + objVirtualServer.UpTime.ToString();

Output += “\r\n” + “Host OS: ” + objVirtualServer.HostInfo.OperatingSystem.ToString();

Output += “\r\n” + “# of CPUs: ” + objVirtualServer.HostInfo.PhysicalProcessorCount.ToString();

Output += “\r\n” + “CPU Speed: ” + objVirtualServer.HostInfo.ProcessorSpeedString;

return Output;

}

}

}

}

Listing 3: Getting Virtual Server Host Info using C#

Coming up next…

Covering details of the Virtual Server object paves the way for the focus of my next article: creating and managing virtual machines. Stay tuned!

Automating Virtual Server, Part 2: Automating Virtual Server Using .NET

This article was first published on SearchServerVirtualization.TechTarget.com.

The .NET Advantage

In the first article in this series, Automating Virtual Server Using VBScript, I provided an overview of Virtual Server’s COM API. If you’re unfamiliar with the object model, I recommend you read that article before continuing with this one. To get started quickly, I presented examples in VBScript format. While this was a simple way to get started, many developers and systems administrators will want to use the features of a type-safe, compiled language for their production automation needs. In this article, I’ll walk through the process of getting started with Virtual Server’s COM API using Visual Studio .NET. And, I’ll provide code samples in both C# and Visual Basic.NET.

Creating a .NET Application

In order to make the most of the topics in this article, you’ll need to be familiar with developing simple .NET applications using Visual Studio. If you don’t consider yourself at least a closet developer, I recommend you stick with using VBScript (at least to being with). If you’d like more information about Microsoft’s .NET development technologies, a great starting place is the Microsoft Developer Network (MSDN) .NET site at http://msdn.microsoft.com/net.

There’s one important requirement that you’ll need to keep in mind when automating Virtual Server using .NET: You must have your COM security settings configured so that your applications will be able to access either the local instance of Virtual Server, or an instance running on another computer. Details related to doing this programmatically are covered in the Virtual Server Programmer’s Guide (a help file that’s automatically installed with Virtual Server). While you’re there, be sure to read details related to threading recommendations.

OK, now that we have the preliminary information out of the way, let’s get started by looking at code that can be using in a C# or VB.NET application. These examples can be used in any type of .NET application, including Windows Forms applications, ASP.NET web applications, command-line applications, and Windows Services.

Checking Your References

Once you’ve created a new .NET project, you’ll need to add a reference to the Virtual Server 2005 R2 Type Library. If you’re using Visual Studio, you can easily to this by clicking on Project à Add Reference, and then selecting the COM tab (see Figure 1). As long as Virtual Server is installed and registered on the local machine, you should see the type library listed.

image

Figure 1: Adding a reference to the “Virtual Server 2005 R2 Type Library” COM object.

Since the type library is a COM object (as opposed to a .NET-based “managed code” object), Visual Studio will automatically create a COM interoperability layer. The bottom line is that you’ll now be able to access the API by adding one of the following lines to your source code (I’ll use the convention of presenting Visual Basic.NET code samples first, followed by C#):

Imports Microsoft.VirtualServer.Interop ‘Visual Basic Example

using Microsoft.VirtualServer.Interop; ‘ C# Example

Connecting to Virtual Server

Most commonly, you’ll start writing your code by creating a Virtual Server object. Here are some code samples for connecting to the local instance of the Virtual Server service:

‘ Visual Basic Example

Dim objVirtualServer As VMVirtualServer

objVirtualServer = New VMVirtualServer

‘C# Example

VMVirtualServer objVirtualServer;

objVirtualServer = new VMVirtualServer();

You’re now free to start working with the properties and methods of the Virtual Server object. To get more details (as well as details about connecting to remote instances of Virtual Server), see the Virtual Server Programmer’s Guide.

Working with Virtual Machines

The most common next step in typical Virtual Server automation code will be to create an object that references a specific virtual machine. This process is easy enough and can be done in a couple of different ways. First, if you know the name of the VM for which you want to create an object, you can simply use the .FindVirtualMachine() method of the Virtual Server object that you’ve created (just provide the name of the VM as a string argument).

If you want to loop through all of the VMs on a particular instance of Virtual Server, you can simply iterate through the .VirtualMachines collection (a property of the Virtual Server object itself). One item will be returned for each VM that is attached to the host. Once you have a reference to a particular VM, you can access properties of the VM object to get and set properties such as the amount of physical memory that’s allocated. And, you can use methods to perform operations such as starting and stopping VMs, and adding and removing virtual hardware. We’ll focus on those topics in later articles in this series.

Looking to the Future

So far, we’ve focused on the first steps that are required to get started with building a basic Virtual Server automation application using .NET. Just as a quick example, the process for building a Windows forms application that performs some of the same operations as Virtual Server’s built-in admin tools can be quick and easy. While it’s not exactly a state-of-the-art example of coding finesse, I created a simple but functional demonstration application (shown in Figure 2) in under an hour. And, I chose not to use my favorite .NET language (I’ll let you guess which one that is).

image

Figure 2: A simple Virtual Server automation application.

The total functional portion of the source code is somewhere around 200 lines (you can download the Visual Studio project from my web site at http://AnilDesai.net). Note that the source code is provided as-is, and it’s only provided as an example – it most certainly isn’t production-quality code.

Update: You can now download the source code directly using the following link: VirtualServerTestApp (Anil Desai).  The file includes a zip file with a Visual Studio 2008 project.  Be sure to see the earlier posts in this series to determine the pre-requisites for running the application.

Building on the Foundation

In this and the previous article, I’ve set the stage for performing more useful tasks. You should now have the ability to connect to an instance of Virtual Server and to create an object for a virtual machine. In the next several articles, I’ll provide details for managing virtual machines, working with virtual hard disks, and configuring virtual networks. We’re just getting warmed up, so stay tuned!

Automating Virtual Server, Part 1: Automating Virtual Server Using VBScript

This article was first published on SearchServerVirtualization.TechTarget.com.

Series Introduction

Among the many benefits of deploying virtualization technology is the ability to better manage complex environments. When implemented correctly, it’s often easier to manage virtual machines than it is to keep track of physical ones. But what happens when you end up with a large number of VMs. Organizations that start by dabbling in virtualization often find that the number of virtualization hosts and guest OS’s can quickly get out-of-hand. Add to that the fact that virtualization management tools are still evolving, and you can end up with quite a challenge for systems administrators.

When dealing with physical servers, many IT pros and end-users have found ways to use automated methods of handling otherwise tedious tasks. For example, performing backups and deploying operating system updates are generally done manually in only the smallest of environments.

When it comes managing Microsoft Virtual Server VMs, there’s a readily available method for automation. In this series of articles, Automating Virtual Server, I’ll present details and examples of how you can programmatically manage your VMs. Code samples will be provided in VBScript, Visual Basic .NET, and C# syntax. Some experience with scripting and application development is assumed, but I’ll provide links to relevant information if you need to get up to speed. Overall, I think you’ll find that the process is fairly easy and straight-forward.

Automating Virtualization

If you’re a systems administrator or developer that’s faced with managing a large number of virtual machines, there’s a good chance that you find yourself wishing for a robot that could handle some of the more mundane tasks. While building such a device is more than could be covered in a single article, the focus here is to demonstrate how you can create scripts for performing routine tasks in Virtual Server. We’ll begin by using the VBScript language in this article, since it’s the easiest way to get up and running. In later articles, I’ll provide code samples in .NET languages (C# and Visual Basic.NET).

Virtual Server’s COM API

One of the built-in features of Microsoft Virtual Server is a fully-documented Component Object Model (COM) API. By connecting to this API, you can perform pretty much any task that can be carried out manually using Virtual Server’s built-in tools. In fact, the Virtual Server Administration Web Site itself is simply a web-based user interface that connects to the COM API behind the scenes.

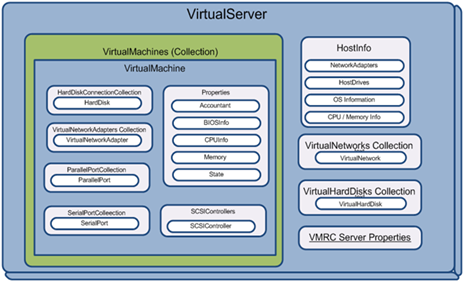
The basic structure of the COM API is based on collections. Figure 1 provides an overview of the some of the most commonly-used ones. The figure is not a complete object model, and the full details can be found in the Virtual Server Programmer’s Guide (a help file that’s automatically installed with the product). The Programmer’s Guide includes details about all of the objects that are available, along with a list of properties, methods and enumeration constants. If you’re doing more than basic scripting, you’ll probably find yourself referring to that file often.

image

Figure 1: An overview of the Virtual Server COM object model

Getting Started with VBScript

It’s beyond the scope of this article to cover the details of the VBScript language. If you’re not familiar with it, some good starting points for more information are the Microsoft Developer Network (MSDN) Scripting site (http://msdn.microsoft.com/scripting) and the Microsoft TechNet Script Center (http://www.microsoft.com/technet/scriptcenter).

VBScript is based on the Visual Basic language syntax, and it’s a very simple language for getting started with automation. The language is not case-sensitive and it provides for automatic data type conversions. These are two “features” that can help get you up and running quickly (though they’re not good practices when writing production applications).

Another advantage of writing VBScript code is that there’s no requirement for a development environment: Just use your favorite text editor. In most cases, you can copy and paste the code in this article and use it directly on a Windows computer that’s running Virtual Server. OK, let’s get started.

Connecting to Virtual Server

Generally, the first programmatic step you’ll take when creating a new VBScript file for automating Virtual Server is to create a new object that attaches to the COM API. The following statement takes care of this:

Set objVirtualServer = CreateObject(“VirtualServer.Application”)

As long as the Virtual Server product is installed on the local computer, this script should run as-is. By default, this will connect to the instance of Virtual Server that is running on the local machine. If you want to connect to an instance of Virtual Server that’s running on a remote computer, you can use a link such as the following:

Set objVirtualServer = CreateObject(“VirtualServer.Application”,”RemoteServerName”)

Note that you’ll need to have the appropriate security settings and configuration to be able to remotely connect to a COM object (you can get details on these topics using the links provided earlier).

Let’s prove that everything’s working by adding the following two lines to get some information about the local Virtual Server instance:

WScript.Echo “Server Name: “ & objVirtualServer.Name

WScript.Echo “Server Uptime (sec): “ & objVirtualServer.Uptime

Now, the script will output the name of the instance (which should be the same as the machine name), along with the number of seconds that the Virtual Server service has been running. We did this by accessing properties of our “objVirtualServer” object. You can use other methods and properties of the Virtual Server object to perform tasks such as programmatically creating virtual hard disks and changing server settings.

Working with Virtual Machines

Many of the most useful scripts you’ll write will for performing tasks with Virtual Server VMs. You do this by creating a virtual machine object and then setting it equal to a particular VM. If you know the name of a particular VM, you can use the following syntax:

Set objVirtualServer = CreateObject(“VirtualServer.Application”)

objVirtualMachine = objVirtualServer.FindVirtualMachine(“Windows XP SP2”)

First, you create a Virtual Server object (as we did in the previous section), and then you use its find method to create a virtual machine object. What if you don’t know the name of the VM you want to access? You can easily loop through the VMs in the Virtual Server object’s “VirtualMachines” collection. Here’s a sample that outputs the name of each VM on the server:

Set objVirtualServer = CreateObject(“VirtualServer.Application”)

For Each objVirtualMachine in objVirtualServer.VirtualMachines

WScript.Echo(“Name of VM: “) & objVirtualMachine.Name

Next

Once you have a “handle” to a virtual machine, you can access and modify its properties. One commonly-used function is to determine the amount of memory attached to a VM:

WScript.Echo “VM Memory: “ & objVirtualMachine.Memory

Of course, you can perform useful tasks like starting or stopping the VM and managing the virtual hardware configuration (those are topics that we’ll cover in later articles in this series).

The End of the Beginning

In this article, I provided a few simple lines of VBScript code that allowed you to connect to Virtual Server and to work with VMs. Admittedly, we haven’t done anything that’s useful in a practical sense just yet. The goal of this article was to lay the foundation for getting started with automation. Next in the series: Automating Virtual Server using .NET.

Optimizing Microsoft Virtual Server, Part 6: Optimizing Network Performance

This article was first published on SearchServerVirtualization.TechTarget.com.

It’s rare these days to encounter computers or applications that don’t in some way rely on a network connection. General networking principals apply to virtual machines just as they apply to physical ones. But, since the host’s network adapters will be providing resources for all VMs, there are some special considerations, as well. In this article, I’ll present some ways in which you can design networks with virtualization performance in mind.

Note: For an introduction to working with Virtual Server’s networking options, see Configuring Virtual Networks in Virtual Server – Microsoft Virtual Server from the Ground Up.

Managing Host Network Adapters

When multiple VMs perform network-intensive operations, the host’s network adapter can become a bottleneck. In the simplest network configuration, a Virtual Server host computer will have only physical network port. While this system will allow you to share the network adapter with VMs, you can add some security and manageability by adding a second network port. Figure 1 shows an example. Since it’s a good idea to isolate network traffic (for security and performance reasons), you can choose to place all VMs on a separate Virtual LAN (VLAN) on your switch.

image

Figure 1: Using multiple host network adapters.

Since Virtual Server allows you to connect up to four virtual NICs per VM, you can add additional physical network connections, as needed.

Using the Virtual DHCP Server

Virtual Server’s built-in DHCP Server can be enabled for virtual networks and can help you create logically-separate networks on the same physical network segments. Through the use of differing IP address ranges, this technique can help segregate network traffic without requiring the configuration of VLANs or other devices on your switches. Figure 2 shows an example of a potential configuration.

image

Figure 2: Using DHCP to logically isolate network traffic.

Using NIC Teaming

The concept of NIC teaming is to allow multiple network ports to act as one logical unit. There are two main goals. The first is automatic fail-over. If one of the connections becomes unavailable (due to a port or switch failure), the other port can seamlessly take over the load. The other goal is performance: Having multiple ports working together in a group can increase effective bandwidth. Keep in mind that some configurations will depend on support from the network infrastructure-side (for example, port grouping options on switches).

Other network adapter optimizations include changing the default TCP packet size. If you’ll be routinely transferring large files (such as VHDs) between servers, using Jumbo Frames can greatly reduce overhead and increase performance.

Virtual Server and Firewalls

It usually goes without saying that firewalls and port-level filters provide an important layer of defense for Virtual Server hosts and VMs. Theoretically, if an unauthorized user gained access to your Virtual Server host, she could gain access to the VMs themselves. If you want to place a firewall between Virtual Server and potential users, you’ll need to keep in mind which ports you might need to open to make various services available (see Figure 3).

image

Figure 3: TCP Ports used by various Virtual Server-related services

Monitoring Network-Related Performance

When planning for virtualization network configurations, it can be useful to get statistics about traffic traversing the host and guest interfaces. Figure 4 provides an example of statistics that can be collecting using Windows System Monitor. When measured at the host level, you can get an aggregate summary of how much bandwidth is being used and if there’s an outbound queue. To drill-down on the source of the network information, each guest OS can be monitored. You can further filter the details per network adapter.

image

Figure 4: Network performance counters of the “Network Interface” object

Summary

There are many different ways in which you can configure networks to better support virtual machines. We looked at methods for segmenting traffic, increasing throughput, configuring firewalls, and monitoring network statistics. All of this can help optimize network performance in virtualized environments of any size.