Archive for category Microsoft Virtual Server

The State of Microsoft Virtual Server (MSVS)

When new technology comes out, IT people often tend to discard the old (or, sometimes, begrudgingly live with it).  Sometimes, however, older solutions are perfectly useful for certain purposes.  I recently wrote an article for TechTarget’s SearchServerVirtualization.com web site that focuses on the superceded-but-still-relevant Microsoft Virtual Server.  From the article’s introduction:

We techies tend to look forward to new technology with good reason. In most cases, new products and services improve upon old technology. But migration in production environments can be slow. So what about existing technology? A good case in point is Microsoft Virtual Server 2005 R2 SP1 (MSVS). MSVS is available for free and is a perfectly viable option for many environments. In this tip, I’ll look at when, where and why you might want to use MSVS rather than its newer replacement, Hyper-V.

You can read the entire article for free: See Microsoft Virtual Server still viable management option.

Migrating from MSVS to Hyper-V

With the official release of Microsoft’s Hyper-V, I’ll bet that many systems administrators are weighing their options for moving existing VMs to their platform.  Fortunately, there are several approaches that will work, each with it’s own blend of pros and cons.  My recent SearchServerVirtualization.com article, Migrating from Microsoft Virtual Server to Hyper-V covers the details.  From the article:

Birds have the right idea: Why not move to where the weather’s better? Sure, it takes a lot of time, effort and energy to cross entire continents, but the trip is often worth it. The same can be said of platform migrations, as technical advantages may come with potential difficulties. Now that Microsoft’s Hyper-V is finally available as an official, fully-supported platform on Windows Server 2008, many IT managers might be thinking about migration.

If you’ve been standing on the sidelines waiting for the official release of Hyper-V, you no longer have any excuses for waiting to at least deploy it in a test environment. If you’ve been working with the beta and release candidate versions, you’re probably ready to deploy some production virtual machines (VMs) with Microsoft’s latest virtualization product. If your data center environment has an existing investment in Microsoft Virtual Server (MSVS) 2005, this article will help you decide why and how you might want to migrate.

Assuming to decide to make the move, the general process is fairly painless (even if you choose to do it completely manually).  Such is the price of keeping up with technology, and I think most administrators will find that they’re much happier after the move to Hyper-V.

Managing Virtualization with System Center Virtual Machine Manager

If you have used the Microsoft Virtual Server 2005 platform, there’s a good chance that you find its default web-based management tools to be lacking.  If you’re running one or a few virtualization host servers, the admin tools can certainly get the job done.  But what if you’re deploying dozens or hundreds of VMs every month.  In order to manage these systems, you’ll need to invest in some virtualization-aware software.  Microsoft’s System Center Virtual Machine Manager (SCVMM) is one such product.

If you have even heard of the product, you might be wondering about its capabilities, its architecture, and how you can get started with it.  The January, 2008 issue of Microsoft TechNet Magazine includes an article titled Real Control with Virtual Machine Manager 2007.   From the article’s introduction:

System Center Virtual Machine Manager 2007 is a new solution that provides a consolidated interface for managing your entire virtual infrastructure. Virtual Machine Manager (VMM) can manage existing Microsoft® Virtual Server 2005 installations, and it can also install Virtual Server 2005 R2 SP1 on new virtual machine (VM) hosts. With VMM, the traditional Virtual Server 2005 administrative tasks can now be performed far more efficiently through a centralized interface, with management access across multiple Virtual Server installations.

In addition, VMM brings new capabilities to Virtual Server, including Physical-to-Virtual (P2V) conversions, Virtual-to-Virtual (V2V) conversion of VMware Virtual Machine Disk Format (VMDK) disks to Virtual Server Virtual Hard Disks (VHDs), and rapid VM deployments from templates and pre-configured VHDs via a centralized library of virtual infrastructure objects.

In the following pages, I’ll explore VMM and the powerful set of features it provides to IT administrators. I will then look at the requirements and steps for creating a VMM installation. Finally, I’ll take a deeper dive into a handful of the more exciting features of VMM and leave you with some helpful tips on getting started.

Microsoft is fairly ambitious with the SCVMM product.  In addition to its current features, future updates will be able to manage VMware and Microsoft’s Hyper-V technology (the new virtualization layer that will be included with Windows Server 2008).  See the article and Microsoft’s site for more details.

Microsoft Infrastructure Planning and Design (IPD) Guides Available

I recently worked with Microsoft’s Solution Accelerator team to develop a guide to designing an infrastructure to support Microsoft’s virtualization solutions.  Unlike much of the other technical information that is available online, this series focuses on the design aspect of managing technology, rather than on implementation details.  From the web site:

Infrastructure Planning and Design guides share a common structure, including:

  • Definition of the technical decision flow through the planning process.
  • Listing of decisions to be made and the commonly available options and considerations.
  • Relating the decisions and options to the business in terms of cost, complexity, and other characteristics.
  • Framing decisions in terms of additional questions to the business to ensure a comprehensive alignment with the appropriate business landscape.

These guides complement product documentation by focusing on infrastructure design options.

Each guide leads the reader through critical infrastructure design decisions, in the appropriate order, evaluating the available options for each decision against its impact on critical characteristics of the infrastructure. The IPD Series highlights when service and infrastructure goals should be validated with the organization and provides additional questions that should be asked of service stakeholders and decision makers.

You can download the files from the Infrastructure Planning and Design page (registration is optional).  The content includes the following downloads:

  • IPD Series Introduction: A brief introduction to the series and its approach.
  • Select the Right Virtualization Solution: This guide includes an overview of Microsoft’s virtualization products and technologies.  The package includes a flowchart that can be helpful in deciding how to select from among Microsoft Virtual Server 2005, Microsoft Virtual PC, Microsoft Terminal Services, Microsoft SoftGrid, and the newly-announced Hyper-V (available with Windows Server 2008).
  • Windows Server Virtualization: This guide covers details on Windows Server Virtualization (WSv, now officially "Hyper-V") and Microsoft Virtual Server.  It includes a document and slides that cover the process of selecting which workloads to virtualize.  The guide then walks through the process of translating virtual machine requirements to host infrastructure requirements.
  • SoftGrid Application Virtualization: This guide focuses on SoftGrid – recently renamed to Microsoft Application Virtualization.  It covers best practices for designing an infrastructure for simplified application deployment and maintenance.

All downloads include files in Office 2003 and Office 2007 formats and are ready for use in your own presentations or proposals.  More guides will be available in the near future, and you should be able to access beta versions of upcoming guides at Microsoft Connect.  I hope you find the content to be useful!

Automating Virtual Server, Part 4: Creating and Managing VMs

This article was first published on SearchServerVirtualization.TechTarget.com.

If you’ve been following along with my series on “Automating Virtual Server” so far, you’re familiar with the process of connecting to an instance of Virtual Server and accessing a virtual machine object (either by name or by looping through a collection of all VMs on the server). I provided examples of code in VBScript, Visual Basic .NET, and C#. In this article, I’ll walk through the process of creating new VMs, and managing some basic VM properties.

Creating a new VM

Since the point of virtualization is to run VMs, it should come as no surprise that the Virtual Server object contains a collection of virtual machines. Let’s walk through the most common operations related to working with VMs. When writing code, you’ll generally first create an instance of a Virtual Server host object by connecting to the host. To create a new VM, you can use the following method:

.CreateVirtualMachine(configurationName, configurationPath)

You need only provide two arguments to this method:

  • configurationName: A string value that specifies the logical name of the new virtual machine. The name must be unique on each instance of Virtual Server, so it’s a good idea to check the .VirtualMachines collection for potential conflicts. Note that this name will also be used to create the default filenames of the VM.
  • configurationPath: A string that specifies the full path to the host folder into which the new VM files will be placed. It’s a good idea to test that the Virtual Server service can access this path. If the specific folder does not exist, the Virtual Server COM API will create it automatically.

It’s important to keep in mind that different instances of Virtual Server might have different configuration settings. Remember that you can get information about default paths and search paths by using properties of the Virtual Server object.

Deleting a Virtual Machine

From time to time, it will be necessary to delete a virtual machine and its associated files. The code requires a call to a method of the Virtual Server object:

.DeleteVirtualMachine(VirtualMachineObject)

The argument here is actually a virtual machine object. So, your code will need to get an instance of a VM object by looping through the .VirtualMachines collection or by finding it by name. There’s one important warning: Calling this method will actually result in the deletion of the relevant virtual machine configuration (.vmc) file, along with any undo disks or saved state files. Use with caution!

Registering VMs

Adding and removing virtual machines from the Virtual Server instance is also a simple process. Registration involves pointing Virtual Server to an existing virtual machine configuration (.vmc) file. Virtual Server will try to enumerate the virtual hard disks and other properties stored in that file and add the VM with a given name. The method call is:

.RegisterVirtualMachine(configurationName, configurationPath)

Note that the syntax is similar to the of creating a new VM – you need to provide the logical name that will be used for the VM, along with the full path and filename of the .vmc file.

Unregistering VMs

If you want to remove a virtual machine from Virtual Server without deleting the associated files, you can use this method:

objVirtualServer.UnregisterVirtualMachine(VirtualMachineObject)

As with deleting virtual machines, you need to provide an instance of a virtual machine object. This method is handy when you want to move or copy a virtual machine to another server.

Code Examples: Managing Virtual Machines

So far, we’ve looked at some pseudo-code that shows you how to perform common operations related to adding and removing VMs. Now, let’s look at specific working examples. The following code will perform these steps:

  • 1) Create a new VM called “VSAutomation”. The files will be stored in “C:\VM\VSAutomation” (note that you’ll most likely want to change this path if you plan to run the code yourself).
  • 2) Unregister this VM from the Virtual Server installation.
  • 3) Copy all VM-related files to a new folder: VSAutomation2.
  • 4) Register the new VM in Virtual Server under the logical name “VSAutomation2”.

Here are the code samples in VBScript, Visual Basic .NET and C# formats, respectively:

Set objVirtualServer = CreateObject(“VirtualServer.Application”)

‘Create a new VM named “VSAutomation ”

objVirtualServer.CreateVirtualMachine “VSAutomation”, “C:\VM\VSAutomation”

‘Get a Virtual Machine object

Set objVirtualMachine = objVirtualServer.FindVirtualMachine(“VSAutomation”)

‘Unregister the new VM

objVirtualServer.UnregisterVirtualMachine(objVirtualMachine)

‘Copy the Virtual Machine files to the folder “VSAutomation2”

Set objFSO = CreateObject(“Scripting.FileSystemObject”)

objFSO.CopyFolder “C:\VM\VSAutomation”, “C:\VM\VSAutomation2”, OverWriteFiles

‘Register the new copy of the virtual machine

objVirtualServer.RegisterVirtualMachine “VSAutomation2”, “C:\VM\VSAutomation2”

WScript.Echo “Operation complete.”

Listing 1: Managing Virtual Machines using VBScript

Imports Microsoft.VirtualServer.Interop

Namespace SearchServerVirtualization_VB

Public Class Listing_2

Public Shared Function ManageVirtualMachines() As String

Dim objVirtualServer As New VMVirtualServer

‘Create a new VM named “VSAutomation”

objVirtualServer.CreateVirtualMachine(“VSAutomation”, ” C:\VM\VSAutomation”)

‘Get a Virtual Machine object

Dim objVirtualMachine As VMVirtualMachine

objVirtualMachine = objVirtualServer.FindVirtualMachine(“VSAutomation”)

‘Unregister the new VM

objVirtualServer.UnregisterVirtualMachine(objVirtualMachine)

‘Copy the Virtual Machine files to the folder “Test-Copy”

My.Computer.FileSystem.CopyDirectory(“C:\VM\VSAutomation”, “C:\VM\VSAutomation2”)

‘Register the new copy of the virtual machine

objVirtualServer.RegisterVirtualMachine(“VSAutomation2”, “C:\VM\VSAutomation2”)

Return “Operation complete.”

End Function

End Class

End Namespace

Listing 2: Managing Virtual Machines using VB.NET

using Microsoft.VirtualServer.Interop;

namespace SearchServerVirtualization_CSharp

{

namespace ScriptingVirtualServer

{

public class Listing_3

{

public static string ManageVirtualMachines()

{

VMVirtualServer objVirtualServer = new VMVirtualServer();

//Create a new VM named “VSAutomation”

objVirtualServer.CreateVirtualMachine(“VSAutomation”, @”C:\VM\VSAutomation”);

//Get a Virtual Machine object

VMVirtualMachine objVirtualMachine;

objVirtualMachine = objVirtualServer.FindVirtualMachine(“VSAutomation”);

//Unregister the new VM

objVirtualServer.UnregisterVirtualMachine(objVirtualMachine);

//Create a new folder called “Test-Copy” and move the .vmc file

System.IO.Directory.CreateDirectory(@”C:\VM\VSAutomation2″);

System.IO.File.Move(@”C:\VM\VSAutomation\VSAutomation.vmc”, @” C:\VM\VSAutomation2\VSAutomation2.vmc “);

//Register the new copy of the virtual machine

objVirtualServer.RegisterVirtualMachine(“VSAutomation”, @”C:\VM\VSAutomation2\VSAutomation2.vmc “);

return “Operation complete.”;

}

}

}

}

Listing 3: Managing Virtual Machines using C#

Summary

In this article, I walked through details related to creating new VMs and managing VM registration in Virtual Server. It only takes a little imagination to see how the code samples could be used to programmatically move and copy VMs between installations of Virtual Server. While I left out important aspects such as error-handling, logging, security-checking, and other details, this should serve as a great foundation for performing useful automation tasks.

In the next article in this series, I’ll provide details about how you can work with VMs, including diving down into their virtual hardware configurations. Stay tuned!
Automating Virtual Server, Part 3: Configuring the Virtual Server Service

This article was first published on SearchServerVirtualization.TechTarget.com.

In the first two articles in this series on “Automating Virtual Server”, I presented details on connecting to an instance of Virtual Server using its COM API. The first focused on accomplishing this using VBScript, and the second focused on using .NET (Visual Basic .NET and C#). The articles stopped a little short of doing anything useful once you’ve connected to a Virtual Server instance. So, that’s where I’ll resume. In this article, I’ll present ways in which you can programmatically manage properties and details related to the Virtual Server service itself.

The Virtual Server Object

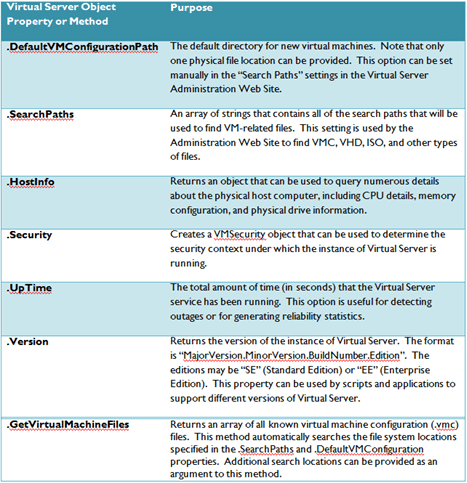
Understanding the relationships between the major objects and collections is an important first step when working with the Virtual Server COM API. The Virtual Server object represents the host computer’s virtualization service. It contains properties and methods related to the configuration of the virtualization layer. Table 1 provides some examples of commonly-used properties.

image

Table 1: Commonly-used properties of the Virtual Server object

If you’re writing script or application code, these properties can be very helpful. For example, you might want to determine the default path into which a new VM would be placed (which returned by the .DefaultVMConfigurationPath property). Or, you might want to reference the .Version property so you can execute different sections of code based on the specific version of the Virtual Server platform that’s running on the system. Finally, the .GetVirtualMachineFiles method allows you to take a quick inventory of all of the VM-related files that are available within the default search paths.

Getting Host Details

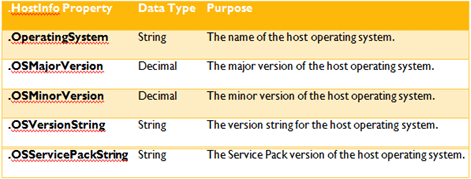
When programmatically working with Virtual Server, it’s important to keep track of the details of the platform you’re managing. One particularly useful collection for returning these details is the .HostInfo property of a Virtual Server object. Table 2 provides a listing of the information you can obtain.

image

Table 2: Properties of the .HostInfo collection

Code Examples: Getting Host Information

Now that we have an understanding of what information is available, let’s write some simple code that will return the following:

  • 1) Total Uptime for the Virtual Server instance (returned in seconds)
  • 2) The Operating System platform
  • 3) The number of CPUs
  • 4) The CPU Speed

The following Listings provide code samples in VBScript, VisualBasic.NET and C# formats, respectively.

Set objVirtualServer = CreateObject(“VirtualServer.Application”)

Set objHostInfo = objVirtualServer.HostInfo

‘Generate the output string

Output = “Uptime (sec): ” & objVirtualServer.Uptime

Output = Output & vbCrLf & “Host OS: ” & objHostInfo.OperatingSystem

Output = Output & vbCrLf & “# of CPUs: ” & objHostInfo.PhysicalProcessorCount

Output = Output & vbCrLf & “CPU Speed: ” & objHostInfo.ProcessorSpeedString

WScript.Echo Output

Listing 1: Getting Virtual Server Host Info using VBScript

Imports Microsoft.VirtualServer.Interop

Namespace SearchServerVirtualization_VB

Public Class Listing_2

Public Shared Function GetHostInfo() As String

Dim objVirtualServer As New VMVirtualServer

Dim Output As String = “”

Output = “Uptime (sec): ” & objVirtualServer.UpTime.ToString

Output &= vbCrLf & “Host OS: ” & objVirtualServer.HostInfo.OperatingSystem.ToString

Output &= vbCrLf & “# of CPUs: ” & objVirtualServer.HostInfo.PhysicalProcessorCount.ToString

Output &= vbCrLf & “CPU Speed: ” & objVirtualServer.HostInfo.ProcessorSpeedString

Return Output

End Function

End Class

End Namespace

Listing 2: Getting Virtual Server Host Info using VB.NET

using Microsoft.VirtualServer.Interop;

namespace SearchServerVirtualization_CSharp

{

namespace ScriptingVirtualServer

{

public class Listing_3

{

public static string GetHostInfo()

{

VMVirtualServer objVirtualServer = new VMVirtualServer();

string Output = “”;

Output = “Uptime (sec): ” + objVirtualServer.UpTime.ToString();

Output += “\r\n” + “Host OS: ” + objVirtualServer.HostInfo.OperatingSystem.ToString();

Output += “\r\n” + “# of CPUs: ” + objVirtualServer.HostInfo.PhysicalProcessorCount.ToString();

Output += “\r\n” + “CPU Speed: ” + objVirtualServer.HostInfo.ProcessorSpeedString;

return Output;

}

}

}

}

Listing 3: Getting Virtual Server Host Info using C#

Coming up next…

Covering details of the Virtual Server object paves the way for the focus of my next article: creating and managing virtual machines. Stay tuned!

Automating Virtual Server, Part 2: Automating Virtual Server Using .NET

This article was first published on SearchServerVirtualization.TechTarget.com.

The .NET Advantage

In the first article in this series, Automating Virtual Server Using VBScript, I provided an overview of Virtual Server’s COM API. If you’re unfamiliar with the object model, I recommend you read that article before continuing with this one. To get started quickly, I presented examples in VBScript format. While this was a simple way to get started, many developers and systems administrators will want to use the features of a type-safe, compiled language for their production automation needs. In this article, I’ll walk through the process of getting started with Virtual Server’s COM API using Visual Studio .NET. And, I’ll provide code samples in both C# and Visual Basic.NET.

Creating a .NET Application

In order to make the most of the topics in this article, you’ll need to be familiar with developing simple .NET applications using Visual Studio. If you don’t consider yourself at least a closet developer, I recommend you stick with using VBScript (at least to being with). If you’d like more information about Microsoft’s .NET development technologies, a great starting place is the Microsoft Developer Network (MSDN) .NET site at http://msdn.microsoft.com/net.

There’s one important requirement that you’ll need to keep in mind when automating Virtual Server using .NET: You must have your COM security settings configured so that your applications will be able to access either the local instance of Virtual Server, or an instance running on another computer. Details related to doing this programmatically are covered in the Virtual Server Programmer’s Guide (a help file that’s automatically installed with Virtual Server). While you’re there, be sure to read details related to threading recommendations.

OK, now that we have the preliminary information out of the way, let’s get started by looking at code that can be using in a C# or VB.NET application. These examples can be used in any type of .NET application, including Windows Forms applications, ASP.NET web applications, command-line applications, and Windows Services.

Checking Your References

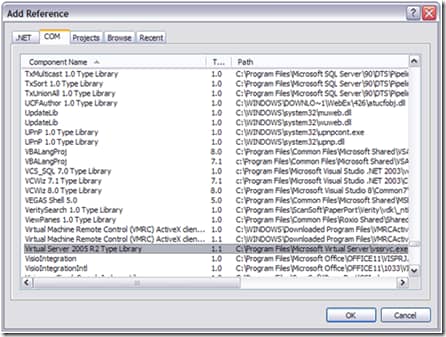
Once you’ve created a new .NET project, you’ll need to add a reference to the Virtual Server 2005 R2 Type Library. If you’re using Visual Studio, you can easily to this by clicking on Project à Add Reference, and then selecting the COM tab (see Figure 1). As long as Virtual Server is installed and registered on the local machine, you should see the type library listed.

image

Figure 1: Adding a reference to the “Virtual Server 2005 R2 Type Library” COM object.

Since the type library is a COM object (as opposed to a .NET-based “managed code” object), Visual Studio will automatically create a COM interoperability layer. The bottom line is that you’ll now be able to access the API by adding one of the following lines to your source code (I’ll use the convention of presenting Visual Basic.NET code samples first, followed by C#):

Imports Microsoft.VirtualServer.Interop ‘Visual Basic Example

using Microsoft.VirtualServer.Interop; ‘ C# Example

Connecting to Virtual Server

Most commonly, you’ll start writing your code by creating a Virtual Server object. Here are some code samples for connecting to the local instance of the Virtual Server service:

‘ Visual Basic Example

Dim objVirtualServer As VMVirtualServer

objVirtualServer = New VMVirtualServer

‘C# Example

VMVirtualServer objVirtualServer;

objVirtualServer = new VMVirtualServer();

You’re now free to start working with the properties and methods of the Virtual Server object. To get more details (as well as details about connecting to remote instances of Virtual Server), see the Virtual Server Programmer’s Guide.

Working with Virtual Machines

The most common next step in typical Virtual Server automation code will be to create an object that references a specific virtual machine. This process is easy enough and can be done in a couple of different ways. First, if you know the name of the VM for which you want to create an object, you can simply use the .FindVirtualMachine() method of the Virtual Server object that you’ve created (just provide the name of the VM as a string argument).

If you want to loop through all of the VMs on a particular instance of Virtual Server, you can simply iterate through the .VirtualMachines collection (a property of the Virtual Server object itself). One item will be returned for each VM that is attached to the host. Once you have a reference to a particular VM, you can access properties of the VM object to get and set properties such as the amount of physical memory that’s allocated. And, you can use methods to perform operations such as starting and stopping VMs, and adding and removing virtual hardware. We’ll focus on those topics in later articles in this series.

Looking to the Future

So far, we’ve focused on the first steps that are required to get started with building a basic Virtual Server automation application using .NET. Just as a quick example, the process for building a Windows forms application that performs some of the same operations as Virtual Server’s built-in admin tools can be quick and easy. While it’s not exactly a state-of-the-art example of coding finesse, I created a simple but functional demonstration application (shown in Figure 2) in under an hour. And, I chose not to use my favorite .NET language (I’ll let you guess which one that is).

image

Figure 2: A simple Virtual Server automation application.

The total functional portion of the source code is somewhere around 200 lines (you can download the Visual Studio project from my web site at http://AnilDesai.net). Note that the source code is provided as-is, and it’s only provided as an example – it most certainly isn’t production-quality code.

Update: You can now download the source code directly using the following link: VirtualServerTestApp (Anil Desai).  The file includes a zip file with a Visual Studio 2008 project.  Be sure to see the earlier posts in this series to determine the pre-requisites for running the application.

Building on the Foundation

In this and the previous article, I’ve set the stage for performing more useful tasks. You should now have the ability to connect to an instance of Virtual Server and to create an object for a virtual machine. In the next several articles, I’ll provide details for managing virtual machines, working with virtual hard disks, and configuring virtual networks. We’re just getting warmed up, so stay tuned!

Automating Virtual Server, Part 1: Automating Virtual Server Using VBScript

This article was first published on SearchServerVirtualization.TechTarget.com.

Series Introduction

Among the many benefits of deploying virtualization technology is the ability to better manage complex environments. When implemented correctly, it’s often easier to manage virtual machines than it is to keep track of physical ones. But what happens when you end up with a large number of VMs. Organizations that start by dabbling in virtualization often find that the number of virtualization hosts and guest OS’s can quickly get out-of-hand. Add to that the fact that virtualization management tools are still evolving, and you can end up with quite a challenge for systems administrators.

When dealing with physical servers, many IT pros and end-users have found ways to use automated methods of handling otherwise tedious tasks. For example, performing backups and deploying operating system updates are generally done manually in only the smallest of environments.

When it comes managing Microsoft Virtual Server VMs, there’s a readily available method for automation. In this series of articles, Automating Virtual Server, I’ll present details and examples of how you can programmatically manage your VMs. Code samples will be provided in VBScript, Visual Basic .NET, and C# syntax. Some experience with scripting and application development is assumed, but I’ll provide links to relevant information if you need to get up to speed. Overall, I think you’ll find that the process is fairly easy and straight-forward.

Automating Virtualization

If you’re a systems administrator or developer that’s faced with managing a large number of virtual machines, there’s a good chance that you find yourself wishing for a robot that could handle some of the more mundane tasks. While building such a device is more than could be covered in a single article, the focus here is to demonstrate how you can create scripts for performing routine tasks in Virtual Server. We’ll begin by using the VBScript language in this article, since it’s the easiest way to get up and running. In later articles, I’ll provide code samples in .NET languages (C# and Visual Basic.NET).

Virtual Server’s COM API

One of the built-in features of Microsoft Virtual Server is a fully-documented Component Object Model (COM) API. By connecting to this API, you can perform pretty much any task that can be carried out manually using Virtual Server’s built-in tools. In fact, the Virtual Server Administration Web Site itself is simply a web-based user interface that connects to the COM API behind the scenes.

The basic structure of the COM API is based on collections. Figure 1 provides an overview of the some of the most commonly-used ones. The figure is not a complete object model, and the full details can be found in the Virtual Server Programmer’s Guide (a help file that’s automatically installed with the product). The Programmer’s Guide includes details about all of the objects that are available, along with a list of properties, methods and enumeration constants. If you’re doing more than basic scripting, you’ll probably find yourself referring to that file often.

image

Figure 1: An overview of the Virtual Server COM object model

Getting Started with VBScript

It’s beyond the scope of this article to cover the details of the VBScript language. If you’re not familiar with it, some good starting points for more information are the Microsoft Developer Network (MSDN) Scripting site (http://msdn.microsoft.com/scripting) and the Microsoft TechNet Script Center (http://www.microsoft.com/technet/scriptcenter).

VBScript is based on the Visual Basic language syntax, and it’s a very simple language for getting started with automation. The language is not case-sensitive and it provides for automatic data type conversions. These are two “features” that can help get you up and running quickly (though they’re not good practices when writing production applications).

Another advantage of writing VBScript code is that there’s no requirement for a development environment: Just use your favorite text editor. In most cases, you can copy and paste the code in this article and use it directly on a Windows computer that’s running Virtual Server. OK, let’s get started.

Connecting to Virtual Server

Generally, the first programmatic step you’ll take when creating a new VBScript file for automating Virtual Server is to create a new object that attaches to the COM API. The following statement takes care of this:

Set objVirtualServer = CreateObject(“VirtualServer.Application”)

As long as the Virtual Server product is installed on the local computer, this script should run as-is. By default, this will connect to the instance of Virtual Server that is running on the local machine. If you want to connect to an instance of Virtual Server that’s running on a remote computer, you can use a link such as the following:

Set objVirtualServer = CreateObject(“VirtualServer.Application”,”RemoteServerName”)

Note that you’ll need to have the appropriate security settings and configuration to be able to remotely connect to a COM object (you can get details on these topics using the links provided earlier).

Let’s prove that everything’s working by adding the following two lines to get some information about the local Virtual Server instance:

WScript.Echo “Server Name: “ & objVirtualServer.Name

WScript.Echo “Server Uptime (sec): “ & objVirtualServer.Uptime

Now, the script will output the name of the instance (which should be the same as the machine name), along with the number of seconds that the Virtual Server service has been running. We did this by accessing properties of our “objVirtualServer” object. You can use other methods and properties of the Virtual Server object to perform tasks such as programmatically creating virtual hard disks and changing server settings.

Working with Virtual Machines

Many of the most useful scripts you’ll write will for performing tasks with Virtual Server VMs. You do this by creating a virtual machine object and then setting it equal to a particular VM. If you know the name of a particular VM, you can use the following syntax:

Set objVirtualServer = CreateObject(“VirtualServer.Application”)

objVirtualMachine = objVirtualServer.FindVirtualMachine(“Windows XP SP2”)

First, you create a Virtual Server object (as we did in the previous section), and then you use its find method to create a virtual machine object. What if you don’t know the name of the VM you want to access? You can easily loop through the VMs in the Virtual Server object’s “VirtualMachines” collection. Here’s a sample that outputs the name of each VM on the server:

Set objVirtualServer = CreateObject(“VirtualServer.Application”)

For Each objVirtualMachine in objVirtualServer.VirtualMachines

WScript.Echo(“Name of VM: “) & objVirtualMachine.Name

Next

Once you have a “handle” to a virtual machine, you can access and modify its properties. One commonly-used function is to determine the amount of memory attached to a VM:

WScript.Echo “VM Memory: “ & objVirtualMachine.Memory

Of course, you can perform useful tasks like starting or stopping the VM and managing the virtual hardware configuration (those are topics that we’ll cover in later articles in this series).

The End of the Beginning

In this article, I provided a few simple lines of VBScript code that allowed you to connect to Virtual Server and to work with VMs. Admittedly, we haven’t done anything that’s useful in a practical sense just yet. The goal of this article was to lay the foundation for getting started with automation. Next in the series: Automating Virtual Server using .NET.

Optimizing Microsoft Virtual Server, Part 6: Optimizing Network Performance

This article was first published on SearchServerVirtualization.TechTarget.com.

It’s rare these days to encounter computers or applications that don’t in some way rely on a network connection. General networking principals apply to virtual machines just as they apply to physical ones. But, since the host’s network adapters will be providing resources for all VMs, there are some special considerations, as well. In this article, I’ll present some ways in which you can design networks with virtualization performance in mind.

Note: For an introduction to working with Virtual Server’s networking options, see Configuring Virtual Networks in Virtual Server – Microsoft Virtual Server from the Ground Up.

Managing Host Network Adapters

When multiple VMs perform network-intensive operations, the host’s network adapter can become a bottleneck. In the simplest network configuration, a Virtual Server host computer will have only physical network port. While this system will allow you to share the network adapter with VMs, you can add some security and manageability by adding a second network port. Figure 1 shows an example. Since it’s a good idea to isolate network traffic (for security and performance reasons), you can choose to place all VMs on a separate Virtual LAN (VLAN) on your switch.

image

Figure 1: Using multiple host network adapters.

Since Virtual Server allows you to connect up to four virtual NICs per VM, you can add additional physical network connections, as needed.

Using the Virtual DHCP Server

Virtual Server’s built-in DHCP Server can be enabled for virtual networks and can help you create logically-separate networks on the same physical network segments. Through the use of differing IP address ranges, this technique can help segregate network traffic without requiring the configuration of VLANs or other devices on your switches. Figure 2 shows an example of a potential configuration.

image

Figure 2: Using DHCP to logically isolate network traffic.

Using NIC Teaming

The concept of NIC teaming is to allow multiple network ports to act as one logical unit. There are two main goals. The first is automatic fail-over. If one of the connections becomes unavailable (due to a port or switch failure), the other port can seamlessly take over the load. The other goal is performance: Having multiple ports working together in a group can increase effective bandwidth. Keep in mind that some configurations will depend on support from the network infrastructure-side (for example, port grouping options on switches).

Other network adapter optimizations include changing the default TCP packet size. If you’ll be routinely transferring large files (such as VHDs) between servers, using Jumbo Frames can greatly reduce overhead and increase performance.

Virtual Server and Firewalls

It usually goes without saying that firewalls and port-level filters provide an important layer of defense for Virtual Server hosts and VMs. Theoretically, if an unauthorized user gained access to your Virtual Server host, she could gain access to the VMs themselves. If you want to place a firewall between Virtual Server and potential users, you’ll need to keep in mind which ports you might need to open to make various services available (see Figure 3).

image

Figure 3: TCP Ports used by various Virtual Server-related services

Monitoring Network-Related Performance

When planning for virtualization network configurations, it can be useful to get statistics about traffic traversing the host and guest interfaces. Figure 4 provides an example of statistics that can be collecting using Windows System Monitor. When measured at the host level, you can get an aggregate summary of how much bandwidth is being used and if there’s an outbound queue. To drill-down on the source of the network information, each guest OS can be monitored. You can further filter the details per network adapter.

image

Figure 4: Network performance counters of the “Network Interface” object

Summary

There are many different ways in which you can configure networks to better support virtual machines. We looked at methods for segmenting traffic, increasing throughput, configuring firewalls, and monitoring network statistics. All of this can help optimize network performance in virtualized environments of any size.

Optimizing Microsoft Virtual Server, Part 5: Using Network-Based Storage

This article was first published on SearchServerVirtualization.TechTarget.com.

Providing and managing storage resources in any IT environment can quickly grow out of control. When you’re using local storage, you often run into limitations based on the number of hard disks that can physically be attached to a single computer. Multiply these requirements by dozens or hundreds of servers, and it quickly becomes unmanageable. Fortunately, there’s a potential solution in centralized, network-based storage. In this article, we’ll look at how you can use network-based storage options to improve the performance and manageability of virtual machines running on Microsoft Virtual Server.

Effects of Network-Based Storage

Using network-based storage can have several effects on overall performance: some are good, some are (potentially) bad. Let’s start with the positive: Disk and network caching that is common on many storage solutions can help increase overall performance. When using centralized storage, even relatively small solutions might have multiple gigabytes of high-speed memory cache. Anytime you can avoid physical disk access is a win from a performance standpoint. Additionally, when using centralized storage, you can take advantage of advanced backup and recovery features such as snapshots and split-mirror features (the terminology and technology vary by vendor).

There are some down-sides to network-based storage. First and foremost is latency: performing round trips across a network can be time-consuming and long delays could lead to VM crashes. Also, the added burden on the network when multiple VMs are trying to use resources can require infrastructure upgrades. Overall, the benefits can outweigh the risks and difficulties (as long as you plan and test properly). With this in mind, let’s look at some technical approaches.

Sharing Virtual Hard Disks (VHDs)

The fact that VHDs are actually files comes with an unexpected benefit: Multiple VMs can access the same VHD files concurrently, as long as the VHD files are read-only. This is a great option if you’re already planning to use undo disks and/or differencing disks since the base or parent VHDs will be read-only, anyway. While you might increase contention and generate “hot spots” on the host file system, when sharing files with many VMs, these effects can be offset by caching. Only performance testing can provide the real numbers, but sharing meets your needs, you’ll have the added benefit of minimizing physical disk space usage.

Using Network-Attached Storage (NAS)

NAS devices provide access to files over a network connection. Standard Windows file shares are the most common example. While NAS devices can support several different protocols, in the Windows world, the CIFS standard is most common. Microsoft’s implementation (SMB) is the protocol that allows Windows users to access file shares. A simple approach involves configuring one or more virtual machines to access a virtual hard disk over the network using a UNC path instead of a local path. Figure 1 provides an example.

image

Figure 1: Accessing a VHD over the network

In order to implement this configuration, the Virtual Server service account must have access to the remote network location, and proper permissions must be set. Whenever a guest OS makes a disk I/O request, Virtual Server sends the request over the network to the VHD file located on the file share.

Using a Storage Area Network (SAN)

SAN technology is based on low-latency, high-performance Fibre Channel networks. The idea is to centralize storage while providing the highest levels of disk compatibility and performance. The major difference between SAN and NAS devices is that SANs use block-level I/OThis means that, to the host operating system, SAN-based storage is indistinguishable from local storage. You can perform operations such as formatting and defragmenting a SAN-attached volume. In contrast, with NAS-based access, you’re limited to file-level operations.

The major drawbacks related to SANs are cost (Fibre Channel host bus adapters and switch ports can be very expensive) and management. Generally, a pool of storage must be carved into smaller slices, each of which is dedicated to a server. This can often lead to wasted disk space (although many vendors have introduced methods for more dynamically managing allocation). Figure 2 shows a high-level logical view of a typical SAN implementation.

image

Figure 2: A basic Storage Area Network (SAN) environment

In order to improve management and reduce costs, configurations that combine SAN and NAS technologies are common in many environments. The Virtual Server computers can access VHD files using the NAS devices and the NAS devices, in turn, will connect to the SAN. This method can help reduce costs (by limiting the number of Fibre Channel ports and connections required) and simplify administration. Figure 3 provides an example of this type of configuration.

image

Figure 3: Combining NAS and SAN devices to store VHD files.

Using iSCSI

The iSCSI standard was designed to provide the storage characteristics of SCSI connections over an Ethernet network. iSCSI clients and servers (called initiators and targets, respectively) are readily available from many different vendors. As with SAN technology, iSCSI provides for block-level disk access. The major benefit of iSCSI is that it can work over an organization’s existing investment in copper-based Ethernet (which is dramatically cheaper than Fibre Channel solutions). Some benchmarks have shown that iSCSI can offer performance similar to Fibre Channel solutions. On the initiator side, iSCSI can be implemented as a software-based solution, or can take advantage of dedicated accelerator cards.

Comparing Network Storage Options

The bottom line for organizations that are trying to manage storage-hungry VMs is that there are several options available for centralizing storage. One major caveat is that you should verify support policies with vendors. Unsupported configurations may work, but you’ll be running without a safety net. And, I can’t overstate enough the importance of testing network-based storage configurations. Issues such as latency and protocol implementation nuances can lead to downtime and data loss. Overall, however, storing VHDs on network-based storage makes a lot of sense and can help reduce some major virtualization headaches.

Optimizing Microsoft Virtual Server, Part 4: Maintaining Virtual Hard Disks

This article was first published on SearchServerVirtualization.TechTarget.com.

IT staff and end-users tend to demand a lot from their hard disk subsystems. We throw thousands of files and move or copy gigabytes of data practically every day. So it probably comes as no surprise that, over time, this can take its toll on overall performance. Just like physical hard disks, virtual hard disk (VHD) files need to be maintained over time. In this article, I’ll present details related to maintaining VHD performance on Virtual Server host computers.

Note: For an introduction to working with Virtual Server’s disk architecture, see Understanding Virtual Hard Disk Options.

Monitoring Disk Performance

Since disk-related throughput and latency often affect overall VM performance, it’s important to monitor disk activity to see if you’re at or near the capacity of your exiting storage system. Figure 1 provides a list of useful System Monitor counters that provide statistics for determine whether disk performance is a bottleneck.

image

Figure 1: Disk-related performance counters

When monitoring disk activity at the host level, you’ll get an aggregate view of activity generated by the host and all VMs combined. These statistics are helpful for determining if a hardware upgrade or rearrangement of files is necessary. By viewing statistics at the level of each VM, you can determine which guest OS’s are generating the most disk activity. All of these details can help clue you in on how the disk subsystem is being used.

Defragmentation

Virtual hard disks are just as susceptible to fragmentation as are physical hard disks. The bad news is that you’ll need to worry about disk fragmentation at two levels: the host-level and within each guest OS. The frequency of running defragmenting operations will vary based on the amount and type of activity within the VMs.

As a general rule, you should use the same schedule that you would use for physical machines that are performing similar activities. So, on a busy file server, you might want to defragment frequently. And on a largely static-content web server, you might be able to go months without any performance degradation. The catch is that you need to coordinate defragmentation operations between VMs and the host: Running multiple defrag operations at the same time will significantly decrease performance and will put a much greater load on the physical disk subsystem. It’s a balancing act, but monitoring can help you determine the most appropriate schedule.

Compacting VHDs

Dynamically-expanding virtual hard disks can be compacted to reclaim space that is currently allocated on the host system, but that is not actually used within the guest. This situation can occur if you’ve deleted a lot of data from within the VM, or if files are often moved to and from the VM’s file system. Compacted VHDs are easier to move around (since they’re smaller), and can perform significantly better.

There are two main steps to getting optimal results. The first is to run the Virtual Disk Precompactor – a utility that is available as an ISO file that’s included with the installation of Virtual Server. Just attach the ISO (or access the utility over the network) and run the executable from within the VM. The pre-compactor will reallocate space to ensure that you get the most efficient compact operation.

With the prep work out of the way, you can compact the VHD using the Virtual Server Administration Web Site’s Inspect Virtual Disks function (see Figure 2). In order to compact a disk, it must not be attached to any running VMs. You’ll need roughly twice the total disk space of the size of the VHD, since Virtual Server actually creates a new VHD in the background. The process can generate a lot of disk I/O and can use significant amounts of CPU time, so you’ll want to perform the operation during periods of low activity. Other options are to script the process or to copy the VHDs to a non-production computer and compact them there.

image

Figure 2: Compacting a Virtual Hard Disk

Developing a VM Maintenance Plan

So far, we’ve looked at various ways in which you can improve performance. Now, let’s look at how you can bring this ideas together to maintain performance in a virtualized production environment. A regular virtual machine maintenance plan might include the following steps:

  • Review virtual disk performance statistics and move VHD files, if necessary. (For more information VHD file placement, see the previous article in this series: “Designing Virtual Hard Disk Storage”)
  • Compact all Dynamically-Expanding Virtual Hard Disks
  • Defragment all Guest OS file systems
  • Defragment the Host file system

The frequency of these tasks will vary based on usage patterns for VMs and the amount of downtime available (or, at least, the amount of time during which activity is low). It can be a lot of work, but it’s usually worth the effort. Third-party disk defragmentation tools can also assist with scheduling and centrally managing defragmentation operations.

A Stitch in Time…

The benefits of a flexible virtual hard disk architecture come at the cost of gradual performance decreases over time. In this article, we look at ways for monitoring and maintaining the performance of VHDs to ensure adequate VM performance. Next up in this series is the topic of using network-based storage for your VHDs.

Optimizing Microsoft Virtual Server, Part 3: Designing Virtual Hard Disk Storage

This article was first published on SearchServerVirtualization.TechTarget.com.

Much of the power and flexibility of virtualization solutions comes from the features available for virtual hard disks. Unfortunately, the many different configuration types that are available, you can end up reducing overall performance if you’re not careful. A key concept is virtual hard disk file placement. Let’s look at some scenarios and recommendations that can have a significant impact on performance.

Note: For an introduction to working with Virtual Server’s disk architecture, see Understanding Virtual Hard Disk Options.

VHD File Placement

Most production-class servers will have multiple physical hard disks installed, often to improve performance and to provide redundancy. When planning for allocating VHDs on the host’s file system, the rule is simple: Reduce disk contention. The best approach requires an understanding of how VHD files are used.

If each of your VMs has only one VHD, then you can simply spread them across the available physical spindles based on their expected workload. A common configuration is to use one VHD for the OS and to attach another for data storage. If both VHDs will be busy, placing then on different physical volumes can avoid competition for resources. Other configurations can be significantly more complicated, but the general rule still applies: try to spread disk activity across physical spindles whenever possible.

Managing Undo and Differencing Disks

If you are using undo disks or differencing disks, you’ll want to arrange them such that concurrent I/O is limited. Figure 1 shows an example in which differencing disks are spread across physical disks. In this configuration, the majority of disk read activity is occurring on the parent VHD file, whereas the differencing disk will experience the majority of write activity. Of course, these are only generalizations as the size of the VHDs and the actual patterns of read and write activity can make a huge difference.

image

Figure 1: Arranging parent and child VHD files for performance.

In some cases, using undo disks can improve performance (for example, when the undo disks and base VHDs are on separate physical spindles). In other cases, such as when you have a long chain of differencing disks, you can generate a tremendous amount of disk-related overhead. For some read and write operations, Virtual Server might need to access multiple files to find the “latest” version of the data. And, this problem will get worse over time. Committing undo disks and merging differencing disks with their parent VHDs are important operations that can help restore overall performance.

Fixed-Size vs. Dynamically-Expanding VHDs

The base type for VHDs you create can have a large affect on overall performance. While dynamically-expanding VHDs can make more efficient use of physical disk space on the host, they tend to get fragmented as they grow. Fixed-size VHDs are more efficient since physical disk space is allocated and reserved when they’re created. The general rule is, if you can spare the disk space, go with fixed-size hard disks. Also, keep in mind that you can always convert between fixed-size and dynamically-expanding VHDs, if your needs change.

Host Storage Configuration

The ultimate disk-related performance limits for your VMs will be determined by your choice of host storage hardware. One important decision (especially for lower-end servers) is the type of local storage connection. IDE-based hard disks will offer the poorest performance, whereas SATA, SCSI, and Serial-Attached SCSI (SAS) will offer many improvements. The key to the faster technologies is that they can efficiently carry out multiple concurrent I/O operations (a common scenario when multiple VMs are cranking away on the same server).

When evaluating local storage solutions, there are a couple of key parameters to keep in mind. The first is overall disk throughput (which reflects the total amount of data that can be passed over the connection in a given amount of time). The other important metric is the number of I/O operations per second that can be processed. VM usage patterns often result in a large number of small I/O operations. Just as important is the number of physical hard disks that are available. The more physical disk spindles that are available, the better will be your overall performance.

Using RAID

Various implementations of RAID technology can also make the job of placing VHD files easier. Figure 2 provides a high-level overview of commonly-used RAID levels, and their pros and cons. By utilizing multiple physical spindles in each array, performance can be significantly improved. Since multiple disks are working together at the disk level, the importance of manually moving VHD files to independent disks is reduced. And, of course, you’ll have the added benefit of fault-tolerance.

image

Figure 2: Comparing various RAID levels

Virtual IDE vs. SCSI Controllers

Virtual Server allows you two different methods for connecting virtual hard disks to your VMs: IDE and SCSI. Note that these options are independent of the storage technology you’re using on the host server. The main benefit of IDE is compatibility: Pretty much every x86-compatible operating system supports the IDE standard. You can have up to four IDE connections per VM, and each can have a virtual hard disk or virtual CD/DVD-ROM device attached.

While IDE-based connections work well for many simpler VMs, SCSI connections offer numerous benefits. First, VHDs attached to an IDE channel are limited to 127GB, whereas SCSI-attached VHDs can be up to 2 terabytes in size. Additionally, the virtual SCSI controller can support up to a total of 28 attached VHDs (four SCSI adapters times seven available channels on each)! Figure 3 provides an overview of the number of possible disk configurations.

image

Figure 3: Hard disk connection interface options for VHDs

If that isn’t enough there’s one more advantage: SCSI-attached VHDs often perform better than IDE-attached VHDs, especially when the VM is generating a lot of concurrent I/O operations. Figure 3 shows an overview of the available hard disk connections for a VM.

image

Figure 4: Configuring a SCSI-attached VHD for a VM.

One helpful feature is that, in general, the same VHD file can be attached to either IDE or SCSI controllers without making changes. A major exception to the rule is the generally the boot hard disk, as BIOS and driver changes will likely be required to make that work. Still, the rule for performance is pretty simple: Use SCSI-attached VHDs whenever you can and use IDE-attached VHDs whenever you must.

Summary

When you’re trying to setup a new Virtual Server installation for success, designing and managing VHD storage options is a great first step. Disk I/O bottlenecks are a common cause of real-world performance limitations, but there are several ways to reduce them. In the next article, I’ll talk about maintaining VHDs to preserve performance over time.

Optimizing Microsoft Virtual Server, Part 2: Managing CPU Resource Allocation

This article was first published on SearchServerVirtualization.TechTarget.com.

By default, Virtual Server will treat all VMs with equal priority. In production environments, however, it’s common to have some VMs that are more important than others. Accordingly, you’ll want to let Virtual Server know which VMs should get preference. Virtual Server offers two main methods for managing CPU utilization per VM. To access the settings, click on “Resource Allocation” in the Virtual Server section of the Administration Web Site. Figure 1 provides a view of the default resource allocations for VMs.

image

Figure 1: Configuring CPU settings in the Virtual Server Administration Web Site.

The initial display might seem simple enough, but there’s a lot of potential power here. Let’s look at the two main ways in which you can configure CPU settings.

Weight-Based Resource Allocation

The simplest way to assign priorities to your VMs is to assign “weights” to them. When doling out CPU resources, Virtual Server will give preference to each VM based on its relative weight setting. The values can range from 1 (the lowest priority) to 10,000 (highest priority). By default, all VMs will have a relative weight setting of 100. Since the values are relative, you can setup your own conventions, such as using only values in the range of 1to 10 or 1 to 100. For example, if you want an important VM to have twice the priority of the others, you can set it to a weight of 200 (assuming that the other VMs are using the default weight of 100).

The preferences will kick in whenever CPU resources are limited. Weight-based resource allocation is the quickest and easiest way prioritize your workloads while ensuring that all CPU resources are still available for use.

Constraint-Based Resource Allocation

In some cases, you’ll want more granular control over how CPU resources are managed. That’s where constraint-based resource allocation comes in. This method is a bit more complicated (and you can make CPU resources unavailable if you don’t understand the settings). But, it can be very useful in production environments. You can specify two constraint types as percentages:

  • Reserved Capacity: This setting tells Virtual Server to reserve a certain amount of CPU time for a VM, whether or not it is actually using it. Since it’s difficult to predict when an important VM will need resources, you can use this setting to ensure that one or more VMs will never be left waiting for CPU time. Just keep in mind that you can adversely impact other VMs running on the same machine, since the reserved capacity won’t be available to other VMs.
  • Maximum Capacity: A potential problem when running multiple VMs is that one VM could monopolize CPU time and adversely affect all of the other VMs on the system. The maximum capacity setting specifics an upper limit to the amount of CPU time that a VM may use. Again, keep in mind that there’s a potential for wasted cycles: Even if there are no other VMs competing for resources, the amount of CPU power that can be accessed by the VM will be limited. This option is also helpful if you have other applications or services running on the host system, and you want to ensure that Virtual Server doesn’t dominate the machine.

By default, the reserved capacity is set to 0%, and the maximum capacity at 100% for all VMs. This effectively disables constraint-based resource allocation. Both settings can be defined as either a percentage of one CPU, or a percentage of all CPU resources on the system. The Administration Web Site automatically calculates the amount of resources left to allocate and shows the current CPU utilization per VM. Figure 2 shows an example of configured values.

image

Figure 2: Enabling Constraint-Based Resource Allocation

One other helpful feature: Resource allocation settings can be change dynamically while VMs are running. That can help troubleshoot problems with, for example, a VM that is hanging and trying to use all of the available CPU time.

Controlling Virtualization Mindshare

As you can see, there are several ways in which you can tune Virtual Server’s CPU resource referee. By letting Virtual Server know the relative importance of your VMs, you can help the virtualization layer make better decisions about how to ration resources. OK, that covers managing CPU resources: Next on our hit-list for performance optimization will be managing virtual hard disks.

Optimizing Microsoft Virtual Server, Part 1: Monitoring CPU and Memory Resources

This article was first published on SearchServerVirtualization.TechTarget.com.

The primary purpose of any virtualization solution is to act as a referee between virtual machines (which are always asking for access to hardware resources) and the underlying hardware itself (which can only respond to a limited number of requests at a time). In this article, I’ll cover ways in which you can moanitor CPU and memory resources.

Getting Host Hardware Information

When managing Virtual Server, a good first step is to get an overview of the host computer’s hardware configuration as seen by the Virtual Server service. To do this, just click on Server Properties – Physical Computer Properties (see Figure 1) in the Virtual Server Administration Web Site. Here, you’ll get a quick rundown of the key CPU and memory statistics.

image

Figure 1: Viewing the physical properties of a host computer.

Make a note of the number of physical and logical CPUs as well as the amount of available physical memory. These numbers will define the constraints under which you’ll be working.

Managing Memory Settings

Configuring memory settings for a virtual machine couldn’t be much easier: As long as the VM is powered off, you can change the memory setting in the properties of the VM. There are some rules to keep in mind: Most importantly, you cannot “overcommit” memory – that is, the sum of physical memory allocated to all VMs on a host server (whether or not they’re actually running) must be less than the total amount of physical memory available on the server.

If you’re going to be running other applications on the same server, keep in mind that you’ll need to reserve a certain amount of memory for the host OS, as well. Fortunately, Virtual Server can access all of the physical memory that is available on the host computer, including support for large memory on 32-bit systems and the increased address space of 64-bit host operating systems.

Physical CPU Considerations

When choosing CPUs for a host server machine, there are several things to keep in mind. First and foremost is the overall performance of the CPU architecture. Clock speed and the number of physical CPU cores are most important. Each virtual machine will run in its own thread, so having multiple CPU cores can greatly help improve performance. Additionally, Intel and AMD both offer virtualization-related extensions that can help improve virtualization performance (an upcoming Virtual Server update will add optimizations that take advantage of these specialized instructions).

Next, keep in mind issues related to heat and power consumption (both will end up hitting your overall budget). Multi-core CPUs offer significant performance advantages while minimizing additional power consumption. Keep in mind that, regardless of the number of physical and virtual CPUs present on the host, each VM will be limited to seeing only a single virtual CPU. Rest assured that Virtual Server will use all of the available host CPUs, as needed.

Monitoring CPU and Memory Performance

Before you can start tweaking CPU and memory settings, you should get an idea of how these resources are being used. Figure 2 provides some useful Windows Performance Monitor counters, and how they can clue you in on what’s going on. It can be valuable to measure these values both at the host-level (for an overview of aggregate hardware utilization) and at the VM-level (to hone in on details related to individual VMs’ resource usage).

image

Figure 2: Windows Performance Monitor counters for measuring CPU and memory statistics.

Summary

In this article, we looked at the ways in which Virtual Server automatically manages access to CPU and memory resources, and how you can monitor actual usage. We’ll build on this information in the next article when we look at manually managing CPU resource allocations. Stay tuned!

Optimizing Microsoft Virtual Server: Series Introduction

This article was first published on SearchServerVirtualization.TechTarget.com.

Issues related to performance rank high on the list of technical concerns related to virtualization. Organizations are often ready to jump toward the use of virtual machines, as long as they can be sure that their applications will continue to perform well. While it’s a fact that virtualization overhead is inevitable, it’s more important to understand how to address bottlenecks and increase performance.

In some ways, this sounds like the not-so-good old days, where systems administrators would go to great lengths to squeeze the maximum performance out of 64MB of RAM on a mid-range server. While hardware constraints are nowhere near as tight as they used to be, it’s still up to IT staff to get the highest performance out of their systems. Fortunately, there are many ways to reach this goal.

This series of articles will focus on strategies for optimizing the performance of virtual machines running on Microsoft Virtual Server 2005 R2. While most of the general tips apply to other virtualization platforms (such as VMware and Xen), I’ll focus on Microsoft’s platform when illustrating specifics. I’ll cover methods to optimize CPU, memory, disk, and network performance. The goal is to help you manage and optimize performance based on Virtual Server’s architecture and your business and technical needs.

Note: The articles in this series assume that you’re already familiar with the Virtual Server platform and have experience working with virtual hard disks, virtual networks, and other settings. If you’re new to virtualization, be sure to check out my previous series of articles: “Virtual Server: From the Ground Up”.