This article was first published on SearchServerVirtualization.TechTarget.com.
Series Introduction
It’s hard to read about IT management these days without hearing about virtualization. Chances are good that you’ve heard about the many features and benefits of using virtual machines. But, you might not know how to get started. That’s where this article series comes in.
Microsoft Virtual Server 2005 is an excellent platform for hosting your VMs, and it’s quick and easy to get started. If you haven’t installed the product and tried it out already, a tutorial that walks through the process “from the ground up” might be just what you need to get started. In this series, I’m going to walk through the basics of working with Microsoft Virtual Server 2005. In this article, I’ll begin with the crucial first step: Installing and configuring the product.
Virtual Server Requirements
So, you’ve heard a lot of about virtualization, and you’re convinced that you should give Microsoft Virtual Server 2005 a try. The first question you’re likely to have is, what do I need to be able to run Virtual Server? Without getting into all of the details (which you can find on Microsoft’s Virtual Server System Requirements page), you’ll need to be running an edition of Windows Server 2003 (both 32-bit and 64-bit systems are supported) or Windows XP SP2. The latter is recommended for non-production use (such as testing and development), but will work just fine.
As long as your hardware is supported by your choice of OS, you should be able to run Virtual Server. From a memory standpoint, the rule is simple: The more, the better. And, you’ll need at least a few gigabytes of disk space to host your VMs. Details will be based on how many VMs you plan to support, and the amount of resources they’ll require.
Virtual Server Architecture
In order to fully understand how Virtual Server works, it’s important to take a look at the overall architecture of the product. Figure 1 provides an overview. The first important aspect to note is that the Virtual Server service (which runs within the host OS) is responsible for creating virtual environments in which your Guest OS’s will run. That’s the heart of the product. Like most Windows services, this process can be started and stopped after it is installed.

Figure 1: A logical overview of the architecture of Microsoft Virtual Server.
The next important aspect is the Virtual Server Administration Web Site – the primary method by which you will interact with the Virtual Server service. This site runs within Internet Information Services (IIS). In the default configuration (which we’ll cover in this article), you will need to have IIS installed on the machine on which the Virtual Server service is installed. It is also possible to install the Administration Web Site on another computer for security, performance, or management purposes.
Installing Virtual Server
OK, enough of the background – let’s get to the hands-on portion. With all of the pre-requisites out of the way, it’s time to walk through the process of actually installing the Virtual Server product. You can obtain the Virtual Server installation package as a free download from the Microsoft Virtual Server web site. Start the installation process by running the executable on that computer on which you want to install the Virtual Server service.
One quick warning: During the installation process, the host computer’s network connection will be dropped and then reconnected. Usually, the interruption is short (and a Remote Desktop session should automatically recover), but keep this in mind if you’re in the middle of transferring a 42GB file over the network.
Here’s a guided tour of the setup process (I’ve omitted “easy” questions like user name and company):
1) Setup Type: In general, you’ll want to choose the Complete option, which will install the Virtual Server service, documentation, and the Virtual Server Administration Web Site. If you are planning to support numerous Virtual Server installations, you might choose not to install the Virtual Server Administration Web Site or other components by using the Custom option.
2) Configure Components: On this screen (shown in Figure 2), you must specify the TCP port number on which the Virtual Server Administration Web Site will respond. The default (TCP port 1024) is applicable to most installations. If you change it from the default, all users of the site will need to be made aware of the port number in order to connect. If you’re installing on Windows XP, you will not be given a choice of port numbers (since the Windows XP version of IIS only supports a single web site). Instead, a new virtual directory will be created.

Figure 2: Specifying the TCP port for the Virtual Server Administration Web Site.
You must also specify the security context under which the Administration Web Site will run. The recommendation is to run as the authenticated user, which means that the site will have the permissions of the user that is connecting. This is the simplest option for most installations. If you need to use constrained delegation (which allows you to access and share resources across multiple servers), you can choose the “Local System Account” option. Rest assured that you can change these settings later.
3) Windows Firewall Exceptions: The installation process will offer to place exceptions in the Windows Firewall list to support the configuration. Unless you’re planning to administer Virtual Server only from the local machine, it’s a good idea to accept the offer.
4) Installation Summary: Once you’ve completed the installation, you’ll see an Installation Summary page (see Figure 3). Be sure to make a note of the URL for the Virtual Server Administration Web Site. Other users will need this information to connect to administer the server from another computer.
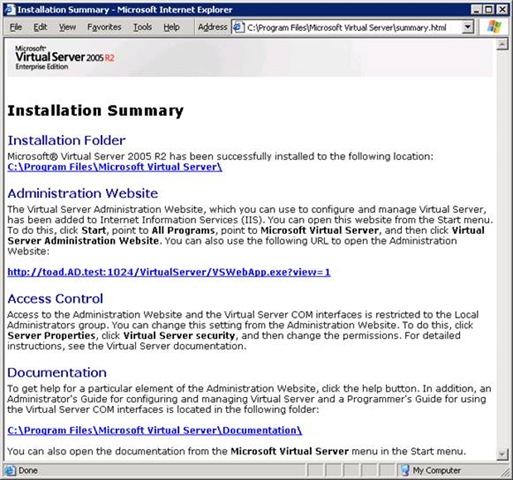
Figure 3: Viewing the Virtual Server Installation Summary page.
If you want to remove Virtual Server for some reason, you can do this using the Add/Remove Programs applet. The process won’t delete your virtual machine files, but it will uninstall the Virtual Server service and the Administration web site. As you can see, the process couldn’t be much simpler.
Connecting to the Virtual Server Administration Web Site
To verify that the installation is working properly, you can use the “Virtual Server Administration Web Site” link in the Microsoft Virtual Server program group, or you can open an instance of Internet Explorer and navigate to the site’s URL directly. Figure 4 shows a typical display that includes some VMs. Note that, the site uses ActiveX controls and IE-specific settings, so you’ll need to use this browser for administration. When connecting, you’ll be prompted for authentication information, and any domain or local user that has permissions to connect to the site will be able to continue.

Figure 4: Accessing the Virtual Server Administration Web Site
During installation, the setup process creates a new “Virtual Server” event log, which you can view using the Administration Web Site or through the Windows Event Viewer application. It’s a good idea to look for any warnings and errors that might have occurred during the installation process. In most cases, though, you’ll be all set to start working with the server right away.
In the next article in this series, I’ll cover details related to configuring Virtual Server and (the point of all of this): Creating your first VM.
