Archive for category Virtualization

Optimizing Microsoft Virtual Server, Part 5: Using Network-Based Storage

This article was first published on SearchServerVirtualization.TechTarget.com.

Providing and managing storage resources in any IT environment can quickly grow out of control. When you’re using local storage, you often run into limitations based on the number of hard disks that can physically be attached to a single computer. Multiply these requirements by dozens or hundreds of servers, and it quickly becomes unmanageable. Fortunately, there’s a potential solution in centralized, network-based storage. In this article, we’ll look at how you can use network-based storage options to improve the performance and manageability of virtual machines running on Microsoft Virtual Server.

Effects of Network-Based Storage

Using network-based storage can have several effects on overall performance: some are good, some are (potentially) bad. Let’s start with the positive: Disk and network caching that is common on many storage solutions can help increase overall performance. When using centralized storage, even relatively small solutions might have multiple gigabytes of high-speed memory cache. Anytime you can avoid physical disk access is a win from a performance standpoint. Additionally, when using centralized storage, you can take advantage of advanced backup and recovery features such as snapshots and split-mirror features (the terminology and technology vary by vendor).

There are some down-sides to network-based storage. First and foremost is latency: performing round trips across a network can be time-consuming and long delays could lead to VM crashes. Also, the added burden on the network when multiple VMs are trying to use resources can require infrastructure upgrades. Overall, the benefits can outweigh the risks and difficulties (as long as you plan and test properly). With this in mind, let’s look at some technical approaches.

Sharing Virtual Hard Disks (VHDs)

The fact that VHDs are actually files comes with an unexpected benefit: Multiple VMs can access the same VHD files concurrently, as long as the VHD files are read-only. This is a great option if you’re already planning to use undo disks and/or differencing disks since the base or parent VHDs will be read-only, anyway. While you might increase contention and generate “hot spots” on the host file system, when sharing files with many VMs, these effects can be offset by caching. Only performance testing can provide the real numbers, but sharing meets your needs, you’ll have the added benefit of minimizing physical disk space usage.

Using Network-Attached Storage (NAS)

NAS devices provide access to files over a network connection. Standard Windows file shares are the most common example. While NAS devices can support several different protocols, in the Windows world, the CIFS standard is most common. Microsoft’s implementation (SMB) is the protocol that allows Windows users to access file shares. A simple approach involves configuring one or more virtual machines to access a virtual hard disk over the network using a UNC path instead of a local path. Figure 1 provides an example.

image

Figure 1: Accessing a VHD over the network

In order to implement this configuration, the Virtual Server service account must have access to the remote network location, and proper permissions must be set. Whenever a guest OS makes a disk I/O request, Virtual Server sends the request over the network to the VHD file located on the file share.

Using a Storage Area Network (SAN)

SAN technology is based on low-latency, high-performance Fibre Channel networks. The idea is to centralize storage while providing the highest levels of disk compatibility and performance. The major difference between SAN and NAS devices is that SANs use block-level I/OThis means that, to the host operating system, SAN-based storage is indistinguishable from local storage. You can perform operations such as formatting and defragmenting a SAN-attached volume. In contrast, with NAS-based access, you’re limited to file-level operations.

The major drawbacks related to SANs are cost (Fibre Channel host bus adapters and switch ports can be very expensive) and management. Generally, a pool of storage must be carved into smaller slices, each of which is dedicated to a server. This can often lead to wasted disk space (although many vendors have introduced methods for more dynamically managing allocation). Figure 2 shows a high-level logical view of a typical SAN implementation.

image

Figure 2: A basic Storage Area Network (SAN) environment

In order to improve management and reduce costs, configurations that combine SAN and NAS technologies are common in many environments. The Virtual Server computers can access VHD files using the NAS devices and the NAS devices, in turn, will connect to the SAN. This method can help reduce costs (by limiting the number of Fibre Channel ports and connections required) and simplify administration. Figure 3 provides an example of this type of configuration.

image

Figure 3: Combining NAS and SAN devices to store VHD files.

Using iSCSI

The iSCSI standard was designed to provide the storage characteristics of SCSI connections over an Ethernet network. iSCSI clients and servers (called initiators and targets, respectively) are readily available from many different vendors. As with SAN technology, iSCSI provides for block-level disk access. The major benefit of iSCSI is that it can work over an organization’s existing investment in copper-based Ethernet (which is dramatically cheaper than Fibre Channel solutions). Some benchmarks have shown that iSCSI can offer performance similar to Fibre Channel solutions. On the initiator side, iSCSI can be implemented as a software-based solution, or can take advantage of dedicated accelerator cards.

Comparing Network Storage Options

The bottom line for organizations that are trying to manage storage-hungry VMs is that there are several options available for centralizing storage. One major caveat is that you should verify support policies with vendors. Unsupported configurations may work, but you’ll be running without a safety net. And, I can’t overstate enough the importance of testing network-based storage configurations. Issues such as latency and protocol implementation nuances can lead to downtime and data loss. Overall, however, storing VHDs on network-based storage makes a lot of sense and can help reduce some major virtualization headaches.

Optimizing Microsoft Virtual Server, Part 4: Maintaining Virtual Hard Disks

This article was first published on SearchServerVirtualization.TechTarget.com.

IT staff and end-users tend to demand a lot from their hard disk subsystems. We throw thousands of files and move or copy gigabytes of data practically every day. So it probably comes as no surprise that, over time, this can take its toll on overall performance. Just like physical hard disks, virtual hard disk (VHD) files need to be maintained over time. In this article, I’ll present details related to maintaining VHD performance on Virtual Server host computers.

Note: For an introduction to working with Virtual Server’s disk architecture, see Understanding Virtual Hard Disk Options.

Monitoring Disk Performance

Since disk-related throughput and latency often affect overall VM performance, it’s important to monitor disk activity to see if you’re at or near the capacity of your exiting storage system. Figure 1 provides a list of useful System Monitor counters that provide statistics for determine whether disk performance is a bottleneck.

image

Figure 1: Disk-related performance counters

When monitoring disk activity at the host level, you’ll get an aggregate view of activity generated by the host and all VMs combined. These statistics are helpful for determining if a hardware upgrade or rearrangement of files is necessary. By viewing statistics at the level of each VM, you can determine which guest OS’s are generating the most disk activity. All of these details can help clue you in on how the disk subsystem is being used.

Defragmentation

Virtual hard disks are just as susceptible to fragmentation as are physical hard disks. The bad news is that you’ll need to worry about disk fragmentation at two levels: the host-level and within each guest OS. The frequency of running defragmenting operations will vary based on the amount and type of activity within the VMs.

As a general rule, you should use the same schedule that you would use for physical machines that are performing similar activities. So, on a busy file server, you might want to defragment frequently. And on a largely static-content web server, you might be able to go months without any performance degradation. The catch is that you need to coordinate defragmentation operations between VMs and the host: Running multiple defrag operations at the same time will significantly decrease performance and will put a much greater load on the physical disk subsystem. It’s a balancing act, but monitoring can help you determine the most appropriate schedule.
Compacting VHDs

Dynamically-expanding virtual hard disks can be compacted to reclaim space that is currently allocated on the host system, but that is not actually used within the guest. This situation can occur if you’ve deleted a lot of data from within the VM, or if files are often moved to and from the VM’s file system. Compacted VHDs are easier to move around (since they’re smaller), and can perform significantly better.

There are two main steps to getting optimal results. The first is to run the Virtual Disk Precompactor – a utility that is available as an ISO file that’s included with the installation of Virtual Server. Just attach the ISO (or access the utility over the network) and run the executable from within the VM. The pre-compactor will reallocate space to ensure that you get the most efficient compact operation.
With the prep work out of the way, you can compact the VHD using the Virtual Server Administration Web Site’s Inspect Virtual Disks function (see Figure 2). In order to compact a disk, it must not be attached to any running VMs. You’ll need roughly twice the total disk space of the size of the VHD, since Virtual Server actually creates a new VHD in the background. The process can generate a lot of disk I/O and can use significant amounts of CPU time, so you’ll want to perform the operation during periods of low activity. Other options are to script the process or to copy the VHDs to a non-production computer and compact them there.

image

Figure 2: Compacting a Virtual Hard Disk

Developing a VM Maintenance Plan

So far, we’ve looked at various ways in which you can improve performance. Now, let’s look at how you can bring this ideas together to maintain performance in a virtualized production environment. A regular virtual machine maintenance plan might include the following steps:

  • Review virtual disk performance statistics and move VHD files, if necessary. (For more information VHD file placement, see the previous article in this series: “Designing Virtual Hard Disk Storage”)
  • Compact all Dynamically-Expanding Virtual Hard Disks
  • Defragment all Guest OS file systems
  • Defragment the Host file system

The frequency of these tasks will vary based on usage patterns for VMs and the amount of downtime available (or, at least, the amount of time during which activity is low). It can be a lot of work, but it’s usually worth the effort. Third-party disk defragmentation tools can also assist with scheduling and centrally managing defragmentation operations.

A Stitch in Time…

The benefits of a flexible virtual hard disk architecture come at the cost of gradual performance decreases over time. In this article, we look at ways for monitoring and maintaining the performance of VHDs to ensure adequate VM performance. Next up in this series is the topic of using network-based storage for your VHDs.

Optimizing Microsoft Virtual Server, Part 3: Designing Virtual Hard Disk Storage

This article was first published on SearchServerVirtualization.TechTarget.com.

Much of the power and flexibility of virtualization solutions comes from the features available for virtual hard disks. Unfortunately, the many different configuration types that are available, you can end up reducing overall performance if you’re not careful. A key concept is virtual hard disk file placement. Let’s look at some scenarios and recommendations that can have a significant impact on performance.

Note: For an introduction to working with Virtual Server’s disk architecture, see Understanding Virtual Hard Disk Options.

VHD File Placement

Most production-class servers will have multiple physical hard disks installed, often to improve performance and to provide redundancy. When planning for allocating VHDs on the host’s file system, the rule is simple: Reduce disk contention. The best approach requires an understanding of how VHD files are used.

If each of your VMs has only one VHD, then you can simply spread them across the available physical spindles based on their expected workload. A common configuration is to use one VHD for the OS and to attach another for data storage. If both VHDs will be busy, placing then on different physical volumes can avoid competition for resources. Other configurations can be significantly more complicated, but the general rule still applies: try to spread disk activity across physical spindles whenever possible.

Managing Undo and Differencing Disks

If you are using undo disks or differencing disks, you’ll want to arrange them such that concurrent I/O is limited. Figure 1 shows an example in which differencing disks are spread across physical disks. In this configuration, the majority of disk read activity is occurring on the parent VHD file, whereas the differencing disk will experience the majority of write activity. Of course, these are only generalizations as the size of the VHDs and the actual patterns of read and write activity can make a huge difference.

image

Figure 1: Arranging parent and child VHD files for performance.

In some cases, using undo disks can improve performance (for example, when the undo disks and base VHDs are on separate physical spindles). In other cases, such as when you have a long chain of differencing disks, you can generate a tremendous amount of disk-related overhead. For some read and write operations, Virtual Server might need to access multiple files to find the “latest” version of the data. And, this problem will get worse over time. Committing undo disks and merging differencing disks with their parent VHDs are important operations that can help restore overall performance.

Fixed-Size vs. Dynamically-Expanding VHDs

The base type for VHDs you create can have a large affect on overall performance. While dynamically-expanding VHDs can make more efficient use of physical disk space on the host, they tend to get fragmented as they grow. Fixed-size VHDs are more efficient since physical disk space is allocated and reserved when they’re created. The general rule is, if you can spare the disk space, go with fixed-size hard disks. Also, keep in mind that you can always convert between fixed-size and dynamically-expanding VHDs, if your needs change.

Host Storage Configuration

The ultimate disk-related performance limits for your VMs will be determined by your choice of host storage hardware. One important decision (especially for lower-end servers) is the type of local storage connection. IDE-based hard disks will offer the poorest performance, whereas SATA, SCSI, and Serial-Attached SCSI (SAS) will offer many improvements. The key to the faster technologies is that they can efficiently carry out multiple concurrent I/O operations (a common scenario when multiple VMs are cranking away on the same server).

When evaluating local storage solutions, there are a couple of key parameters to keep in mind. The first is overall disk throughput (which reflects the total amount of data that can be passed over the connection in a given amount of time). The other important metric is the number of I/O operations per second that can be processed. VM usage patterns often result in a large number of small I/O operations. Just as important is the number of physical hard disks that are available. The more physical disk spindles that are available, the better will be your overall performance.

Using RAID

Various implementations of RAID technology can also make the job of placing VHD files easier. Figure 2 provides a high-level overview of commonly-used RAID levels, and their pros and cons. By utilizing multiple physical spindles in each array, performance can be significantly improved. Since multiple disks are working together at the disk level, the importance of manually moving VHD files to independent disks is reduced. And, of course, you’ll have the added benefit of fault-tolerance.

image

Figure 2: Comparing various RAID levels

Virtual IDE vs. SCSI Controllers

Virtual Server allows you two different methods for connecting virtual hard disks to your VMs: IDE and SCSI. Note that these options are independent of the storage technology you’re using on the host server. The main benefit of IDE is compatibility: Pretty much every x86-compatible operating system supports the IDE standard. You can have up to four IDE connections per VM, and each can have a virtual hard disk or virtual CD/DVD-ROM device attached.

While IDE-based connections work well for many simpler VMs, SCSI connections offer numerous benefits. First, VHDs attached to an IDE channel are limited to 127GB, whereas SCSI-attached VHDs can be up to 2 terabytes in size. Additionally, the virtual SCSI controller can support up to a total of 28 attached VHDs (four SCSI adapters times seven available channels on each)! Figure 3 provides an overview of the number of possible disk configurations.

image

Figure 3: Hard disk connection interface options for VHDs

If that isn’t enough there’s one more advantage: SCSI-attached VHDs often perform better than IDE-attached VHDs, especially when the VM is generating a lot of concurrent I/O operations. Figure 3 shows an overview of the available hard disk connections for a VM.

image

Figure 4: Configuring a SCSI-attached VHD for a VM.

One helpful feature is that, in general, the same VHD file can be attached to either IDE or SCSI controllers without making changes. A major exception to the rule is the generally the boot hard disk, as BIOS and driver changes will likely be required to make that work. Still, the rule for performance is pretty simple: Use SCSI-attached VHDs whenever you can and use IDE-attached VHDs whenever you must.

Summary

When you’re trying to setup a new Virtual Server installation for success, designing and managing VHD storage options is a great first step. Disk I/O bottlenecks are a common cause of real-world performance limitations, but there are several ways to reduce them. In the next article, I’ll talk about maintaining VHDs to preserve performance over time.

Optimizing Microsoft Virtual Server, Part 2: Managing CPU Resource Allocation

This article was first published on SearchServerVirtualization.TechTarget.com.

By default, Virtual Server will treat all VMs with equal priority. In production environments, however, it’s common to have some VMs that are more important than others. Accordingly, you’ll want to let Virtual Server know which VMs should get preference. Virtual Server offers two main methods for managing CPU utilization per VM. To access the settings, click on “Resource Allocation” in the Virtual Server section of the Administration Web Site. Figure 1 provides a view of the default resource allocations for VMs.

image

Figure 1: Configuring CPU settings in the Virtual Server Administration Web Site.

The initial display might seem simple enough, but there’s a lot of potential power here. Let’s look at the two main ways in which you can configure CPU settings.

Weight-Based Resource Allocation

The simplest way to assign priorities to your VMs is to assign “weights” to them. When doling out CPU resources, Virtual Server will give preference to each VM based on its relative weight setting. The values can range from 1 (the lowest priority) to 10,000 (highest priority). By default, all VMs will have a relative weight setting of 100. Since the values are relative, you can setup your own conventions, such as using only values in the range of 1to 10 or 1 to 100. For example, if you want an important VM to have twice the priority of the others, you can set it to a weight of 200 (assuming that the other VMs are using the default weight of 100).

The preferences will kick in whenever CPU resources are limited. Weight-based resource allocation is the quickest and easiest way prioritize your workloads while ensuring that all CPU resources are still available for use.

Constraint-Based Resource Allocation

In some cases, you’ll want more granular control over how CPU resources are managed. That’s where constraint-based resource allocation comes in. This method is a bit more complicated (and you can make CPU resources unavailable if you don’t understand the settings). But, it can be very useful in production environments. You can specify two constraint types as percentages:

  • Reserved Capacity: This setting tells Virtual Server to reserve a certain amount of CPU time for a VM, whether or not it is actually using it. Since it’s difficult to predict when an important VM will need resources, you can use this setting to ensure that one or more VMs will never be left waiting for CPU time. Just keep in mind that you can adversely impact other VMs running on the same machine, since the reserved capacity won’t be available to other VMs.
  • Maximum Capacity: A potential problem when running multiple VMs is that one VM could monopolize CPU time and adversely affect all of the other VMs on the system. The maximum capacity setting specifics an upper limit to the amount of CPU time that a VM may use. Again, keep in mind that there’s a potential for wasted cycles: Even if there are no other VMs competing for resources, the amount of CPU power that can be accessed by the VM will be limited. This option is also helpful if you have other applications or services running on the host system, and you want to ensure that Virtual Server doesn’t dominate the machine.

By default, the reserved capacity is set to 0%, and the maximum capacity at 100% for all VMs. This effectively disables constraint-based resource allocation. Both settings can be defined as either a percentage of one CPU, or a percentage of all CPU resources on the system. The Administration Web Site automatically calculates the amount of resources left to allocate and shows the current CPU utilization per VM. Figure 2 shows an example of configured values.

image

Figure 2: Enabling Constraint-Based Resource Allocation

One other helpful feature: Resource allocation settings can be change dynamically while VMs are running. That can help troubleshoot problems with, for example, a VM that is hanging and trying to use all of the available CPU time.

Controlling Virtualization Mindshare

As you can see, there are several ways in which you can tune Virtual Server’s CPU resource referee. By letting Virtual Server know the relative importance of your VMs, you can help the virtualization layer make better decisions about how to ration resources. OK, that covers managing CPU resources: Next on our hit-list for performance optimization will be managing virtual hard disks.

Optimizing Microsoft Virtual Server, Part 1: Monitoring CPU and Memory Resources

This article was first published on SearchServerVirtualization.TechTarget.com.

The primary purpose of any virtualization solution is to act as a referee between virtual machines (which are always asking for access to hardware resources) and the underlying hardware itself (which can only respond to a limited number of requests at a time). In this article, I’ll cover ways in which you can moanitor CPU and memory resources.

Getting Host Hardware Information

When managing Virtual Server, a good first step is to get an overview of the host computer’s hardware configuration as seen by the Virtual Server service. To do this, just click on Server Properties – Physical Computer Properties (see Figure 1) in the Virtual Server Administration Web Site. Here, you’ll get a quick rundown of the key CPU and memory statistics.

image

Figure 1: Viewing the physical properties of a host computer.

Make a note of the number of physical and logical CPUs as well as the amount of available physical memory. These numbers will define the constraints under which you’ll be working.

Managing Memory Settings

Configuring memory settings for a virtual machine couldn’t be much easier: As long as the VM is powered off, you can change the memory setting in the properties of the VM. There are some rules to keep in mind: Most importantly, you cannot “overcommit” memory – that is, the sum of physical memory allocated to all VMs on a host server (whether or not they’re actually running) must be less than the total amount of physical memory available on the server.

If you’re going to be running other applications on the same server, keep in mind that you’ll need to reserve a certain amount of memory for the host OS, as well. Fortunately, Virtual Server can access all of the physical memory that is available on the host computer, including support for large memory on 32-bit systems and the increased address space of 64-bit host operating systems.

Physical CPU Considerations

When choosing CPUs for a host server machine, there are several things to keep in mind. First and foremost is the overall performance of the CPU architecture. Clock speed and the number of physical CPU cores are most important. Each virtual machine will run in its own thread, so having multiple CPU cores can greatly help improve performance. Additionally, Intel and AMD both offer virtualization-related extensions that can help improve virtualization performance (an upcoming Virtual Server update will add optimizations that take advantage of these specialized instructions).

Next, keep in mind issues related to heat and power consumption (both will end up hitting your overall budget). Multi-core CPUs offer significant performance advantages while minimizing additional power consumption. Keep in mind that, regardless of the number of physical and virtual CPUs present on the host, each VM will be limited to seeing only a single virtual CPU. Rest assured that Virtual Server will use all of the available host CPUs, as needed.

Monitoring CPU and Memory Performance

Before you can start tweaking CPU and memory settings, you should get an idea of how these resources are being used. Figure 2 provides some useful Windows Performance Monitor counters, and how they can clue you in on what’s going on. It can be valuable to measure these values both at the host-level (for an overview of aggregate hardware utilization) and at the VM-level (to hone in on details related to individual VMs’ resource usage).

image

Figure 2: Windows Performance Monitor counters for measuring CPU and memory statistics.

Summary

In this article, we looked at the ways in which Virtual Server automatically manages access to CPU and memory resources, and how you can monitor actual usage. We’ll build on this information in the next article when we look at manually managing CPU resource allocations. Stay tuned!

Optimizing Microsoft Virtual Server: Series Introduction

This article was first published on SearchServerVirtualization.TechTarget.com.

Issues related to performance rank high on the list of technical concerns related to virtualization. Organizations are often ready to jump toward the use of virtual machines, as long as they can be sure that their applications will continue to perform well. While it’s a fact that virtualization overhead is inevitable, it’s more important to understand how to address bottlenecks and increase performance.

In some ways, this sounds like the not-so-good old days, where systems administrators would go to great lengths to squeeze the maximum performance out of 64MB of RAM on a mid-range server. While hardware constraints are nowhere near as tight as they used to be, it’s still up to IT staff to get the highest performance out of their systems. Fortunately, there are many ways to reach this goal.

This series of articles will focus on strategies for optimizing the performance of virtual machines running on Microsoft Virtual Server 2005 R2. While most of the general tips apply to other virtualization platforms (such as VMware and Xen), I’ll focus on Microsoft’s platform when illustrating specifics. I’ll cover methods to optimize CPU, memory, disk, and network performance. The goal is to help you manage and optimize performance based on Virtual Server’s architecture and your business and technical needs.

Note: The articles in this series assume that you’re already familiar with the Virtual Server platform and have experience working with virtual hard disks, virtual networks, and other settings. If you’re new to virtualization, be sure to check out my previous series of articles: “Virtual Server: From the Ground Up”.

Microsoft Virtual Server from the Ground Up, Part 5: Comparing Virtual Server vs. VirtualPC

This article was first published on SearchServerVirtualization.TechTarget.com.

People often equate the ability to choose with freedom. That’s usually a good thing, but Microsoft has two virtualization offerings that are both great products at a great price (free). Your options are Virtual Server 2005 and Virtual PC. So which one is better? Well, it depends on what you’re trying to do. In this article, I’ll talk about the differences between these two products, and about how you can switch between them.

A Tale of Two Platforms

If you look at Microsoft’s two virtualization options from a marketing and technical standpoint, there’s one conclusion that seems consistent: Virtual PC has been designed to make virtual machines accessible to desktop users, whereas Virtual Server provides powerful Enterprise-class features. If you’re squarely in one camp or the other, then the decision might be simple. The two products do have a lot in common, but there are some important differences. Let’s take a look at the details.

Virtual PC: Easy Does It

Virtual PC has been designed to be as simple to install and use as possible. That makes it a great solution for people who want to run one or two VMs on their desktops with minimal setup hassles. Perhaps the most noticeable feature is that Virtual PC comes with a standard Windows application for administration. The user interface is familiar and user-friendly (see Figure 1), and most users should be able to get up and running in a matter of minutes (assuming they understand basic virtualization concepts).

clip_image002

Figure 1: Configuring VM hardware settings in Virtual PC.

There are more useful features in the area of administration. A very handy feature is that virtual machine windows can be resized while they’re running (just like you might resize a Word document or e-mail message). As long as the guest OS is supported by the Virtual PC platform, its desktop resolution will scale automatically.

A common task when working with VMs is to transfer files between the host computer and the VM. While you could certainly accomplish this through the use of networking, Virtual PC allows you to simply drag and drop files between the host and guest OS through the use of Shared Folders. Also in the area of networking is the ability to configure Network Address Translation (NAT) to easily share the host’s network connection without worrying about network addresses. Finally, Virtual PC includes an emulated virtual sound card. It may not rock your world, but it can be helpful for testing some applications.

Virtual Server: Power to the [IT] People

Virtual Server has been designed to host many virtual machines, efficiently and reliably. It runs as a service on Windows XP or Windows Server 2003 computers. Due to its multi-threaded architecture, it can simultaneously run many VMs (assuming you have enough CPU, disk, and memory resources). Virtual Server also supports both 32-bit and 64-bit host operating systems. The most noticeable difference between the two products is that Virtual Server is managed using an Administration Web Site (see Figure 2). While this can be more accessible (all someone needs is a browser in order to manage it), the interface isn’t nearly as user-friendly as a Windows application.

clip_image004

Figure 2: Using the Virtual Server Administration Web Site.

Other than performance, Virtual Server provides numerous additional benefits. One of my favorite features is scripting and automation support through the use of a Component Object Model (COM) interface. The API is well-documented and you can use VBScript, Visual Basic.NET or C# to manage your VMs. As you might expect from any Enterprise product, Virtual Server offers advanced networking and security features. It also provides support for SCSI-based hard disks (allowing terabytes of total storage), iSCSI network-based storage, and clustering (both at the host and guest levels). You can also manage Virtual Server using Microsoft Operations Manager (MOM), or third-party tools.

Feature Comparison

Nothing sums up features and differences like a good table. Figure 3 provides just that.

image

Figure 3: A summary of features of Virtual PC and Virtual Server

The Best of Both Worlds?

If you still can’t decide which platform is best, here’s a reassuring fact: For the most part, VMs are portable between the two platforms. You can create a VM in Virtual PC and then later run it within Virtual Server (or vice versa). This can be very handy in development, testing, support, and other related situations. There are a few things to keep in mind, however. First, the saved state file formats are not compatible between the two platforms. So, you’ll need to completely shut down a VM before you move it between platforms. Virtual Server does not support virtual sound cards (most Guest OS’s will automatically detect this), and Virtual PC does not support virtual SCSI hard disk controllers. The latter is mainly an issue for boot volumes, since you can always take a virtual hard disk file and move it between SCSI and IDE attachments.

Overall, if you don’t mind a bit of a learning curve and you want to host multiple VMs as efficiently as possible, Virtual Server is probably the best bet. If, on the other hand, you just want to run one or two VMs as quickly as possible, then you should probably start with Virtual Server. You really can’t go wrong with either one, since you can change your decision pretty easily and the cost of admission is free. Good luck!

Microsoft Virtual Server from the Ground Up, Part 4: Configuring Virtual Networks in Virtual Server

This article was first published on SearchServerVirtualization.TechTarget.com.

While virtual machines working in isolation can be useful for some purposes, modern day applications and operating systems often rely on network connectivity to accomplish their tasks. The challenge is in finding the right balance between ease of communications and security. In this article, I’ll cover details about virtual networking options in Microsoft Virtual Server 2005. Read on, so you’ll be able to ensure that no VM is an island (unless, of course, you want it to be).

Virtual Server’s Networking Architecture

Let’s start by taking a look at the architecture of how Virtual Server handles network access. Figure 1 provides a high-level view. Starting from the bottom, you have your physical network – the actual cables, switches, routers, and other devices to which the host computer is connected. Above that is the host’s physical network interface card (NIC) and its associated driver. That’s the standard stuff. Virtual Server adds a layer called the “Virtual Machine Network Services Driver”. It’s the responsibility of this layer to allow virtual NICs (which are configured within the VM) the ability to access the physical network.

clip_image002

Figure 1: An overview of Virtual Server’s network architecture

In the simplest configuration, you’ll likely have only a single physical NIC and a single virtual NIC. However, Virtual Server supports as many host NICs as you can install on the host OS, and up to four virtual NICs within each VM.

Understanding Virtual Networks

Virtual Networks are created within Virtual Server to simplify the administration of networking options. One option is not to attach the VM’s NIC to any virtual network (or to not use a virtual NIC at all). In that case, the VM will not be able to communicate with other physical or virtual machines. If you do want to enable communications, there are two main types of virtual networks options.

Guest-Only Networks

A good way to minimize network security risks is to create a virtual network that restricts virtual machines to talking only to each other. Figure 2 shows an example. You can create many different Guest-Only networks, simply by choosing not to bind them to any of the host’s physical network adapters.

clip_image004

Figure 2: A logical overview of Guest-Only virtual networks.

External Networks

When you choose to connect a host network adapter to a virtual network, all VMs that are connected to that network will act as if they were physically connected to the host’s LAN (see Figure 3). In fact, other computers on the same network will have a hard time distinguishing that these machines are VMs. While this offers the best connectivity, it comes at the risk of security (you must ensure that your VMs are properly patched and secured), and manageability (VMs must use compatible network addresses).

clip_image006

Figure 3: A logical overview of Guest-Only virtual networks.

Creating Virtual Networks

The good news is that, once you understand Virtual Server’s networking architecture, creating and managing virtual networks is pretty simple. First, let’s look at how you can place limits on which physical network connections can be used.

Enabling Host Network Adapters

It’s not uncommon for server-side computers to have multiple physical network adapters. This is often done to segment traffic (for example, in the case of a public web server), or for performance (for example, creating a separate network connection for performing backups). In these cases, it’s likely that you’ll want to tell Virtual Server that one or more network interfaces is “off limits” for VMs. You can do this by editing the properties of the appropriate network connection and unbinding the Virtual Machine Network Services item (see Figure 3). The rules are simple: If the box is checked, then virtual networks will be able to use the physical adapter. If not, the network connection will not be available.

clip_image007

Figure 4: Configuring the Virtual Machine Network Services item in the properties of a host network adapter.

Managing Virtual Networks

OK, now that we have all the pre-requisites out of the way, it’s time to fire up the Virtual Server Administration Web Site. By clicking on the items in the “Virtual Networks” Section, you can create and configure virtual networks. Figure 5 shows the screen you’ll see when creating a new virtual network. The name of the virtual network can be anything descriptive. Next, you can choose whether you want to bind the network to one of the host’s physical network adapters, or if you want to create a guest-only network. Finally, this page will automatically list all virtual network adapters that are not currently connected to a virtual network and will allow you to connect them directly. Click OK, and your virtual network should be ready for use.

clip_image009

Figure 5: Create a new virtual network.

Configuring VM Network Adapters

You can connect virtual network adapters to virtual networks by editing the configuration of an existing VM. Figure 6 shows the configuration of a VM that has multiple virtual NICs. Note that you can specify a static MAC address, or you can have Virtual Server automatically create one that will avoid conflicts. The best news is that you can connect and disconnect virtual network attachments even while the VM is running (just be sure that your OS and applications are OK with this).

clip_image011

Figure 6: Modifying virtual network adapter properties for a VM

More Virtual Server Networking Features

In this article, I covered the basics of getting up and running with Virtual Server’s networking options. But wait, there’s more! Virtual Server includes a built-in DHCP server that can be used for each of your virtual networks. As with physical network environments, this can help to greatly simplify the management of network addresses (especially if you often copy or move VMs). Of course, if your VMs are participating on the host network, you can use DHCP and other network services that might already be available.

Both Windows XP SP2 and the Windows Server 2003 platform offer built-in firewall functionality, and an Internet Connection Sharing (ICS) feature. Both of these are available for you to use with your VMs through an interesting application of the Microsoft Loopback Adapter (see Virtual Server Books Online for more details).

Overall, Virtual Server’s networking architecture is flexible and easy-to-manage, once you know how it all works. Keep this information in mind when you’re trying to determine the best balance between communications and security for your VMs.

Microsoft Virtual Server from the Ground Up, Part 3: Installing a Virtual Server Guest OS

This article was first published on SearchServerVirtualization.TechTarget.com.

If you’ve been following the article series so far, you’ve already setup Microsoft Virtual Server, configured some basic server settings, and have created a new VM. What’s missing in this picture? Well, so far, the VM doesn’t do much – you can start it, but all you’ll get is a black screen stating that no operating system can be found. That makes sense – so far, you have the equivalent of a physical computer with a blank hard drive. The next logical step is to install a guest operating system. You’re in luck, as that’s the topic of this article!

Guest OS Installation Overview

The process of installing a guest operating system is similar to that of installing an operating system on a new physical machine. You need to start with some way of getting the OS installer (and all related files) onto the computer. In the old days, you’d likely use floppy disks. Now, CDs, DVDs, and network-based installs are more common. Literally hundreds of operating systems have been successfully run with Virtual Server (though only a small subset of them are officially supported by Microsoft). In general, as long as your guest OS supports the hardware configuration shown in Figure 1, you should be able to run it within a Virtual Server VM.

image

Figure 1: The virtual hardware configuration for a Virtual Server VM.

The main concept to keep in mind is that, in almost every way, the guest OS will function like a physical one. It has a BIOS, it performs a POST operation, and it enumerates removable drives and fixed hard disks during the boot process. You can even go into the BIOS to make changes (though the default options will probably work best). OK, with that out of the way, let’s look at installation options.

Guest OS Installation Options

On a physical machine, you’d most likely start the installation of a new OS by inserting a CD or DVD into the system. Since there are no physical drives for a virtual machine, you’ll need to attach your VM’s virtual DVD-ROM drive (which also supports CD-ROMs) to the appropriate media. To manage these attachments, simply choose to edit the configuration of your virtual machine using the Virtual Server Administration Web Site. Let’s look at the three most common methods.

Installation Using Physical Media

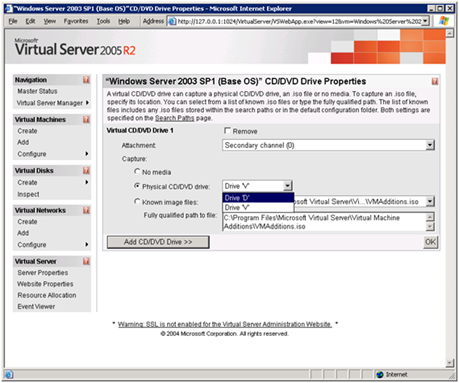
If you have a physical CD-ROM or DVD-ROM from which you can install your guest OS, the simplest approach is to “capture” host computer’s physical DVD-ROM drive to your VM’s virtual DVD-ROM drive. To do this, go to the configuration of your virtual machine and then click on the “CD/DVD” link. As shown in Figure 2, you’ll have several options. Just select “Physical CD/DVD drive” and choose the appropriate drive letter from the host.

image

Figure 2: Capturing a physical CD/DVD drive.

The next time the VM is booted, it should automatically detect the media as if it were mounted in a virtual DVD-ROM device. Assuming that the media is bootable, you’ll be off and running with the Guest OS installation process. This is a pretty simple process, but there’s one catch: Using physical media can be a very slow method of installing an OS. Also, only a single VM can capture a physical host drive at a time (a problem if you’re planning to run multiple installations in parallel). Fortunately, there’s another option.

Installation Using ISO Files

The ISO standard specifies a method by which disc-based media formats (like DVDs and CDs) can be represented in a file. You can create an ISO file using various third-party utilities, and it has become very common for OS distributions to be available for download in ISO formats. If you have an ISO file, you can easily make it available for use by a VM, as shown in Figure 3.

image

Figure 3: Attaching to an ISO file to a VM’s Virtual CD/DVD drive.

Installing from an ISO file is usually significantly faster than using physical media, and multiple VMs can attach to the same ISO file at the same time.

Network-Based Installations

The Pre-boot eXecution Environment (PXE) standard allows for computers to be booted over a network. There are several requirements for this to work properly. First, the virtual network card must support PXE booting. Virtual Server has you covered here (as long as you’re using Virtual Server 2005 R2 or later). The other is that a collection of server-side technologies need to be available. Various vendors (including Microsoft) have PXE-based installation methods for their operating systems.

Using the VMRC

Once you’ve captured the appropriate media for installation, all you need to do is start the VM and use the VMRC to connect to it from within the Virtual Server Administration Web Site. Both operations can be performed by clicking on the thumbnail of the VM in the “Master Status” page.

Completing the OS Installation

Obviously, the exact steps for performing an OS installation will vary based on the specific OS. Again, keep in mind that the process should be similar (if not identical) to that of installing on a physical machine.

The first step that you’ll want to perform after the OS installation is complete is to install the Virtual Machine Additions. This package includes drivers and related software that will greatly improve VM performance and usability. The easiest way to do this is to click the “Install VM Additions” link when using the VMRC. Behind the scenes, Virtual Server will automatically mount the appropriate ISO file and (if your OS supports it), will automatically start the installation process. Once you reboot the VM, you should be all set to do what you will with your new VM.

Virtualization Checkpoint

In the first three articles in this series, we’ve gone through the process of setting up a new VM and getting it ready for use with a guest OS of your choice. In future articles, I’ll cover details related to other configuration options such as configuring virtual networks. Stay tuned!

Microsoft Virtual Server from the Ground Up, Part 2: Creating Your First Virtual Server VM

This article was first published on SearchServerVirtualization.TechTarget.com.

In the first article in this series, we walked through the process of installing Microsoft Virtual Server 2005. That process set the stage for the real task: Creating and managing virtual machines. In this article, I’ll walk through what you need to know to create a new VM.

Configuring Virtual Server Settings

While you could start creating VMs immediately after the installation of the Virtual Server service, it’s worth taking some time to examine and customize some basic server settings. If you want to play along at home, start by launching the Virtual Server Administration Web Site (I’ll provide screenshots if you’d rather just sit back). While there are many different configuration options that might be important, in this article, I’m going to hit the highlights (settings that most Virtual Server administrators will want to change).

Enabling the VMRC Server

The Virtual Machine Remote Control (VMRC) Server is a process that allows users to connect directly with virtual machines. This is usually most important during the guest OS installation process. For security purposes, the VMRC Server is disabled by default. To enable it, click on the “Server Properties” link under “Virtual Server” in the left navigation bar. Then, click on the VMRC Server link.

Here, you’ll be able to configure many different settings, including the TCP port number, on which network interface(s) the VMRC server will respond, default screen resolution, and supported authentication methods (see Figure 1). To allow connections, check the Enable checkbox and click OK. You’ll now be able to connect to VMs using the VMRC client application or directly through the Virtual Server Administration Web Site.

image

Figure 1: Configuring VMRC Server options for Virtual Server.

Configuring Search Paths

By default, Virtual Server will create new VM-related files within a folder buried beneath the local “Documents and Settings” folder. It’s almost always better to create your VMs in another file system location. In order to change these settings, again click on “Server Properties” in the Virtual Server Administration Web Site and then select “Search Paths”. Figure 2 shows the options that are available.3

image

Figure 2: Configuring Virtual Server search paths.

The two settings are:

  • Default virtual machine configuration folder: This is a single file system path that specifies where new virtual machines will be created. Be sure to choose a path on a volume that has plenty of free disk space. You can always override this location, but keeping VM-related files in an organized location will pay off in simplifying administration.
  • Search paths: Here, you can enter a comma-separated list of file system paths. This option is provided mainly for convenience: When you’re working with VMs and related objects, the Virtual Server Administration Web Site will automatically look in these paths for files. You can always manually type the path names, but it’s much easier to just select appropriate objects from a list.

When you click OK, Virtual Server will attempt to verify the file system locations that you’ve specified. If the paths or folders don’t exist, you’ll receive a warning. You can always change these file system locations in the future (just note that Virtual Server will not move any files – you’ll have to do that yourself).

Creating a New Virtual Machine

With the basic server settings out of the way, it’s time to create a new virtual machine. While you could manually created virtual hard disks (VHDs) and VMs, Virtual Server provides a shortcut. The process is easy enough using the Virtual Server Administration Web Site: Just click on “Create” in the Virtual Machines section. Figure 3 shows the available options.

image

Figure 3: Creating a new virtual machine.

Incase you’re worried, rest assured that all of the decisions you make here can be changed later. Here’s a quick overview of the information you’ll need to specify:

  • Virtual machine name: This is the name of the virtual machine you are creating. It’s a good idea to use a description of the configuration of the VM. Examples might be, “Windows Server 2003 Enterprise Ed.”, or “RedHat Test Workstation”). Virtual Server will use these names for the folder name and the name of the initial virtual machine configuration (.vmc) file and, optionally, virtual hard disk (.vhd) file that it creates. Note that if you want to create the VM in a location other than the default Virtual Server path, you can type the fully-qualified path in this box.
  • Memory: This box will allow you to specify the total amount of physical memory that will be committed to the virtual machine. A good rule of thumb is to use at least the minimum that you would have in a physical machine that was designed to run the intended guest OS. You can always change the setting later.
  • Virtual hard disk: In this section, you can choose to create a new virtual hard disk (VHD). This is the simplest option, as it allows you to specify the maximum size of the VHD and whether it should be connected to a virtual IDE or SCSI controller. The physical file that is created will initially be small but will expand as space is required by the Guest OS. Since the maximum size cannot be directly changed, it’s a good idea to use the 16GB recommendation. You can also attach an already-existing VHD, or choose to create the VM with no VHD at all.
  • Virtual network adapter: Here’s where you can determine the type of network connectivity you want the VM to have. By default you’ll have the option of internal network (specifying that VMs will only be able to talk to each other), or external network (which will allow the VM to participate on the host’s LAN connection). I’ll cover the options in detail in a future article. If you’re not sure what to choose, “Not connected” is a safe bet (you can always attached to a network later).

Once you’ve provided the necessary details, you can click the Create button to define the VM. Virtual Server will create the necessary files, and you’ll see your new VM in the “Master Status” page of the Administration Web Site.

Configuring VM Hardware Options

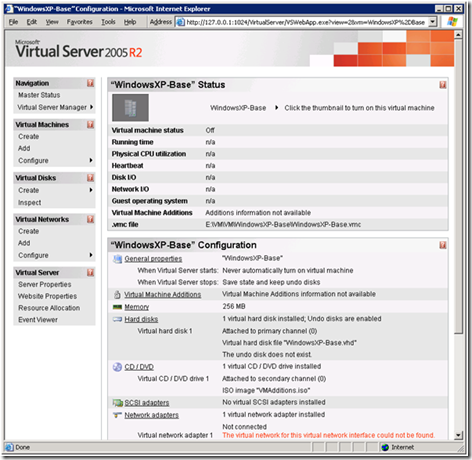
So far, you’ve only included the bare minimum that’s required to create a basic VM. You can also view further details about the hardware configuration of the VM by clicking on “Configure” in the “Virtual Machines” section of the Administration Web Site. As shown in Figure 4, you’ll be able to make changes such as changing the amount of memory allocated to the VM, changing its name, modifying virtual network adapters, adding virtual hard disks, etc. I’ll cover several of these options in future articles.

image

Figure 4: Viewing a VMs virtual hardware configuration.

Next Steps

Now that you’ve configured Virtual Server and created your first VM, you’re ready for the process of installing a guest OS. I’ll cover that topic in the next article.

Microsoft Virtual Server from the Ground Up, Part 1: Installing Virtual Server

This article was first published on SearchServerVirtualization.TechTarget.com.

Series Introduction

It’s hard to read about IT management these days without hearing about virtualization. Chances are good that you’ve heard about the many features and benefits of using virtual machines. But, you might not know how to get started. That’s where this article series comes in.

Microsoft Virtual Server 2005 is an excellent platform for hosting your VMs, and it’s quick and easy to get started. If you haven’t installed the product and tried it out already, a tutorial that walks through the process “from the ground up” might be just what you need to get started. In this series, I’m going to walk through the basics of working with Microsoft Virtual Server 2005. In this article, I’ll begin with the crucial first step: Installing and configuring the product.

Virtual Server Requirements

So, you’ve heard a lot of about virtualization, and you’re convinced that you should give Microsoft Virtual Server 2005 a try. The first question you’re likely to have is, what do I need to be able to run Virtual Server? Without getting into all of the details (which you can find on Microsoft’s Virtual Server System Requirements page), you’ll need to be running an edition of Windows Server 2003 (both 32-bit and 64-bit systems are supported) or Windows XP SP2. The latter is recommended for non-production use (such as testing and development), but will work just fine.

As long as your hardware is supported by your choice of OS, you should be able to run Virtual Server. From a memory standpoint, the rule is simple: The more, the better. And, you’ll need at least a few gigabytes of disk space to host your VMs. Details will be based on how many VMs you plan to support, and the amount of resources they’ll require.

Virtual Server Architecture

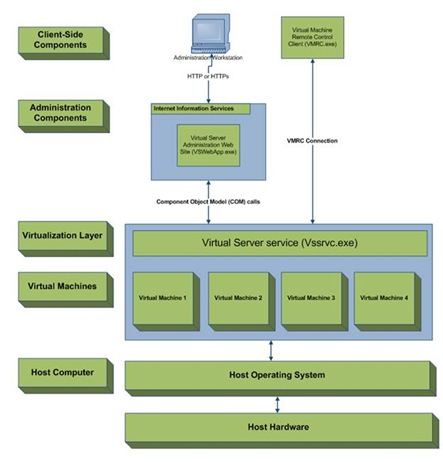
In order to fully understand how Virtual Server works, it’s important to take a look at the overall architecture of the product. Figure 1 provides an overview. The first important aspect to note is that the Virtual Server service (which runs within the host OS) is responsible for creating virtual environments in which your Guest OS’s will run. That’s the heart of the product. Like most Windows services, this process can be started and stopped after it is installed.

clip_image002

Figure 1: A logical overview of the architecture of Microsoft Virtual Server.

The next important aspect is the Virtual Server Administration Web Site – the primary method by which you will interact with the Virtual Server service. This site runs within Internet Information Services (IIS). In the default configuration (which we’ll cover in this article), you will need to have IIS installed on the machine on which the Virtual Server service is installed. It is also possible to install the Administration Web Site on another computer for security, performance, or management purposes.

Installing Virtual Server

OK, enough of the background – let’s get to the hands-on portion. With all of the pre-requisites out of the way, it’s time to walk through the process of actually installing the Virtual Server product. You can obtain the Virtual Server installation package as a free download from the Microsoft Virtual Server web site. Start the installation process by running the executable on that computer on which you want to install the Virtual Server service.

One quick warning: During the installation process, the host computer’s network connection will be dropped and then reconnected. Usually, the interruption is short (and a Remote Desktop session should automatically recover), but keep this in mind if you’re in the middle of transferring a 42GB file over the network.

Here’s a guided tour of the setup process (I’ve omitted “easy” questions like user name and company):

1) Setup Type: In general, you’ll want to choose the Complete option, which will install the Virtual Server service, documentation, and the Virtual Server Administration Web Site. If you are planning to support numerous Virtual Server installations, you might choose not to install the Virtual Server Administration Web Site or other components by using the Custom option.

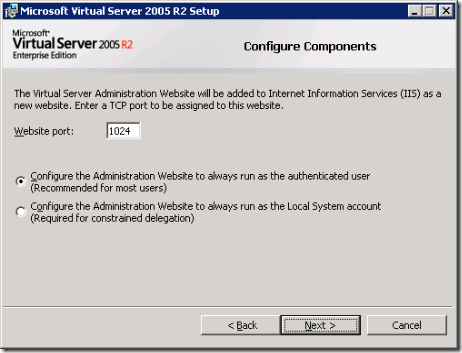
2) Configure Components: On this screen (shown in Figure 2), you must specify the TCP port number on which the Virtual Server Administration Web Site will respond. The default (TCP port 1024) is applicable to most installations. If you change it from the default, all users of the site will need to be made aware of the port number in order to connect. If you’re installing on Windows XP, you will not be given a choice of port numbers (since the Windows XP version of IIS only supports a single web site). Instead, a new virtual directory will be created.

clip_image003

Figure 2: Specifying the TCP port for the Virtual Server Administration Web Site.

You must also specify the security context under which the Administration Web Site will run. The recommendation is to run as the authenticated user, which means that the site will have the permissions of the user that is connecting. This is the simplest option for most installations. If you need to use constrained delegation (which allows you to access and share resources across multiple servers), you can choose the “Local System Account” option. Rest assured that you can change these settings later.

3) Windows Firewall Exceptions: The installation process will offer to place exceptions in the Windows Firewall list to support the configuration. Unless you’re planning to administer Virtual Server only from the local machine, it’s a good idea to accept the offer.

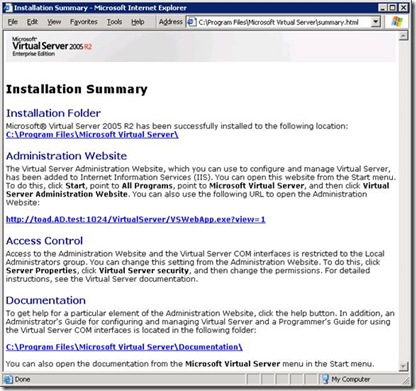
4) Installation Summary: Once you’ve completed the installation, you’ll see an Installation Summary page (see Figure 3). Be sure to make a note of the URL for the Virtual Server Administration Web Site. Other users will need this information to connect to administer the server from another computer.

clip_image005

Figure 3: Viewing the Virtual Server Installation Summary page.

If you want to remove Virtual Server for some reason, you can do this using the Add/Remove Programs applet. The process won’t delete your virtual machine files, but it will uninstall the Virtual Server service and the Administration web site. As you can see, the process couldn’t be much simpler.

Connecting to the Virtual Server Administration Web Site

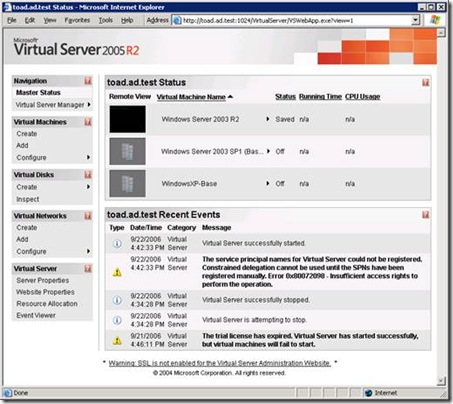
To verify that the installation is working properly, you can use the “Virtual Server Administration Web Site” link in the Microsoft Virtual Server program group, or you can open an instance of Internet Explorer and navigate to the site’s URL directly. Figure 4 shows a typical display that includes some VMs. Note that, the site uses ActiveX controls and IE-specific settings, so you’ll need to use this browser for administration. When connecting, you’ll be prompted for authentication information, and any domain or local user that has permissions to connect to the site will be able to continue.

clip_image007

Figure 4: Accessing the Virtual Server Administration Web Site

During installation, the setup process creates a new “Virtual Server” event log, which you can view using the Administration Web Site or through the Windows Event Viewer application. It’s a good idea to look for any warnings and errors that might have occurred during the installation process. In most cases, though, you’ll be all set to start working with the server right away.

In the next article in this series, I’ll cover details related to configuring Virtual Server and (the point of all of this): Creating your first VM.

Managing Virtualization, Part 4: Managing VM Sprawl with a VM Library

This article was first published on SearchServerVirtualization.TechTarget.com.

Managing VM Sprawl with a VM Library

A compelling reason for most organizations to look into virtualization is to help manage “server sprawl” through the use of datacenter consolidation. By running many virtual machines on the same hardware, you can realize significant cost savings and you can decrease administration overhead. But, there’s a catch: Since VMs are so easy to build, duplicate and deploy, many organizations are realizing that they are running into a related problem: “VM sprawl”.

Once they’re aware that the technology is available, users from throughout the organization often start building and deploying their own VMs without the knowledge of their IT departments. The result is a plethora of systems that don’t follow IT guidelines and practices. In this article, I’ll describe some of the problems that this can cause, along with details on how IT departments can reign in the management of virtual machines.

Benefits of VM Standardization

With the rise in popularity of virtualization products for both workstations and servers, users can easily build and deploy their own VMs. Often, these VMs don’t meet standards related to the following areas:

  • Consistency: End-users rarely have the expertise (or inclination) to follow best practices related to enabling only necessary services and locking down their system configurations. The result is a wide variety of VMs that are all deployed on an ad-hoc basis. Supporting these configurations can quickly become difficult and time-consuming.
  • Security: Practices such as keeping VMs up-to-date and applying the principal of least privilege will often be neglected by users who deploy their “home-grown” VMs. Often, the result is VMs that are a security liability and that might be susceptible to viruses, spyware, and related problems that can affect machines throughout the network.
  • Manageability: Many IT departments include standard backup agents and other utilities on their machines. Users generally won’t install this software, unless it’s something that they specifically need.
  • Licensing: In almost all cases, operating systems and applications will require additional licenses. Even when end-users are careful, situations that involve client access licenses can quickly cause a department to become non-compliant.
  • Infrastructure Capacity: Resources such as network addresses, host names, and other system settings must be coordinated with all of the computers in an environment. When servers that were formerly running only a few low-load application are upgraded, they tend to draw more power (and require greater cooling). IT departments must be able to take all of this information into account, even when users are creating their own VMs.

Creating a VM Library

One method by which organizations can address problems related to “VM sprawl” is to create a fully-supported set of base virtual machine images. These images can follow the same rigorous standards and practices that are used when deploying physical machines. Security software, configuration details, and licensing should all be taken into account. Procedures for creating new virtual machines can be placed on an intranet, and users can be instructed to request access to virtual hard disks and other resources.

Enforcement is an important issue, and IT policies should specifically prohibit users from creating their own images without the approval of IT. This will allow IT departments to keep track of which VMs are deployed, along with their purpose and function. Exceptions might be made, for example, when software developers or testers need to create their own configurations for testing.

Designing Base VM Images

The process of determining what to include in a base VM image can be a challenge. One goal should be to minimize the number of base images that are required, in order to keep things simple and manageable. Another goal is to try to provide all of the most commonly-used applications and features in the base image. Often, these two requirements are at odds with each other. Figure 1 provides an example of some typical base images that might be created. Base images will need to be maintained over time, either through the use of automated update solutions or through the manual application of patches and updates.

image

Figure 1: Sample base VM images and their contents.

Supporting Image Duplication

With most virtualization platforms, the process of making a duplicate of a virtual machine image is as simple as copying one or a few files. However, there’s more to the overall process. Most operating systems will require unique host names, network addresses, security identifiers, and other settings. IT departments should make it as easy as possible for users to manage these settings, since conflicts can cause major havoc throughout a network environment. One option is for IT departments to manually configure these settings before “handing over” a VM image to a user. Another option is to use scripting or management software to make the changes. The specific details will be operating system-specific, but many operating systems offer tools that can be used to handle the deployment of new machines. One example is Microsoft’s Desktop Deployment Center which includes numerous utilities for handling these settings (note that most utilities should work fine in virtual machines, even if support for virtualization is not explicitly mentioned).

Building Disk Hierarchies

Many server virtualization platforms support features that allow for creating virtual hard disks that are based on other virtual hard disks. Remembering the goal of minimizing the number of available images while still providing as much of the configuration as possible, it’s possible to establish base operating systems and then add on “options” that users might require. Figure 2 provides an example for a Windows-based environment.

image

Figure 2: An example of a virtual hard disk hierarchy involving parent and child hard disks.

Keep in mind that there are technical restrictions that can make this process less-than-perfect. For example, a base virtual hard disk cannot be modified, so if you need to add on service packs, security updates, or new software versions, you’ll need to do that at the “child” level.

Summary

Overall, through the use of virtual machine libraries, IT departments can make the process of creating and deploying virtual machines much easier on end-users. Simultaneously, they can avoid provides with inconsistent and out-of-date configurations, just as they would with physical computers. The end-result is a win-win situation for those that are looking to take advantage of the many benefits of virtualization.

Managing Virtualization, Part 3: Choosing a Virtualization Approach

This article was first published on SearchServerVirtualization.TechTarget.com.

The term “virtualization” is a general one, and it can apply to many different technologies. For example, storage systems, databases, and networks can all be virtualized in one way or another. Much of the current buzz about virtualization focuses on “server virtualization” – the ability to allow multiple independent operating systems to run on the same hardware at the same time. Products from Microsoft and VMware lead in this area. While this approach can clearly provide tremendous benefits , it’s not the only option out there. In this article, I’ll provide some details related to various approaches to virtualization, along with the pros and cons of each. The goal is to determine the best method for a particular workload.

An Overview of Virtualization Approaches

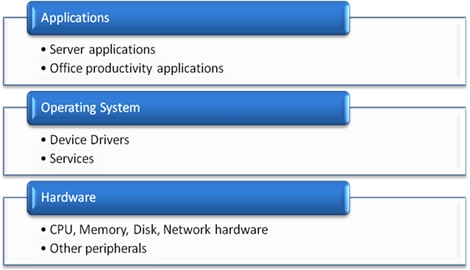
Figure 1 provides a high level overview of when areas of a standard server “stack” can be virtualized. Moving up from the bottom is the hardware layer, followed by the operating system, and finally the applications.

image001

Figure 1: A diagram showing various virtualization layers.

Before we get into further technical details, let’s quickly review the key goals related to virtualization. The first is to ensure independence and isolation between the applications and operating systems that are running on a particular piece of hardware. The second is to provide access to as much of the underlying hardware system as possible. The third is to do all of this while minimizing performance overhead. That’s no small set of goals, but it can be done (and in more ways than one). Let’s take a look at how.

Hardware-Level Virtualization and Hypervisors

We’ll start the bottom of the “stack” – the hardware level. Theoretically, virtualization platforms that run directly on the base hardware should provide the best performance by minimizing overhead. An example of this type of solution is VMware’s ESX Server. ESX Server installs directly on a supported hardware platform and includes a minimal operating system. Administration is performed through a web-based application that can be access remotely using a web browser.

The main concept behind a Hypervisor is that it’s a thin layer that runs directly between operating systems and the hardware itself. Again, the goal here is to avoid the overhead related to having a “host” operating system. Microsoft and other vendors will be moving to a Hypervisor-based model in future versions of their virtualization platforms.

While the low-level approach might seem like an ideal one, there are some drawbacks. First and foremost is the issue of device compatibility. In order for the platform to work at all, it must support all of the devices that are connected to the main computer. Currently, products such as ESX Server are limited to running only on approved hardware platforms. While many popular server platforms are supported, this clearly is not as compatible as other solutions. Another issue is related to manageability. The dedicated virtualization layers must provide some methods for managing virtualization services. There are various approaches, including operating system “hooks” and web-based administration, but they tend to be more complicated than other virtualization options.

Server-Level Virtualization

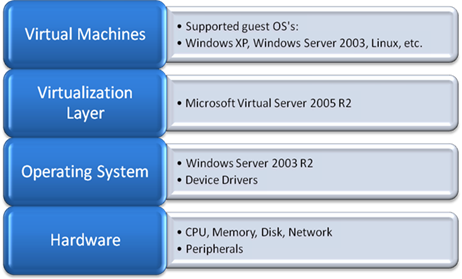
Perhaps the best known and most readily useful virtualization products are those that operate at the server level. Products such as VMware Server and Microsoft Virtual Server 2005 are examples. These products are installed within a host operating system (such as a supported Linux distribution or the Windows Server platform). In this approach, virtual machines run within a service or application that then communicates with hardware by using the host OS’s device drivers. Figure 2 shows an example of server virtualization using Microsoft Virtual Server 2005.

image002

Figure 2: An example of a server-level virtualization stack

The benefits of server-level virtualization include ease of administration (since standard management features of the host OS can be used), increased hardware compatibility (through the use of host OS device drivers), and integration with directory services and network security. Overall, whether you’re running on a desktop or a server OS, you can be up and running with these platforms within a matter of minutes.

The drawbacks include additional overhead caused by the need for the host OS. The amount of memory, CPU, disk, network, and other resources used by the host must be subtracted from what would otherwise be available for use by VMs. Generally, the host OS also requires an operating system license. Finally, server-level virtualization solutions are often not quite as efficient as that of hardware-based virtualization platforms.

Application-Level Virtualization

In some cases, running multiple independent operating systems is overkill. If you only want to create isolate environments that allow multiple users to concurrently run instances of a few applications, there’s no need to create a separate VM for each concurrent user. That’s where application-level virtualization comes in. Such products run on top of a host operating system, and place standard applications (such as those included with Microsoft Office) in isolated environments. Each user that accesses the computer gets what appears to be his or her own unique installation of the products. Behind the scenes, file system modifications, Registry settings, and other details are performed in isolated sandbox environments, and appear to be independent for each user. Softricity and SWSoft are two vendors that provide application-level virtualization solutions.

The main benefits of this approach include greatly reduced overhead (since only one full operating system is required) and improved scalability (many users can run applications concurrently on the same server). Generally, only one OS license is required (for the host OS). The drawbacks are that only software settings will be independent. Therefore, if a user wants to change hardware settings (such as memory or network details) or operating system versions (through patches or updates) those changes will be made for all users on the system.

Thin Clients and Remote Application Execution

The idea of “thin-clients” has been around since the days of mainframes (when they were less affectionately known as “dumb terminals”). The idea here is that users can connect remotely to a centralized server using minimal software and hardware on the client side. All applications execute on the server, and only keyboard, video, and mouse I/O are transferred over the wire. Solutions from Citrix and Microsoft Windows Server 2003 Terminal Services are examples of this approach.

Selecting the Best Approach

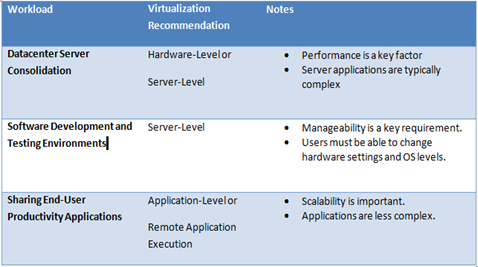
So now that you know that there are options, how do you decide which is the best one for a particular virtualization workload? Table 1 provides some examples of typical workloads. In general, as you move from Hardware- to Server- to Application-level virtualization, you gain scalability at the cost of overall independence. The “best” solution will be based on the specific workload and other related details. The bottom line is that you do have options when deciding to go with virtualization, so be sure to consider them all.

image

Table 1: Comparing virtualization approaches for various workload types

Managing Virtualization, Part 2: VM Profiling and Load Distribution

This article was first published on SearchServerVirtualization.TechTarget.com.

VM Profiling and Load Distribution

Managing performance is a key requirement in systems administration. And, when it comes to virtualization (where multiple independent OS’s are competing for system resources), it’s even more important. The key is to measure and monitor real-world performance of your applications. However, this is often easier said than done. In this article, I’ll cover some details and approaches for monitoring performance of your physical and virtual machines. The goal is to make better decisions related to virtualization performance and load distribution.

Monitoring Real-World Performance

When measuring performance, it’s important to keep in mind that the best predictions can be made by using real-world activity. For example, if you’re planning to move a production line-of-business application from a physical server to a virtual one, it’s best to have a performance profile that highlights production load as closely as possible. Or, if you’re developing a new application, expected workload information can be instrumental in making better decisions. All too often, systems administrators take the approach of trail by fire: “If there are performance problems, we’ll address them when users complain.” So, that raises the question of how you can collect realistic performance data.

IT organizations that have invested in centralized performance monitoring tools will be able to easily collect CPU, memory, disk, network, and other performance statistics. Generally, this information is stored in a central repository, and reports can be generated on-demand.

Alternately, there’s a “manual” approach. Since most operating systems provide methods that allow for capturing performance statistics over time, all that’s required it to setup those tools to collect the relevant information. For example, Figure 1 shows options for tracking server performance over time using the Windows Performance Tool. Details related to key performance statistics such as CPU, memory, disk, and network utilization can be collected over time and analyzed. You’ll want to pay close attention to the peaks and the average values.

clip_image002

Figure 1: Capturing performance data using the Windows System Monitor tool.

Performing Stress-Testing

If you’re deciding to migrate an existing application to a virtual environment, you can monitor its current performance. But what if you are considering deploying a new application? That’s where stress-testing comes in. Some applications might include performance testing functionality as part of the code-base. For those that don’t, there are numerous load-testing tools available on the market. They range from free or cheap utilities to full Enterprise performance-testing suites. For example, Microsoft provides its Application Center Test (ACT) utility to test the performance of web applications and report on a number of useful metrics.

You can predict approximate performance by running the application within a VM and measuring response times for common operations, based on a variety of different types of load. There are two main goals: First, you want to ensure that the expected workload will be supported. Second, you want to make sure that no unforeseen stability or performance problems arise.

Using Benchmarks

It’s no secret that virtualization solutions typically present some level of overhead that reduces the performance of virtual machines. The additional load is based on the cost of context-switching and redirecting requests through a virtualization layer. Unfortunately, it’s very difficult to provide a single number or formula for predicting how well an application will perform in a virtual environment. That’s where synthetic performance benchmarks can help. The operative word here is synthetic – meaning that the tests will not provide real-world usage information. Instead, it will give you information related to the maximum performance of the hardware given a pre-defined workload. An example of a suite of benchmark tools is SiSoft Sandra 2007 (a free version is available from SiSoftware). Many other tools are available from third-party vendors. It’s important to stay consistent with the tools used, since results from different products (and often, versions) cannot be accurately compared.

clip_image004

Figure 2: Viewing results from a physical disk benchmark performed with SiSoftware’s Sandra 2007.

The general approach is to run similar tests on both physical hardware and within virtual machines. If the tests are run on the same or similar hardware configurations, they can be reliably compared. Table 1 provides an example of typical benchmark results that might be obtained by testing a single operating system and application in physical versus virtual environments. A quantitative comparison of the capabilities of each subsystem can help determine the amount of “virtualization platform overhead” that can be expected.

 image

Table 1: Comparing VM and physical machine performance statistics.

Distributing VM Load

One of the main benefits of virtualization is that of portability: It’s usually fairly simple to move an VM from one host server to another. Ideally, once you profile your physical and virtual machines, you’ll be able to determine general resource requirements. Based on these details, you can mix and match VMs on host computers to obtain the best performance out of your physical hardware.

Table 2 provides an example a simple table that shows high-level requirements for some hypothetical VM workloads. Ideally, the load will be distributed: For example, those VMs that have high CPU requirements can be placed on the same physical host as those that are disk-intensive. The end result is a more efficient allocation of VMs based on the needs of each workload.

image

Table 2: Comparing high-level information about various virtual machine workloads.

Making Better Virtualization Decisions

Overall, a little bit of performance testing can go a long way toward ensuring that your VMs will work properly in a virtual environment. By combining data from real-world performance tests with stress-testing results and synthetic benchmarks, you can get a good idea of how to best allocate your VMs.

Managing Virtualization, Part 1: Selecting Virtualization Candidates

This article was first published on SearchServerVirtualization.TechTarget.com.

Selecting Virtualization Candidates

With all the buzz about virtualization, you might be tempted to consider converting all of your physical machines to virtual ones. With the portability, deployment, and hardware utilization benefits alone, virtualization can make a compelling case. Unfortunately, virtualization isn’t the best solution for every application (at least not yet). Therefore, the challenge is related to figuring out which applications and servers are the best candidates for running within virtual machines. The central theme of the selection process is based on information about currently-supported applications: The more you know, the better. Let’s take a look at factors you should keep in mind.

Hardware Requirements

The first factor you should take into account is the actual hardware requirements for the servers and applications you plan to support. In general, you can expect that virtual machines will require approximately the same resources as a physical server: for example, if a physical server is currently running well using 512MB of RAM, you can expect to use the same amount of RAM for a virtual machine that supports the same operating system and applications. You should also look at CPU, disk, and network requirements. Most virtualization solutions will provide the amount of flexibility required to support common business applications.

Applications and services that have specific hardware or driver requirements are generally not well-suited for virtualization. For example, custom video drivers that support hardware-based 3-D acceleration are not supported on most virtualization platforms. Overall, by checking the hardware requirements, you can get a quick “go / no-go” decision.

Software Compatibility

Modern business applications range from simple executables to distributed, multi-tier configurations. When determining software requirements, it’s most important to make sure that the operating system you plan to run is supported by the virtualization platform. While you’ll only be able to get vendor support if the platform is supported, most platforms work fine with hundreds of different operating systems. You should also keep in mind requirements for specific components of distributed applications. It might be possible to virtualize some lightly-used web servers, while keeping the back-end components running on dedicated hardware.

Table 1 provides an example of how you can collect and organize information related to system requirements.

image

Table 1: An example of a virtualization decision worksheet

Licensing Issues

In many environments, software licenses can be more expensive than the hardware on which it runs. Organizations should check with vendors regarding details. In some cases, reduced licensing costs multiple applications or OS’s running on the same hardware could add up to making a strong financial case for using virtualization. Lacking any information to the contrary, however, it’s best to treat virtual machines like physical ones for the purpose of determining licensing costs.

Business Requirements

The decision to move to a virtualization platform should be coordinated with the organization’s business needs. Sometimes, it’s easy to identify areas that can immediately benefit from the many benefits of virtualization. Here are some basic signs that might indicate that virtualization is the key:

  • Are the required configurations consistent? If there is a need to deploy dozens of machines with nearly identical software and OS configurations, then the use of VMs might make sense.
  • Is there a need to reduce deployment times? In software testing and training environments, getting machines up and running quickly generally takes priority over performance and other concerns.
  • Is there a limitation on hardware availability? Virtualization can make much more efficient use of existing hardware.

Resource Utilization

Perhaps one of the most important concerns related to selecting virtualization candidates involves performance concerns. Here’s where any available performance data can be useful. In an ideal situation, you’ll have performance monitoring baselines that include statistics related to CPU, memory, disk, and network utilization. These details can help you determine the actual operating requirements for each potential VM. Unfortunately, there’s no simple formula for translating physical performance into virtual performance. If possible, you should implement performance benchmarking or compare simulated activity results when running on physical vs. virtual machines. Later in this series, I’ll cover some ways in which you can monitor performance and resource usage.

To Virtualize or Not to Virtualize?

All of this information will help you make the final decision: whether or not a specific application or server is a good candidate for virtualization. If the virtualization platform you’ve selected meets the hardware and software requirements for the application, your candidate meets the minimum requirements. If you find that you have a good fit from a resource utilization standpoint, it’s usually worthwhile to at least test the configuration in a virtual environment. By consider hardware, software, licensing, resource and business requirements when evaluating virtualization candidates, you can help ensure virtualization is the right tool for the job.