Microsoft Virtual Server from the Ground Up, Part 2: Creating Your First Virtual Server VM

This article was first published on SearchServerVirtualization.TechTarget.com.

In the first article in this series, we walked through the process of installing Microsoft Virtual Server 2005. That process set the stage for the real task: Creating and managing virtual machines. In this article, I’ll walk through what you need to know to create a new VM.

Configuring Virtual Server Settings

While you could start creating VMs immediately after the installation of the Virtual Server service, it’s worth taking some time to examine and customize some basic server settings. If you want to play along at home, start by launching the Virtual Server Administration Web Site (I’ll provide screenshots if you’d rather just sit back). While there are many different configuration options that might be important, in this article, I’m going to hit the highlights (settings that most Virtual Server administrators will want to change).

Enabling the VMRC Server

The Virtual Machine Remote Control (VMRC) Server is a process that allows users to connect directly with virtual machines. This is usually most important during the guest OS installation process. For security purposes, the VMRC Server is disabled by default. To enable it, click on the “Server Properties” link under “Virtual Server” in the left navigation bar. Then, click on the VMRC Server link.

Here, you’ll be able to configure many different settings, including the TCP port number, on which network interface(s) the VMRC server will respond, default screen resolution, and supported authentication methods (see Figure 1). To allow connections, check the Enable checkbox and click OK. You’ll now be able to connect to VMs using the VMRC client application or directly through the Virtual Server Administration Web Site.

image

Figure 1: Configuring VMRC Server options for Virtual Server.

Configuring Search Paths

By default, Virtual Server will create new VM-related files within a folder buried beneath the local “Documents and Settings” folder. It’s almost always better to create your VMs in another file system location. In order to change these settings, again click on “Server Properties” in the Virtual Server Administration Web Site and then select “Search Paths”. Figure 2 shows the options that are available.3

image

Figure 2: Configuring Virtual Server search paths.

The two settings are:

  • Default virtual machine configuration folder: This is a single file system path that specifies where new virtual machines will be created. Be sure to choose a path on a volume that has plenty of free disk space. You can always override this location, but keeping VM-related files in an organized location will pay off in simplifying administration.
  • Search paths: Here, you can enter a comma-separated list of file system paths. This option is provided mainly for convenience: When you’re working with VMs and related objects, the Virtual Server Administration Web Site will automatically look in these paths for files. You can always manually type the path names, but it’s much easier to just select appropriate objects from a list.

When you click OK, Virtual Server will attempt to verify the file system locations that you’ve specified. If the paths or folders don’t exist, you’ll receive a warning. You can always change these file system locations in the future (just note that Virtual Server will not move any files – you’ll have to do that yourself).

Creating a New Virtual Machine

With the basic server settings out of the way, it’s time to create a new virtual machine. While you could manually created virtual hard disks (VHDs) and VMs, Virtual Server provides a shortcut. The process is easy enough using the Virtual Server Administration Web Site: Just click on “Create” in the Virtual Machines section. Figure 3 shows the available options.

image

Figure 3: Creating a new virtual machine.

Incase you’re worried, rest assured that all of the decisions you make here can be changed later. Here’s a quick overview of the information you’ll need to specify:

  • Virtual machine name: This is the name of the virtual machine you are creating. It’s a good idea to use a description of the configuration of the VM. Examples might be, “Windows Server 2003 Enterprise Ed.”, or “RedHat Test Workstation”). Virtual Server will use these names for the folder name and the name of the initial virtual machine configuration (.vmc) file and, optionally, virtual hard disk (.vhd) file that it creates. Note that if you want to create the VM in a location other than the default Virtual Server path, you can type the fully-qualified path in this box.
  • Memory: This box will allow you to specify the total amount of physical memory that will be committed to the virtual machine. A good rule of thumb is to use at least the minimum that you would have in a physical machine that was designed to run the intended guest OS. You can always change the setting later.
  • Virtual hard disk: In this section, you can choose to create a new virtual hard disk (VHD). This is the simplest option, as it allows you to specify the maximum size of the VHD and whether it should be connected to a virtual IDE or SCSI controller. The physical file that is created will initially be small but will expand as space is required by the Guest OS. Since the maximum size cannot be directly changed, it’s a good idea to use the 16GB recommendation. You can also attach an already-existing VHD, or choose to create the VM with no VHD at all.
  • Virtual network adapter: Here’s where you can determine the type of network connectivity you want the VM to have. By default you’ll have the option of internal network (specifying that VMs will only be able to talk to each other), or external network (which will allow the VM to participate on the host’s LAN connection). I’ll cover the options in detail in a future article. If you’re not sure what to choose, “Not connected” is a safe bet (you can always attached to a network later).

Once you’ve provided the necessary details, you can click the Create button to define the VM. Virtual Server will create the necessary files, and you’ll see your new VM in the “Master Status” page of the Administration Web Site.

Configuring VM Hardware Options

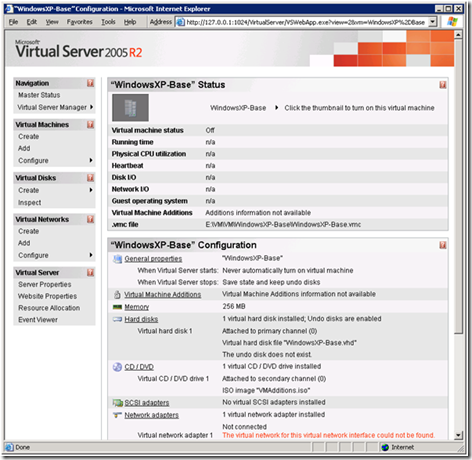
So far, you’ve only included the bare minimum that’s required to create a basic VM. You can also view further details about the hardware configuration of the VM by clicking on “Configure” in the “Virtual Machines” section of the Administration Web Site. As shown in Figure 4, you’ll be able to make changes such as changing the amount of memory allocated to the VM, changing its name, modifying virtual network adapters, adding virtual hard disks, etc. I’ll cover several of these options in future articles.

image

Figure 4: Viewing a VMs virtual hardware configuration.

Next Steps

Now that you’ve configured Virtual Server and created your first VM, you’re ready for the process of installing a guest OS. I’ll cover that topic in the next article.

Microsoft Virtual Server from the Ground Up, Part 1: Installing Virtual Server

This article was first published on SearchServerVirtualization.TechTarget.com.

Series Introduction

It’s hard to read about IT management these days without hearing about virtualization. Chances are good that you’ve heard about the many features and benefits of using virtual machines. But, you might not know how to get started. That’s where this article series comes in.

Microsoft Virtual Server 2005 is an excellent platform for hosting your VMs, and it’s quick and easy to get started. If you haven’t installed the product and tried it out already, a tutorial that walks through the process “from the ground up” might be just what you need to get started. In this series, I’m going to walk through the basics of working with Microsoft Virtual Server 2005. In this article, I’ll begin with the crucial first step: Installing and configuring the product.

Virtual Server Requirements

So, you’ve heard a lot of about virtualization, and you’re convinced that you should give Microsoft Virtual Server 2005 a try. The first question you’re likely to have is, what do I need to be able to run Virtual Server? Without getting into all of the details (which you can find on Microsoft’s Virtual Server System Requirements page), you’ll need to be running an edition of Windows Server 2003 (both 32-bit and 64-bit systems are supported) or Windows XP SP2. The latter is recommended for non-production use (such as testing and development), but will work just fine.

As long as your hardware is supported by your choice of OS, you should be able to run Virtual Server. From a memory standpoint, the rule is simple: The more, the better. And, you’ll need at least a few gigabytes of disk space to host your VMs. Details will be based on how many VMs you plan to support, and the amount of resources they’ll require.

Virtual Server Architecture

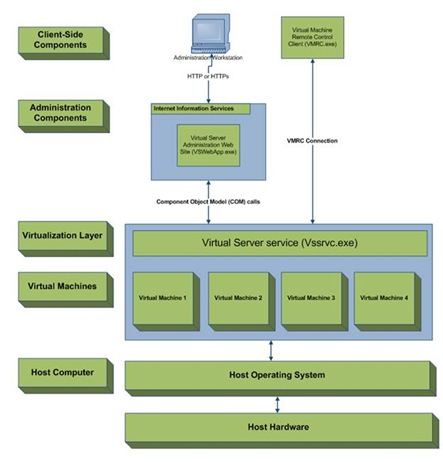
In order to fully understand how Virtual Server works, it’s important to take a look at the overall architecture of the product. Figure 1 provides an overview. The first important aspect to note is that the Virtual Server service (which runs within the host OS) is responsible for creating virtual environments in which your Guest OS’s will run. That’s the heart of the product. Like most Windows services, this process can be started and stopped after it is installed.

clip_image002

Figure 1: A logical overview of the architecture of Microsoft Virtual Server.

The next important aspect is the Virtual Server Administration Web Site – the primary method by which you will interact with the Virtual Server service. This site runs within Internet Information Services (IIS). In the default configuration (which we’ll cover in this article), you will need to have IIS installed on the machine on which the Virtual Server service is installed. It is also possible to install the Administration Web Site on another computer for security, performance, or management purposes.

Installing Virtual Server

OK, enough of the background – let’s get to the hands-on portion. With all of the pre-requisites out of the way, it’s time to walk through the process of actually installing the Virtual Server product. You can obtain the Virtual Server installation package as a free download from the Microsoft Virtual Server web site. Start the installation process by running the executable on that computer on which you want to install the Virtual Server service.

One quick warning: During the installation process, the host computer’s network connection will be dropped and then reconnected. Usually, the interruption is short (and a Remote Desktop session should automatically recover), but keep this in mind if you’re in the middle of transferring a 42GB file over the network.

Here’s a guided tour of the setup process (I’ve omitted “easy” questions like user name and company):

1) Setup Type: In general, you’ll want to choose the Complete option, which will install the Virtual Server service, documentation, and the Virtual Server Administration Web Site. If you are planning to support numerous Virtual Server installations, you might choose not to install the Virtual Server Administration Web Site or other components by using the Custom option.

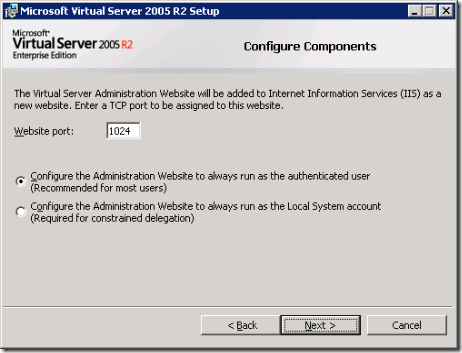
2) Configure Components: On this screen (shown in Figure 2), you must specify the TCP port number on which the Virtual Server Administration Web Site will respond. The default (TCP port 1024) is applicable to most installations. If you change it from the default, all users of the site will need to be made aware of the port number in order to connect. If you’re installing on Windows XP, you will not be given a choice of port numbers (since the Windows XP version of IIS only supports a single web site). Instead, a new virtual directory will be created.

clip_image003

Figure 2: Specifying the TCP port for the Virtual Server Administration Web Site.

You must also specify the security context under which the Administration Web Site will run. The recommendation is to run as the authenticated user, which means that the site will have the permissions of the user that is connecting. This is the simplest option for most installations. If you need to use constrained delegation (which allows you to access and share resources across multiple servers), you can choose the “Local System Account” option. Rest assured that you can change these settings later.

3) Windows Firewall Exceptions: The installation process will offer to place exceptions in the Windows Firewall list to support the configuration. Unless you’re planning to administer Virtual Server only from the local machine, it’s a good idea to accept the offer.

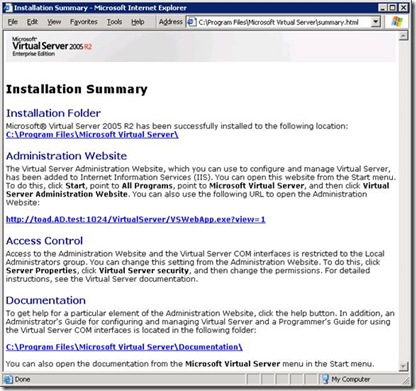
4) Installation Summary: Once you’ve completed the installation, you’ll see an Installation Summary page (see Figure 3). Be sure to make a note of the URL for the Virtual Server Administration Web Site. Other users will need this information to connect to administer the server from another computer.

clip_image005

Figure 3: Viewing the Virtual Server Installation Summary page.

If you want to remove Virtual Server for some reason, you can do this using the Add/Remove Programs applet. The process won’t delete your virtual machine files, but it will uninstall the Virtual Server service and the Administration web site. As you can see, the process couldn’t be much simpler.

Connecting to the Virtual Server Administration Web Site

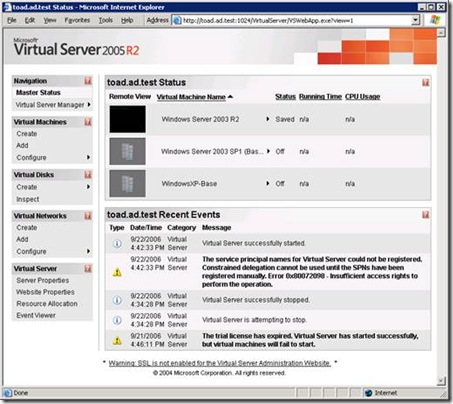
To verify that the installation is working properly, you can use the “Virtual Server Administration Web Site” link in the Microsoft Virtual Server program group, or you can open an instance of Internet Explorer and navigate to the site’s URL directly. Figure 4 shows a typical display that includes some VMs. Note that, the site uses ActiveX controls and IE-specific settings, so you’ll need to use this browser for administration. When connecting, you’ll be prompted for authentication information, and any domain or local user that has permissions to connect to the site will be able to continue.

clip_image007

Figure 4: Accessing the Virtual Server Administration Web Site

During installation, the setup process creates a new “Virtual Server” event log, which you can view using the Administration Web Site or through the Windows Event Viewer application. It’s a good idea to look for any warnings and errors that might have occurred during the installation process. In most cases, though, you’ll be all set to start working with the server right away.

In the next article in this series, I’ll cover details related to configuring Virtual Server and (the point of all of this): Creating your first VM.

Managing Virtualization, Part 4: Managing VM Sprawl with a VM Library

This article was first published on SearchServerVirtualization.TechTarget.com.

Managing VM Sprawl with a VM Library

A compelling reason for most organizations to look into virtualization is to help manage “server sprawl” through the use of datacenter consolidation. By running many virtual machines on the same hardware, you can realize significant cost savings and you can decrease administration overhead. But, there’s a catch: Since VMs are so easy to build, duplicate and deploy, many organizations are realizing that they are running into a related problem: “VM sprawl”.

Once they’re aware that the technology is available, users from throughout the organization often start building and deploying their own VMs without the knowledge of their IT departments. The result is a plethora of systems that don’t follow IT guidelines and practices. In this article, I’ll describe some of the problems that this can cause, along with details on how IT departments can reign in the management of virtual machines.

Benefits of VM Standardization

With the rise in popularity of virtualization products for both workstations and servers, users can easily build and deploy their own VMs. Often, these VMs don’t meet standards related to the following areas:

  • Consistency: End-users rarely have the expertise (or inclination) to follow best practices related to enabling only necessary services and locking down their system configurations. The result is a wide variety of VMs that are all deployed on an ad-hoc basis. Supporting these configurations can quickly become difficult and time-consuming.
  • Security: Practices such as keeping VMs up-to-date and applying the principal of least privilege will often be neglected by users who deploy their “home-grown” VMs. Often, the result is VMs that are a security liability and that might be susceptible to viruses, spyware, and related problems that can affect machines throughout the network.
  • Manageability: Many IT departments include standard backup agents and other utilities on their machines. Users generally won’t install this software, unless it’s something that they specifically need.
  • Licensing: In almost all cases, operating systems and applications will require additional licenses. Even when end-users are careful, situations that involve client access licenses can quickly cause a department to become non-compliant.
  • Infrastructure Capacity: Resources such as network addresses, host names, and other system settings must be coordinated with all of the computers in an environment. When servers that were formerly running only a few low-load application are upgraded, they tend to draw more power (and require greater cooling). IT departments must be able to take all of this information into account, even when users are creating their own VMs.

Creating a VM Library

One method by which organizations can address problems related to “VM sprawl” is to create a fully-supported set of base virtual machine images. These images can follow the same rigorous standards and practices that are used when deploying physical machines. Security software, configuration details, and licensing should all be taken into account. Procedures for creating new virtual machines can be placed on an intranet, and users can be instructed to request access to virtual hard disks and other resources.

Enforcement is an important issue, and IT policies should specifically prohibit users from creating their own images without the approval of IT. This will allow IT departments to keep track of which VMs are deployed, along with their purpose and function. Exceptions might be made, for example, when software developers or testers need to create their own configurations for testing.

Designing Base VM Images

The process of determining what to include in a base VM image can be a challenge. One goal should be to minimize the number of base images that are required, in order to keep things simple and manageable. Another goal is to try to provide all of the most commonly-used applications and features in the base image. Often, these two requirements are at odds with each other. Figure 1 provides an example of some typical base images that might be created. Base images will need to be maintained over time, either through the use of automated update solutions or through the manual application of patches and updates.

image

Figure 1: Sample base VM images and their contents.

Supporting Image Duplication

With most virtualization platforms, the process of making a duplicate of a virtual machine image is as simple as copying one or a few files. However, there’s more to the overall process. Most operating systems will require unique host names, network addresses, security identifiers, and other settings. IT departments should make it as easy as possible for users to manage these settings, since conflicts can cause major havoc throughout a network environment. One option is for IT departments to manually configure these settings before “handing over” a VM image to a user. Another option is to use scripting or management software to make the changes. The specific details will be operating system-specific, but many operating systems offer tools that can be used to handle the deployment of new machines. One example is Microsoft’s Desktop Deployment Center which includes numerous utilities for handling these settings (note that most utilities should work fine in virtual machines, even if support for virtualization is not explicitly mentioned).

Building Disk Hierarchies

Many server virtualization platforms support features that allow for creating virtual hard disks that are based on other virtual hard disks. Remembering the goal of minimizing the number of available images while still providing as much of the configuration as possible, it’s possible to establish base operating systems and then add on “options” that users might require. Figure 2 provides an example for a Windows-based environment.

image

Figure 2: An example of a virtual hard disk hierarchy involving parent and child hard disks.

Keep in mind that there are technical restrictions that can make this process less-than-perfect. For example, a base virtual hard disk cannot be modified, so if you need to add on service packs, security updates, or new software versions, you’ll need to do that at the “child” level.

Summary

Overall, through the use of virtual machine libraries, IT departments can make the process of creating and deploying virtual machines much easier on end-users. Simultaneously, they can avoid provides with inconsistent and out-of-date configurations, just as they would with physical computers. The end-result is a win-win situation for those that are looking to take advantage of the many benefits of virtualization.

Managing Virtualization, Part 3: Choosing a Virtualization Approach

This article was first published on SearchServerVirtualization.TechTarget.com.

The term “virtualization” is a general one, and it can apply to many different technologies. For example, storage systems, databases, and networks can all be virtualized in one way or another. Much of the current buzz about virtualization focuses on “server virtualization” – the ability to allow multiple independent operating systems to run on the same hardware at the same time. Products from Microsoft and VMware lead in this area. While this approach can clearly provide tremendous benefits , it’s not the only option out there. In this article, I’ll provide some details related to various approaches to virtualization, along with the pros and cons of each. The goal is to determine the best method for a particular workload.

An Overview of Virtualization Approaches

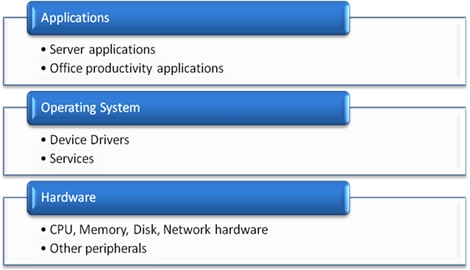
Figure 1 provides a high level overview of when areas of a standard server “stack” can be virtualized. Moving up from the bottom is the hardware layer, followed by the operating system, and finally the applications.

image001

Figure 1: A diagram showing various virtualization layers.

Before we get into further technical details, let’s quickly review the key goals related to virtualization. The first is to ensure independence and isolation between the applications and operating systems that are running on a particular piece of hardware. The second is to provide access to as much of the underlying hardware system as possible. The third is to do all of this while minimizing performance overhead. That’s no small set of goals, but it can be done (and in more ways than one). Let’s take a look at how.

Hardware-Level Virtualization and Hypervisors

We’ll start the bottom of the “stack” – the hardware level. Theoretically, virtualization platforms that run directly on the base hardware should provide the best performance by minimizing overhead. An example of this type of solution is VMware’s ESX Server. ESX Server installs directly on a supported hardware platform and includes a minimal operating system. Administration is performed through a web-based application that can be access remotely using a web browser.

The main concept behind a Hypervisor is that it’s a thin layer that runs directly between operating systems and the hardware itself. Again, the goal here is to avoid the overhead related to having a “host” operating system. Microsoft and other vendors will be moving to a Hypervisor-based model in future versions of their virtualization platforms.

While the low-level approach might seem like an ideal one, there are some drawbacks. First and foremost is the issue of device compatibility. In order for the platform to work at all, it must support all of the devices that are connected to the main computer. Currently, products such as ESX Server are limited to running only on approved hardware platforms. While many popular server platforms are supported, this clearly is not as compatible as other solutions. Another issue is related to manageability. The dedicated virtualization layers must provide some methods for managing virtualization services. There are various approaches, including operating system “hooks” and web-based administration, but they tend to be more complicated than other virtualization options.

Server-Level Virtualization

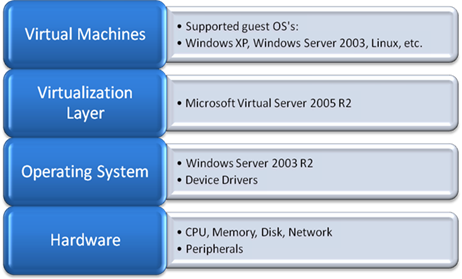
Perhaps the best known and most readily useful virtualization products are those that operate at the server level. Products such as VMware Server and Microsoft Virtual Server 2005 are examples. These products are installed within a host operating system (such as a supported Linux distribution or the Windows Server platform). In this approach, virtual machines run within a service or application that then communicates with hardware by using the host OS’s device drivers. Figure 2 shows an example of server virtualization using Microsoft Virtual Server 2005.

image002

Figure 2: An example of a server-level virtualization stack

The benefits of server-level virtualization include ease of administration (since standard management features of the host OS can be used), increased hardware compatibility (through the use of host OS device drivers), and integration with directory services and network security. Overall, whether you’re running on a desktop or a server OS, you can be up and running with these platforms within a matter of minutes.

The drawbacks include additional overhead caused by the need for the host OS. The amount of memory, CPU, disk, network, and other resources used by the host must be subtracted from what would otherwise be available for use by VMs. Generally, the host OS also requires an operating system license. Finally, server-level virtualization solutions are often not quite as efficient as that of hardware-based virtualization platforms.

Application-Level Virtualization

In some cases, running multiple independent operating systems is overkill. If you only want to create isolate environments that allow multiple users to concurrently run instances of a few applications, there’s no need to create a separate VM for each concurrent user. That’s where application-level virtualization comes in. Such products run on top of a host operating system, and place standard applications (such as those included with Microsoft Office) in isolated environments. Each user that accesses the computer gets what appears to be his or her own unique installation of the products. Behind the scenes, file system modifications, Registry settings, and other details are performed in isolated sandbox environments, and appear to be independent for each user. Softricity and SWSoft are two vendors that provide application-level virtualization solutions.

The main benefits of this approach include greatly reduced overhead (since only one full operating system is required) and improved scalability (many users can run applications concurrently on the same server). Generally, only one OS license is required (for the host OS). The drawbacks are that only software settings will be independent. Therefore, if a user wants to change hardware settings (such as memory or network details) or operating system versions (through patches or updates) those changes will be made for all users on the system.

Thin Clients and Remote Application Execution

The idea of “thin-clients” has been around since the days of mainframes (when they were less affectionately known as “dumb terminals”). The idea here is that users can connect remotely to a centralized server using minimal software and hardware on the client side. All applications execute on the server, and only keyboard, video, and mouse I/O are transferred over the wire. Solutions from Citrix and Microsoft Windows Server 2003 Terminal Services are examples of this approach.

Selecting the Best Approach

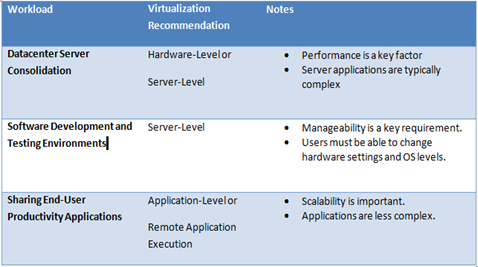
So now that you know that there are options, how do you decide which is the best one for a particular virtualization workload? Table 1 provides some examples of typical workloads. In general, as you move from Hardware- to Server- to Application-level virtualization, you gain scalability at the cost of overall independence. The “best” solution will be based on the specific workload and other related details. The bottom line is that you do have options when deciding to go with virtualization, so be sure to consider them all.

image

Table 1: Comparing virtualization approaches for various workload types

Managing Virtualization, Part 2: VM Profiling and Load Distribution

This article was first published on SearchServerVirtualization.TechTarget.com.

VM Profiling and Load Distribution

Managing performance is a key requirement in systems administration. And, when it comes to virtualization (where multiple independent OS’s are competing for system resources), it’s even more important. The key is to measure and monitor real-world performance of your applications. However, this is often easier said than done. In this article, I’ll cover some details and approaches for monitoring performance of your physical and virtual machines. The goal is to make better decisions related to virtualization performance and load distribution.

Monitoring Real-World Performance

When measuring performance, it’s important to keep in mind that the best predictions can be made by using real-world activity. For example, if you’re planning to move a production line-of-business application from a physical server to a virtual one, it’s best to have a performance profile that highlights production load as closely as possible. Or, if you’re developing a new application, expected workload information can be instrumental in making better decisions. All too often, systems administrators take the approach of trail by fire: “If there are performance problems, we’ll address them when users complain.” So, that raises the question of how you can collect realistic performance data.

IT organizations that have invested in centralized performance monitoring tools will be able to easily collect CPU, memory, disk, network, and other performance statistics. Generally, this information is stored in a central repository, and reports can be generated on-demand.

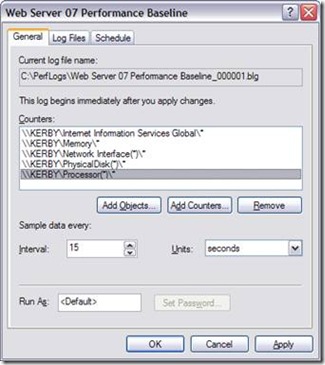
Alternately, there’s a “manual” approach. Since most operating systems provide methods that allow for capturing performance statistics over time, all that’s required it to setup those tools to collect the relevant information. For example, Figure 1 shows options for tracking server performance over time using the Windows Performance Tool. Details related to key performance statistics such as CPU, memory, disk, and network utilization can be collected over time and analyzed. You’ll want to pay close attention to the peaks and the average values.

clip_image002

Figure 1: Capturing performance data using the Windows System Monitor tool.

Performing Stress-Testing

If you’re deciding to migrate an existing application to a virtual environment, you can monitor its current performance. But what if you are considering deploying a new application? That’s where stress-testing comes in. Some applications might include performance testing functionality as part of the code-base. For those that don’t, there are numerous load-testing tools available on the market. They range from free or cheap utilities to full Enterprise performance-testing suites. For example, Microsoft provides its Application Center Test (ACT) utility to test the performance of web applications and report on a number of useful metrics.

You can predict approximate performance by running the application within a VM and measuring response times for common operations, based on a variety of different types of load. There are two main goals: First, you want to ensure that the expected workload will be supported. Second, you want to make sure that no unforeseen stability or performance problems arise.

Using Benchmarks

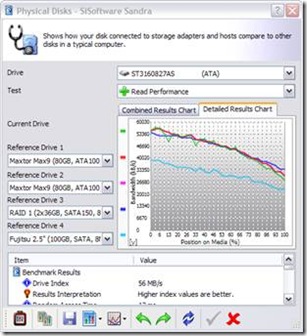
It’s no secret that virtualization solutions typically present some level of overhead that reduces the performance of virtual machines. The additional load is based on the cost of context-switching and redirecting requests through a virtualization layer. Unfortunately, it’s very difficult to provide a single number or formula for predicting how well an application will perform in a virtual environment. That’s where synthetic performance benchmarks can help. The operative word here is synthetic – meaning that the tests will not provide real-world usage information. Instead, it will give you information related to the maximum performance of the hardware given a pre-defined workload. An example of a suite of benchmark tools is SiSoft Sandra 2007 (a free version is available from SiSoftware). Many other tools are available from third-party vendors. It’s important to stay consistent with the tools used, since results from different products (and often, versions) cannot be accurately compared.

clip_image004

Figure 2: Viewing results from a physical disk benchmark performed with SiSoftware’s Sandra 2007.

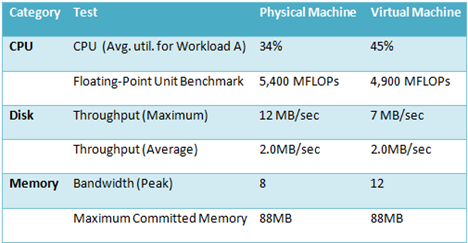
The general approach is to run similar tests on both physical hardware and within virtual machines. If the tests are run on the same or similar hardware configurations, they can be reliably compared. Table 1 provides an example of typical benchmark results that might be obtained by testing a single operating system and application in physical versus virtual environments. A quantitative comparison of the capabilities of each subsystem can help determine the amount of “virtualization platform overhead” that can be expected.

 image

Table 1: Comparing VM and physical machine performance statistics.

Distributing VM Load

One of the main benefits of virtualization is that of portability: It’s usually fairly simple to move an VM from one host server to another. Ideally, once you profile your physical and virtual machines, you’ll be able to determine general resource requirements. Based on these details, you can mix and match VMs on host computers to obtain the best performance out of your physical hardware.

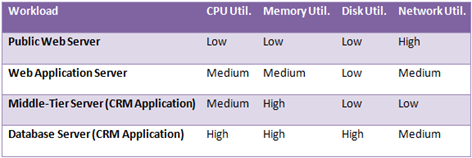
Table 2 provides an example a simple table that shows high-level requirements for some hypothetical VM workloads. Ideally, the load will be distributed: For example, those VMs that have high CPU requirements can be placed on the same physical host as those that are disk-intensive. The end result is a more efficient allocation of VMs based on the needs of each workload.

image

Table 2: Comparing high-level information about various virtual machine workloads.

Making Better Virtualization Decisions

Overall, a little bit of performance testing can go a long way toward ensuring that your VMs will work properly in a virtual environment. By combining data from real-world performance tests with stress-testing results and synthetic benchmarks, you can get a good idea of how to best allocate your VMs.

Managing Virtualization, Part 1: Selecting Virtualization Candidates

This article was first published on SearchServerVirtualization.TechTarget.com.

Selecting Virtualization Candidates

With all the buzz about virtualization, you might be tempted to consider converting all of your physical machines to virtual ones. With the portability, deployment, and hardware utilization benefits alone, virtualization can make a compelling case. Unfortunately, virtualization isn’t the best solution for every application (at least not yet). Therefore, the challenge is related to figuring out which applications and servers are the best candidates for running within virtual machines. The central theme of the selection process is based on information about currently-supported applications: The more you know, the better. Let’s take a look at factors you should keep in mind.

Hardware Requirements

The first factor you should take into account is the actual hardware requirements for the servers and applications you plan to support. In general, you can expect that virtual machines will require approximately the same resources as a physical server: for example, if a physical server is currently running well using 512MB of RAM, you can expect to use the same amount of RAM for a virtual machine that supports the same operating system and applications. You should also look at CPU, disk, and network requirements. Most virtualization solutions will provide the amount of flexibility required to support common business applications.

Applications and services that have specific hardware or driver requirements are generally not well-suited for virtualization. For example, custom video drivers that support hardware-based 3-D acceleration are not supported on most virtualization platforms. Overall, by checking the hardware requirements, you can get a quick “go / no-go” decision.

Software Compatibility

Modern business applications range from simple executables to distributed, multi-tier configurations. When determining software requirements, it’s most important to make sure that the operating system you plan to run is supported by the virtualization platform. While you’ll only be able to get vendor support if the platform is supported, most platforms work fine with hundreds of different operating systems. You should also keep in mind requirements for specific components of distributed applications. It might be possible to virtualize some lightly-used web servers, while keeping the back-end components running on dedicated hardware.

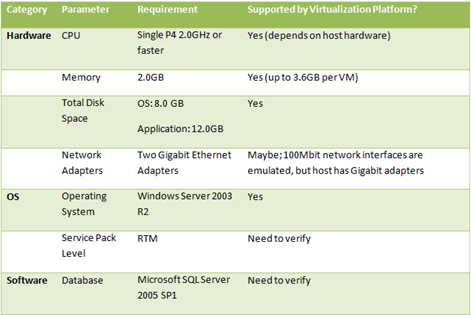
Table 1 provides an example of how you can collect and organize information related to system requirements.

image

Table 1: An example of a virtualization decision worksheet

Licensing Issues

In many environments, software licenses can be more expensive than the hardware on which it runs. Organizations should check with vendors regarding details. In some cases, reduced licensing costs multiple applications or OS’s running on the same hardware could add up to making a strong financial case for using virtualization. Lacking any information to the contrary, however, it’s best to treat virtual machines like physical ones for the purpose of determining licensing costs.

Business Requirements

The decision to move to a virtualization platform should be coordinated with the organization’s business needs. Sometimes, it’s easy to identify areas that can immediately benefit from the many benefits of virtualization. Here are some basic signs that might indicate that virtualization is the key:

  • Are the required configurations consistent? If there is a need to deploy dozens of machines with nearly identical software and OS configurations, then the use of VMs might make sense.
  • Is there a need to reduce deployment times? In software testing and training environments, getting machines up and running quickly generally takes priority over performance and other concerns.
  • Is there a limitation on hardware availability? Virtualization can make much more efficient use of existing hardware.

Resource Utilization

Perhaps one of the most important concerns related to selecting virtualization candidates involves performance concerns. Here’s where any available performance data can be useful. In an ideal situation, you’ll have performance monitoring baselines that include statistics related to CPU, memory, disk, and network utilization. These details can help you determine the actual operating requirements for each potential VM. Unfortunately, there’s no simple formula for translating physical performance into virtual performance. If possible, you should implement performance benchmarking or compare simulated activity results when running on physical vs. virtual machines. Later in this series, I’ll cover some ways in which you can monitor performance and resource usage.

To Virtualize or Not to Virtualize?

All of this information will help you make the final decision: whether or not a specific application or server is a good candidate for virtualization. If the virtualization platform you’ve selected meets the hardware and software requirements for the application, your candidate meets the minimum requirements. If you find that you have a good fit from a resource utilization standpoint, it’s usually worthwhile to at least test the configuration in a virtual environment. By consider hardware, software, licensing, resource and business requirements when evaluating virtualization candidates, you can help ensure virtualization is the right tool for the job.

About this Blog

AnilDesai01

I have created this blog to share with readers my thoughts on specific technology and related topics.  That’s overly-broad on purpose, as I hope to post about topics ranging from IT-related issues to gaming.  Of course, audience participation is encouraged.

I’m an independent IT consultant based in Austin, TX.  I do a wide variety of different things, ranging from IT architecture consulting to database and applications development.  I’m also a writer of books and online articles.  My technical focus is fairly broad, but it includes virtualization, Microsoft .NET, SQL Server, and the Windows Server platform.  For more information about me and for technical information, see my web site at http://AnilDesai.net.  And, you can e-mail me at Anil@AnilDesail.net.